73592
16.a React.js

Description
No tags specified
Module Information
Description
No tags specified
Show more
Course's Objectives
1. To understand the problem that react solves and the benefits that come with it.
2. To understand how to install and use react core libraries.
3. What React components are and how to create our own components and use them.
4. What a component's task is? What does the render function do? What is JSX?
5. How to render components to DOM?
6. How to inject JavaScript expressions inside JSX?
7. How to have conditional and dynamic rendering inside our JSX?
8. What are a component's props? How are they used to parameterize the same component?
9. What is the prop-types library and how to use it to validate a component's props.
10. How to attach react event listeners and handlers. What is the role of the bind method?
11. What is state in react? How can we create a component's state and how it is different than props?
12. How to make parent-children components to communicate? How to achieve the same with siblings components?
Show less
Context
Description
No tags specified
Show more
What is React?
This walkthrough is dedicated to React.js. But what exactly is react?
React is a client-side JavaScript framework that is backed up from Facebook inc. It runs inside the browser (client-only) and automates some of the most common actions we do normally manually by using vanilla.js.
Of course everything comes at a cost. That means that react works in a specific frame, that you have to comply yourself to it. It doesn't just provide a bunch of functions like JQuery does, rather it runs through a specific set of rules, and the structure should be very specific as we will see.
When someone gets itself used to it, it should see the benefits and how React, automates things.
Show less
Context
Description
No tags specified
Show more
Create React App
React code cannot be executed natively from the browsers. That's because react, as we will later, has a unique way to mix HTML and JS together. This is something that no browsers are taught to read and render.
Thus after installing react and every package you need to use separately, we need to install also some packages that will transpile react code to something browser can understand and execute. This could be most of the times the @babel/core package and some presets. Then every time we want to compile our code in order to be executed properly we need to run a babel script or a webpack build command. This can take time and can cause a lot of pain to configure manually.
That's why we can install a specific script which is the create-react-app through command line. This comes with specific features, creating (or scaffolding) a ready-to-use application's folder structure, and comes with many handy scripts, for creating a dev-live-server (on reload without transpiling and 'building'). (hit npm start)
At the end, when we feel good about our application, we can 'build' the final folder that is going to be taken by the browsers. This 'build' folder contains the translated code from 'react' code to vanillaJS code. (hit npm run build)
p.s. It is strongly recommended that you revisit how to handle and initialize npm repository inside your project if you are not familiar with.
If you want to learn more regarding the installation process and more:
Show less
Context
Description
No tags specified
Show more
Install and use React
React is not the type of framework where you install it, and the whole functionality comes directly out of the box. For better performance it's creators have split functionality to smaller pieces of code (packages or modules) and each one does a separate task. Thus depending on what we want to do, we install the necessary package.
There are though couple of packages that are considered necessary for a react application to run. These are the react core library and the react-dom. These are the 2 first packages we have to install as shown above, looking at the first picture (the top one).
Attetion: If you have already downloaded and executed create-react-app script as shown in previous examples, you can safely omit this step, as react and react-dom are already installed through the create-react-app process. The modules have been also imported, and the only thing we have to do is to run 'npm start'. This will start a dev-live server, that will automatically reload our application in the browser as soon as we save any changes in our code.
After installing, the second step is to import them to our application. We use the ES6 import statement as shown to the second image above for that. React will take care of the rest and translate this import statement to something the browsers can understand.
Show less
Context
Description
No tags specified
Show more
Create a react component
Once you have imported the core react library as we have seen, you can start using it for creating components. Components are re-usable pieces of an application. The main idea behind it, is instead of having one big page, we split our page into smaller pieces. These pieces could be anything, like a navbar, an aside section, a main section, a form or even smaller pieces like buttons.
These components are autonomous and they serve a specific task, normally to render some HTML with some functionality inside. Components for now are separable, and we will see later how we can make them communicate with each other.
The main purpose of components is that we separate concerns, and we have an easier to debug, develop and test code. It is one of the key concepts that react brings in.
We can create a component by extending the React.Component class that comes from react as shown to the picture. We will see later, what to put inside the component, and how to use it in our application.
Show less
Context
Description
No tags specified
Show more
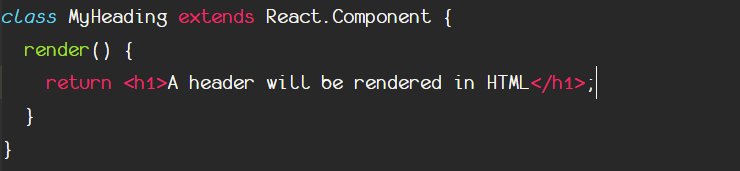
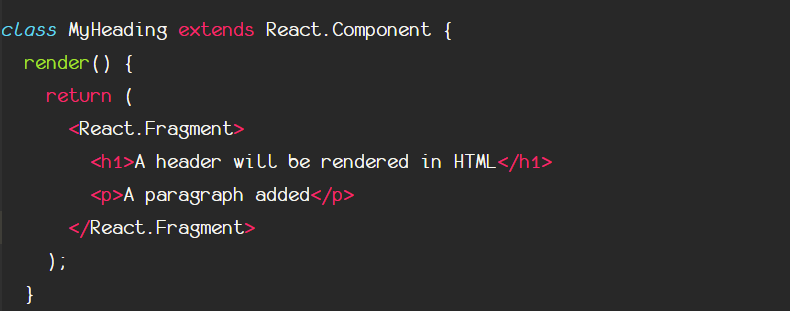
Render HTML from a component
Let's create our first component and try to render some HTML to it (actually is JSX, a mixed version between JavaScript and HTML as we will find out later).
Inside the MyHeading component we will try to render some HTML. We need the render function for that. By default the render function should return a JSX structure, that will be compiled to HTML at the end.
Show less
Context
Description
No tags specified
Show more
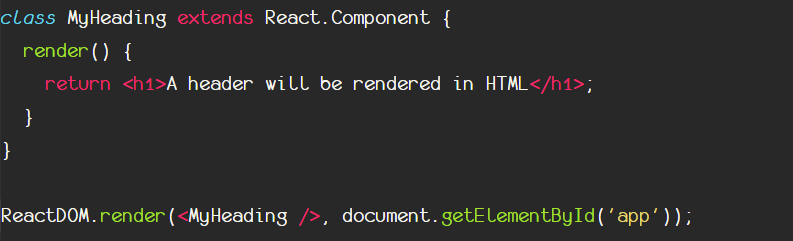
Rendering component to DOM
You can mount whatever a component's render function returns, to the DOM by using the ReactDOM.render method. Specify the component or some JSX as first argument, and the entry point on your HTML, in our case a div with id attribute of 'app'.
Then, whatever the component's render function returns, will replace the element with the given id.
Show less
Context
Description
No tags specified
Show more
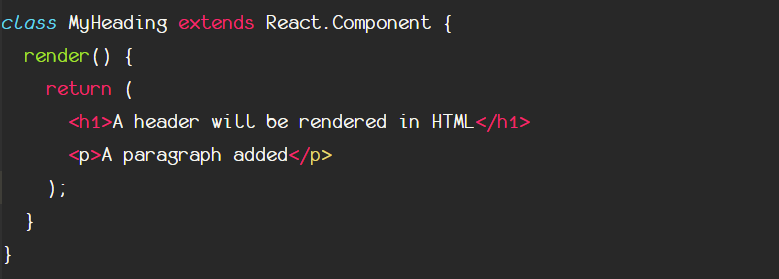
Rendering multiple elements
What if a component renders more than one element, a whole structure for example: We could use a parenthesis in order to specify a multi-line structure return statement. Every time we can't place the returned JSX into a single line (into the same line with the return keyword) we must wrap all the elements inside a parenthesis.
After we have done this, we can return more than one elements. Although this is correct, in this case there is another problem. Take a look to the picture above, what do you think?
Would this work?
Show less
Context
Description
No tags specified
Show more
Wrapping one outer element
The answer is unfortunately still no. Every component must return ONE single outer element, whatever is inside can go as deep as you want. But outside is going to be only one wrapper element.
So we could re-write this functionality exactly like the image suggests, by wrapping everything inside a div. This will work because this component now returns only one element as a root element.
Show less
Context
Description
No tags specified
Show more
React Fragments
What if you don't want to literally return a div or a specific element that has a meaning to HTML, but just a wrapper? Well, React gives you this opportunity with React.Fragment. That acts like a wrapper but will be ignored during compile phase from the browser.
At the end, it will not take any place, or space and it will not mount to the DOM at all.
You can place them by wrapping everything you want in an opening and closing tag respectively as the code above suggests.
Show less
Context
Description
No tags specified
Show more
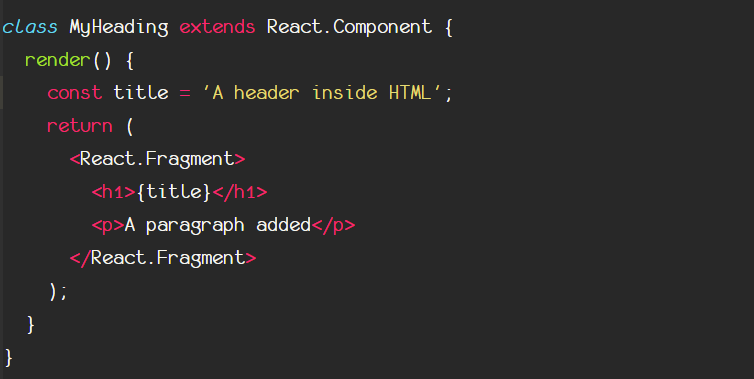
JavaScript Injection to HTML
What if we want to add some JS functionality inside our HTML? Normally you need to write functions, to grab some elements by selectors, and then change the innerHTML or the innerText etc.
Well react provides a much neater way of doing these things and interpolating JS expressions inside JSX. As it seems, in React whatever needs to be evaluated has to be inside curly brace { }. This will escape the actual content, and it will execute JS code in place.
The example above will render 'A header inside HTML' inside the h1.
Attention: In order for this to work, the variables must be initiated inside the same render function of the component. Otherwise everything will be out of scope, and the JSX that is rendered from component's render function, will have no access to outside variables.
Show less
Context
Description
No tags specified
Show more
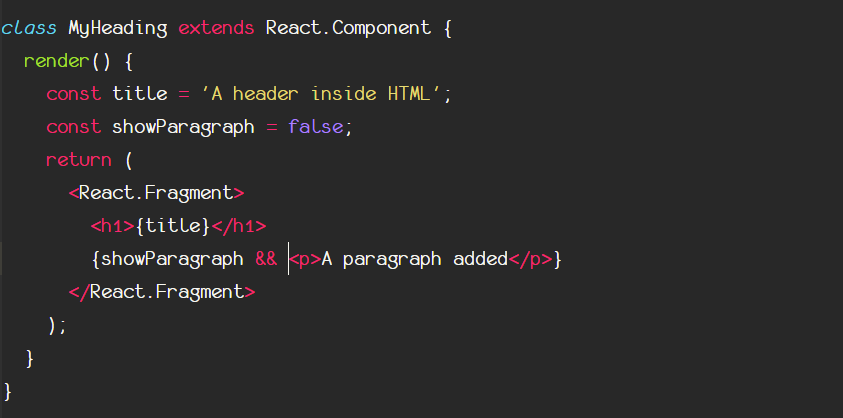
Conditional rendering
Sometimes we want to evaluate a boolean value, and based upon it to decide if an element (or even a whole component) will be rendered. There are many ways to do that: Ternary operator, if else statements etc. In this case we will use the && operator that React provides in order to make decisions.
Syntax has to be inside { } as we saw any time we need to evaluate a JS expression inside JSX.
In the case above, the paragraph will be in the DOM only in case showParagraph evaluates to true (has a truthy value).
Show less
Context
Description
No tags specified
Show more
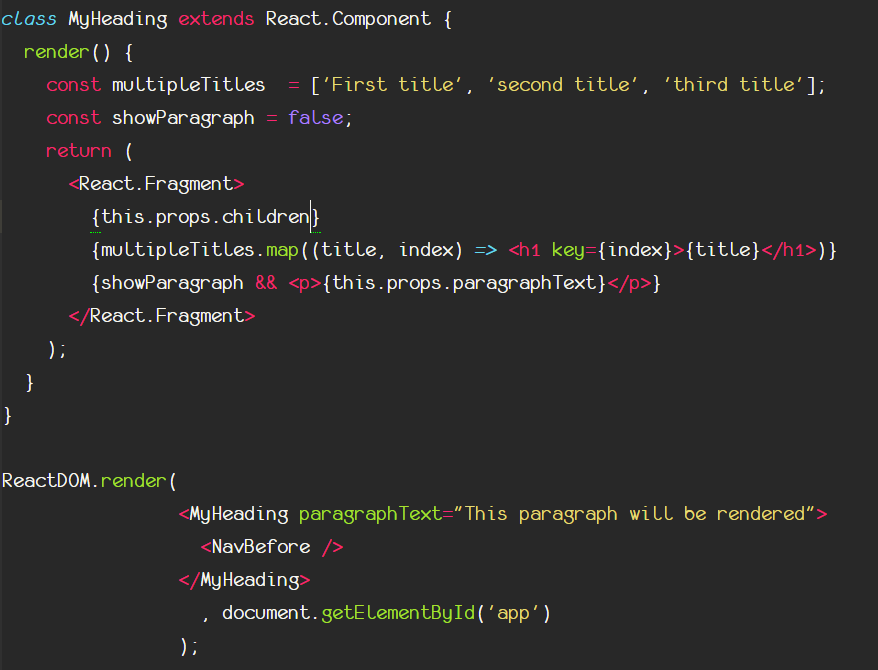
Dynamic Rendering
Sometimes we don't know how many elements we would like to render. The react provides a very nice way by using the map function in order to create elements on the fly. We can instantiate an array, and then push, or remove elements from there. Then we can loop through the array, and create as many HTML elements as the length of the array. For that we use the map function.
The component above will render only 3 elements (and no paragraph). The key inside is almost mandatory, so react can remember the exact order that each h1 was rendered on the beginning and doesn't have to do the same procedure from the beginning if a new title is added to the multipleTitles variable. As convention we use the index of every map function.
Attention: The absence of a key attribute will not produce an error, but a warning. Key should go always to outer element of the map function and no deeper inside.
Show less
Context
Description
No tags specified
Show more
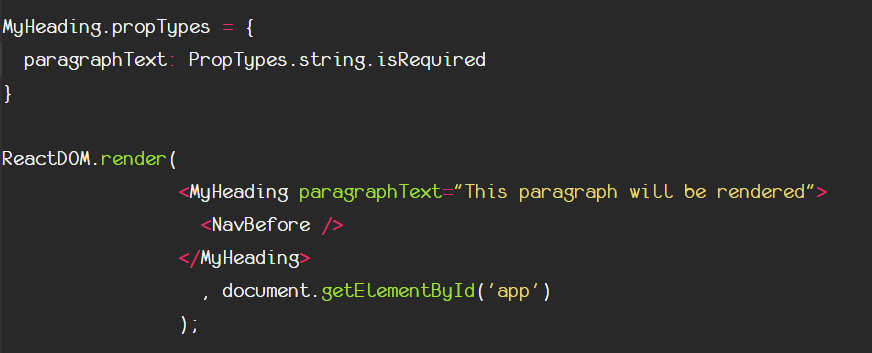
Components' Props
Every component is like a template. This template although fixed, can vary, and every component that comes from the same class can differentiate itself through props.
Consider that all humans come from the <Human /> component. That means that all humans share some characteristics. A date they were born, a nationality, an age, a name etc. These characteristics are different though from human to human. The template is the same, the content no. These characteristics that are unique from components instance to another components instance are called props of the component.
Components props can be accessed anytime inside the component through the {this.props.nameOfPropHere} property. You can have as many as you want. These props actually parameterize a component's look. Lets see the example above:
The props are passed always when the component mounts to the DOM (that means create a new object of this class, with these props, in this case the paragraphText).
Then inside the component we use a string in order to put it to the paragraph, if not a string then this has to be put inside {} curly braces.
You can create and render many <MyHeading /> components with different props and change the behavior and the appearance of it.
Show less
Context
Description
No tags specified
Show more
Components render other components
A very common use is that components, except JSX can also render other compnents. That means that a component acts as a parent-component and inside renders other components and whatever these render.
During rendering phase, myHeading has another component inside. That means that potentially this NavBefore component can be placed somewhere inside the MyHeading render function.
There is no designated place for that. It can be put either before, after or somewhere between. In order to specify that, we use the {this.props.children} inside the MyHeading render function, in order to specify where the NavBefore component should be rendered.
Show less
Context
Description
No tags specified
Show more
Component's Prop Types
PropTypes are not a mandatory section of react but is always nice to have for performance and for prop validation purposes. You can check if a specific component has specific props, ad additionally you can check for the type the value of this prop is, and even the schema of it.
First we must install the separate prop-types module from npm registry. Don't forget to import it to your script in order to connect it with a specific component as we will see during the next section.
Show less
Context
Description
No tags specified
Show more
Using Prop Types within a component
Then in order to use it, you select the component and you set it's props to the type you want them to have. The types can be string, bool, object, number etc. Additionally you can specify if a property will be mandatory on instantiation of the component or not (required or optional) as it is shown above.
By taking a look at our example above with the heading, the prop paragraphText not only must be there, anytime we create a MyHeading instance, but also must be of a type string.
The propTypes object, when attached to a component, contains the component's props as keys, and a number of pre-defined requirements as values.
Show less
Context
Description
No tags specified
Show more
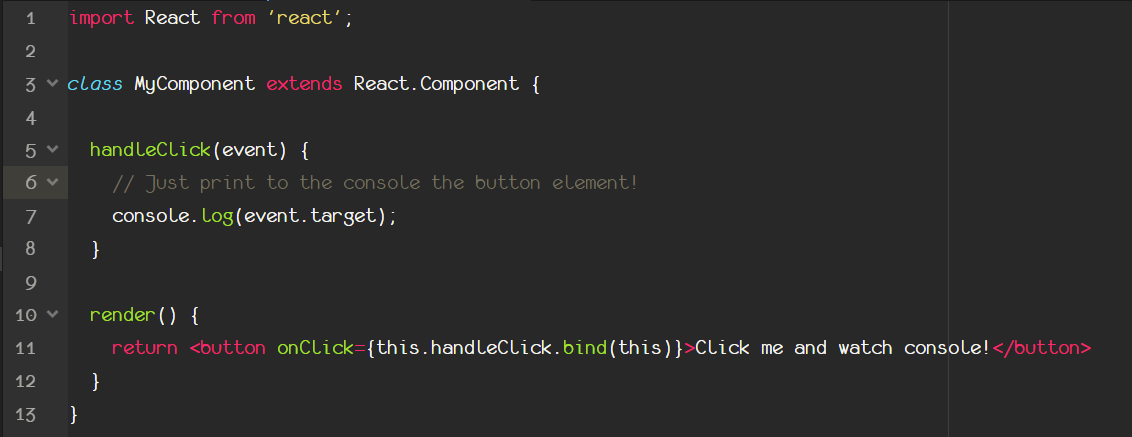
React events
Events in React can be created through ‘inline-style’. Inside the JSX element that triggers the event. That means that there are many attribute names, one for every event, some of the most common used are:
onClick
onMouseOver
onChange
onSubmit
The pattern is that we type on and the name of the event together, in a camelCase syntax! Then the value can be a javascript expression inside {} curly braces. Most of the times you will call a specific function there. Let’s take a look at the example above.
The button that is rendered from the component has an event attached to it. When clicked, executes the function with the name handleClick, because this function has not been declared globally but inside the class, the this keyword must come before. That indicates that we are talking about a function that is declared inside the same class with the button and not a global function.
But what is this bind function that lies next to it?
Show less
Context
Description
No tags specified
Show more
The bind function
If you observe a bit more closely inside the button’s event listener you will see something very strange, a ‘bind’ method attached to the function you have created in the class.
What is this? Is this necessary?
The answer is yes! Normally every function you create inside a component (inside a class), you want to change some properties, variables that are also part of this component. In order to achieve this result you must use the keyword ‘this’ , in order to gain access to these variables.
The problem is, that anytime you use the keyword ‘this’ inside the function, you create a reference NOT to the class, but to the element that triggers the event and eventually the function (that means the button element!!). So if you want to change a variable that has been created inside the class (let’s say with the property’s name, name) you have to go to the function and say
this.name = ‘Jake’;
But the this keyword means to whoever calls the event, so the compiler understands:
button.name = ‘Jake’;
DOM elements don’t have such properties, so this will throw an error.
What we can do, is to change the point of reference of the this keyword, so when used inside the function, instead of pointing to the button, to point to the class. And that’s exactly what the bind does. It changes the point of reference of the function to the current context (which is the class component).
At the beginning maybe it seems a weird syntax but at the end you will get used to it. It's like a react poem you have to learn by heart.
Show less
Context
Description
No tags specified
Show more
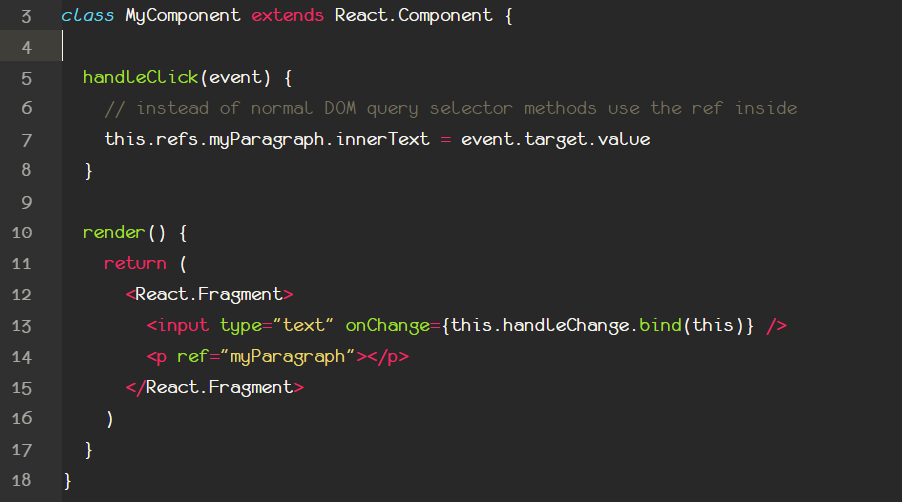
React Refs
If we want to grab specific JSX elements in React we could still use all the normal methods that VanillaJS give us, like the document.getElementById or the document.querySelector method. But this is not the best or the most efficient way to do it, because these methods start searching for the specified elements across the whole DOM, that means from the beginning
tag of it.
React provides a way to reference elements only inside the class they were defined. And that is through the refs object, like seen above. In our example any time the value of the input field changes, we execute the function above. What this function does, is that takes the current value of the input any given moment and pastes it to the paragraph. The grab of the paragraph is done by ref as shown.
Every JSX element can have a ref attribute like a special identifier. This has to be a string. Then inside every function that exists or have been created inside the class, you can grab any JSX element you want by referencing to it.
How? By simply using the refs object that every react component provides. Because every component has a unique refs object, you can have different JSX elements with the same name as ref, as long as they are in different components.
But not more than one JSX elements with the same ref inside the same component!
This method is optimized as it limits the range of search only inside the component and to the elements that the render function of the component returns.
Show less
Context
Description
No tags specified
Show more
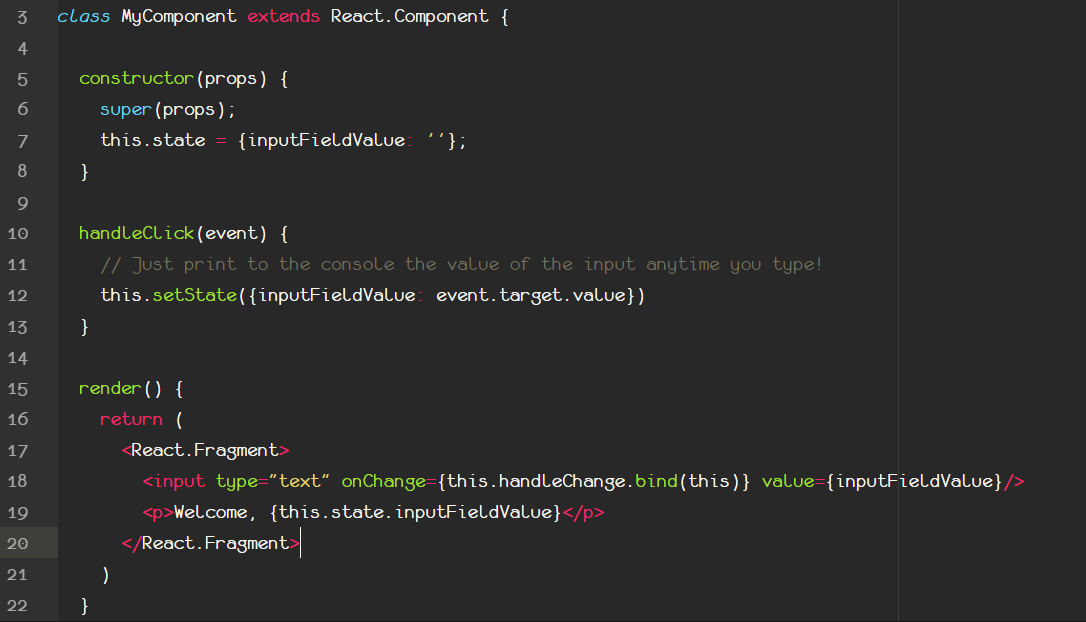
Create and handle component's state
Exactly like props, every component has another place to store variables and their corresponding values. Values that can be used and are accessible inside the component. This object that stores all the variables is called state.
State works exactly like props but with a key difference. State and every property that lies inside, can change (so it’s what we call mutable).
Additionally when the state changes then automatically the render function of the component is called once again.
In our example we will use state to update live the paragraph’s content based on what the user types on the input field. We will update the value anytime we have a change of value to the input field form. Exactly like the previous example, but we will not use the ref object.
Anytime you want a live update to happen in react and you don’t want to handle all the things manually, you have to create a state object. The state is always created inside the constructor function at the beginning of the class. They way to instantiate a state object is through the:
this.state = {property: value} . This is the pattern that react accepts.
Of course you can have more than one properties that you want react to take a look at and re-render any time something there changes, but for now we will need only one.
So there we create a state property which in the future is going to hold the value of the input. At the beginning we set this equal to empty string. Then we add the value attribute to the input field, so we connect the value of the input field with that place in memory (the state.inputFieldValue).
Now that this connection was made, inside the handleChange function that is executed anytime we change something on the input field, we update the this.state.inputFieldValue.
We can change any value that lies within the state object through the this.setState function that accepts an object with the properties that you want to change and the corresponding values!
Attention: Anytime this function (this.setState) is executed, automatically the render function of the component executes itself. This is why you SHOULD NEVER put any function that has a setState invocation, inside the render function. This will create an infinite loop and will make your browser to crash!!
Then the last thing we will do is inside the paragraph instead using any ref, we will put as a content the current state of the inputFieldValue. Any time the state of this property changes, the render function will render the paragraph with the new updated value. Simple as that!!
Show less
Context
Description
No tags specified
Show more
Decomposing components
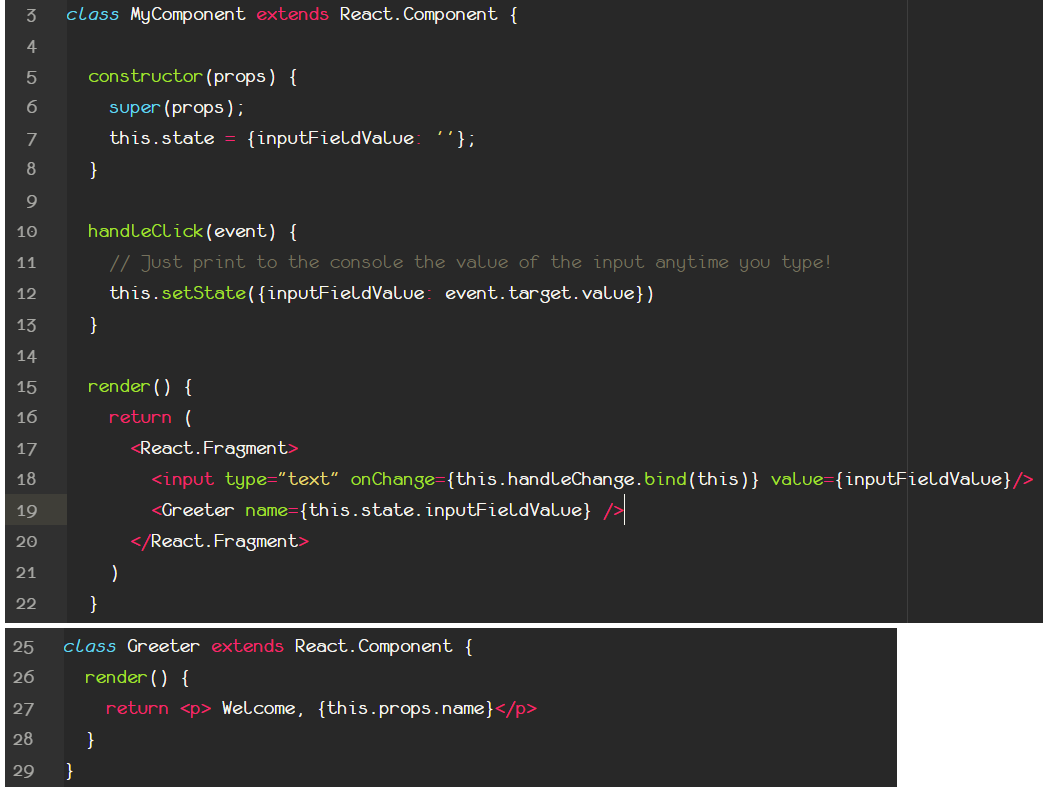
That’s all good, but for now we have everything inside the same component. The input that holds the functionality for changing the state, and the paragraph that actually uses the state in order to render a property of it.
But then we lose the best thing that react provides. Which is the decomposition of components. That means having your application split to many components. But what happens if these components must communicate in order to exchange data?
In our case for example, we could create a completely new component for the paragraph that the only thing that does is to render the paragraph. Wait a second and think. Would this work?
This answer is no! Because we just decompose the component that renders the paragraph, but still we have a reference inside paragraph’s content to the {this.state}. Remember! The new component now has no state!!
So how are we going to access the state of the <MyComponent>? The parent-component and use it inside the child-component?
Simple, the answer is through props! We will go inside the render function of the <MyComponent /> and after the button we will render the <Greeter /> component! Then because the greeting component lies inside the <MyComponent /> instead, we will create a new property during rendering named name, and we will make this equal to the state of the <MyComponent />.
Then inside the <Greeter /> component (that holds the paragraph) instead of using the state, we will use something that paragraph has access to. The props of it’s component!!
At the end, we will have something similar to the example above. Thus you have succeeded to separate tasks to different components, something that is way more manageable, and at the same time you succeeded, to make two separate components to communicate, by putting the one inside the other one. Then the child component, passes to itself the parent's state through it's props.
In other words, props act like a door to Narnia! This is very common in react and props act like doors for passing data from a component to the other one.
Show less
Context
Description
No tags specified
Show more
Connecting siblings components
What if we want to pass data through components who are siblings? And not parent and children? Then the solution is to initialize and maintain state to a common parent component of both siblings.
Since they are siblings, they should share a parent component! Then they can both have access to the state of the parent component, passed as props.
Already confused? Let’s see an example!
Show less
Flowchart
A diagram that depicts an overview of the application architecture when we want to connect in react two siblings components.
Context
Description
No tags specified
Show more
Parent component's structure
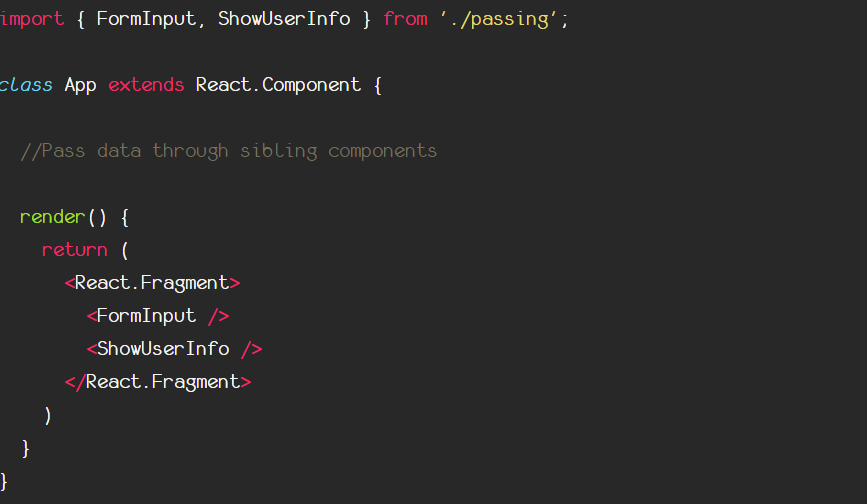
Let’s imagine you have a form with a single input field, and a paragraph that takes the value from this field and displays it. We have seen this before but your structure now has to be the one above.
Both the form, and the paragraph will be in autonomous components, and what they do contain we will find out soon. But what is essential for us, in order to make these components to communicate, is to put them under the same 'roof'. Under a common parent component. Above you can see that these two components are siblings, and children of the <App /> component.
In the <App /> component we will create the state, then we will give the ability to the <FormInput /> component to change this state. The <ShowUserInfo /> only depicts the current state. Anytime the state changes from the <FormInput />, the <App /> re-renders and the new changes are depicted from the <ShowUserInfo />.
Let's see what these siblings components look like.
Show less
Context
Description
No tags specified
Show more
Change state functionality
The plan is to initialize and centralize the state somewhere where both components can pull this information from.
That’s on the parent component!
We will initialize state with the value of the input as an empty string, and then a function that is going to be executed from the form field anytime the data changes there!
Then, anytime the data changes, the value gets updated, the state changes and the paragraph depicts automatically the new value!
Show less
Context
Description
No tags specified
Show more
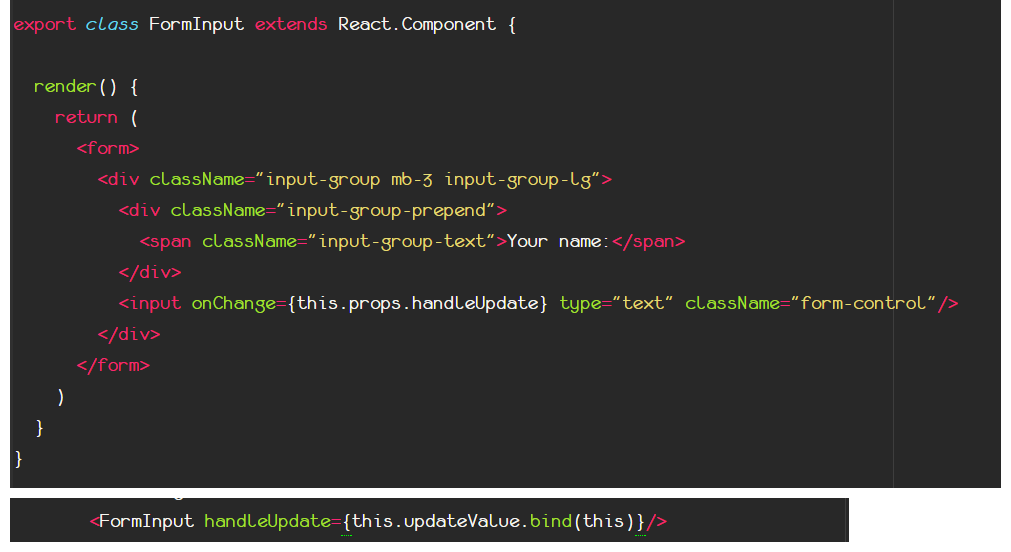
Changing parent's state through Form
Now we will give the <FormInput /> component the power to change the state by passing the updateValue function to this component as a prop!
At the same time we will use the current state of the input value every time to update the depicted message! We will use again the props here in order to achieve this effect.
It is extremely important here to bind the function as it is shown to the second image down. That means that the function will be executed inside the FormInput component but the state is going to be <App /> component state! So in other words, we change App’s state from the FormInput component.
Then we use the passed prop function every time the field is updated and the data is changed!
Show less
Context
Description
No tags specified
Show more
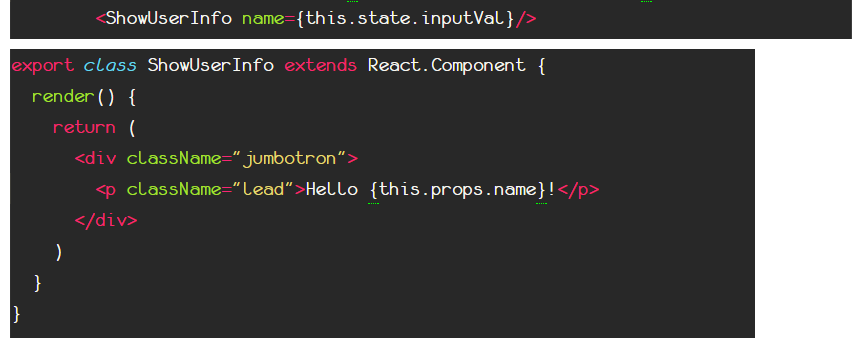
Show parent component's current state through props
Great! Now anytime the value of the input field changes, we change the corresponding value in the <App /> component's state!
Then the next step is to use this value to depict it from another component that has access to this state.
We pass the value of the state as a prop to the <ShowUserInfo /> component and then we use this info inside it to display it to the user.
There you made it!
You created two siblings components and nested them side by side inside a parent (the app) component, then both have access to the state you created to the parent component. The first has the power to execute the function that changes a specific variable of the state, and the other one depicts this change anytime it occurs.
Show less
Context
Description
No tags specified
Show more
R-1 Create a todo list app with react
Create a todo list application that is comprised from a single input form and a submit button. The user can type anything into the input anytime, and the value of the field will be added as a list item beneath the form as you can see here: This is the final result
Attention: For now ignore the bounce animation effect on creation of the tasks. This is something we will optionally take a look later.
Every list item additionally. Should have two buttons. The one for deleting the current task and the other one for setting this to done (which just puts a line-through decoration to the text).
Bonus: Additionally, the page should prevent the user to define the same task twice, as long as it already exists, and it should prevent the user to create an empty task by giving appropriate messages in both cases.
Show less