62615
12. DOM manipulation

Beschreibung
Modulinformationen
Beschreibung
Keine Merkmale angegeben
Mehr sehen
Course's Objectives
1. To learn how to grab HTML elements from a script
2. To manipulate HTML elements, change their attributes, CSS properties and even content.
3. To learn how to apply specific code under specific circumstances (event handling).
4. To learn the basic event types that exist (click, mouseover, scroll etc)
5. To learn that document and window itself has properties that can be used in order to detect user's activity.
Weniger sehen
Kontext
Beschreibung
Keine Merkmale angegeben
Mehr sehen
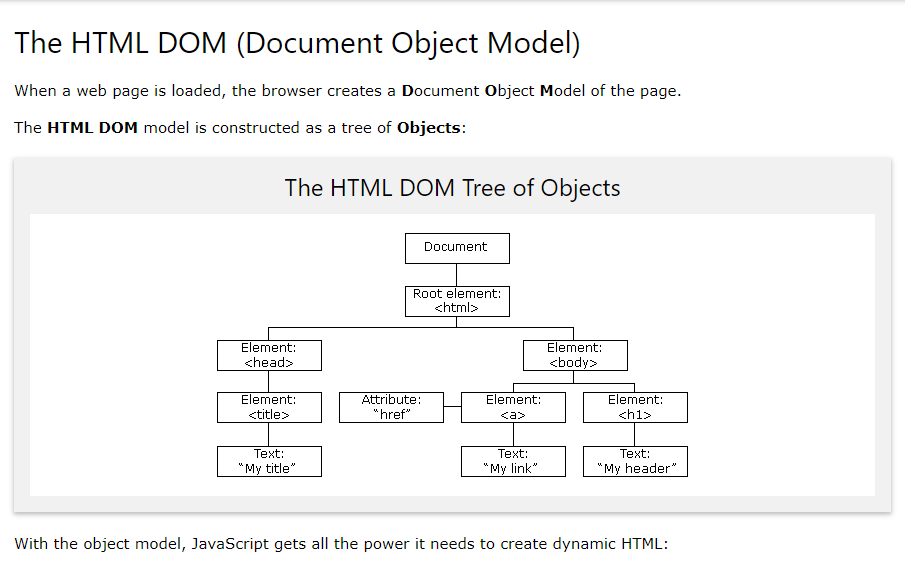
The DOM Tree
Any HTML document that is comprised from HTML elements has a specific hierarchy. By keeping it's mind to this hierarchy (think it like a tree) the browser knows which element is inside which other element, what properties the child element inherits from the parent element and many many more. All this information helps and defines the strategy, that the browser in the end is going to use in order to render the page and every single element individually correctly.
In reality the whole HTML document is a JavaScript object that holds information about every element individually, but also about the relationship and the connection between these HTML elements.
The Document Object Model explained
These elements on their side, hold their own properties (HTML attributes and more) that define their appearance and behavior in the page. These properties can be grabbed and altered by JavaScript on the fly. After an event has occurred for example.
The first thing we need to learn, in order to make changes on HTML elements on the fly, is to learn how to select them. By group or individually.
Weniger sehen
Kontext
Beschreibung
Keine Merkmale angegeben
Mehr sehen
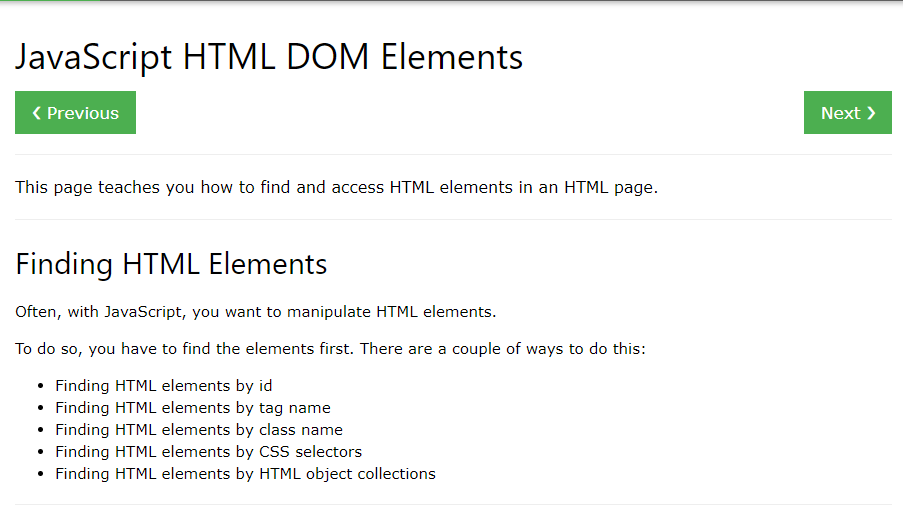
Selecting DOM elements
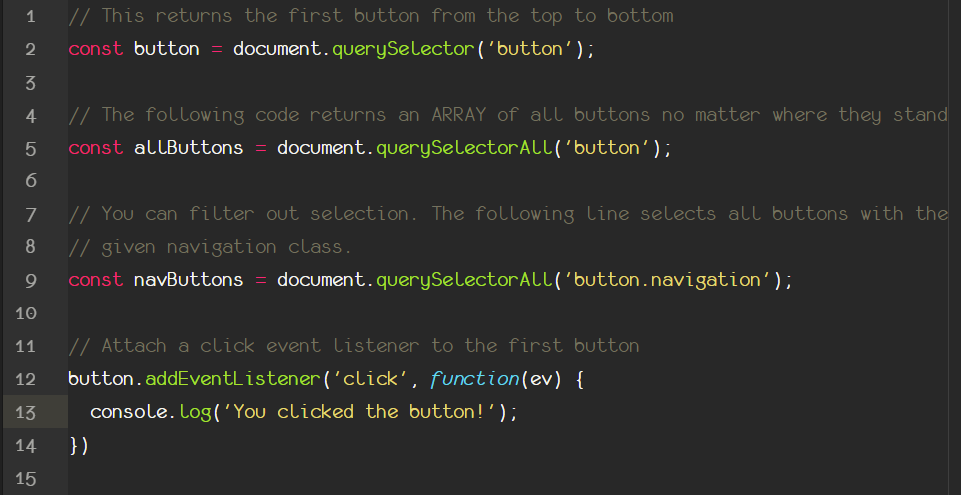
Generally speaking there are many different ways to select elements from an HTML document. We use these functions:
document.body // returns the whole body element of the html document
document.getElementById('unique') // returns the element with the id set to 'unique'
document.getElementsByTagName('H3') // returns an array with all h3 elements
document.getElementsByClassName('bigSize') // returns an array with this class elements
document.querySelector('p.intro') // CSS selector type. Returns the first element that is a p and has a class 'intro'
document.querySelectorAll('div img') // returns an array with images that lie inside a div
Find a full list here!
Weniger sehen
Kontext
Beschreibung
Keine Merkmale angegeben
Mehr sehen
Adding event listeners
Now that you now how to grab specific HTML elements from inside a JS script, you can attach event listeners to them.
Adding event listeners to html elements is like playing the old 'Cluedo' table game. Instead of stating that the murder was done by 'Colonel Mustard, in the Kitchen with the stilleto' you need to answer the same questions but in a different way.
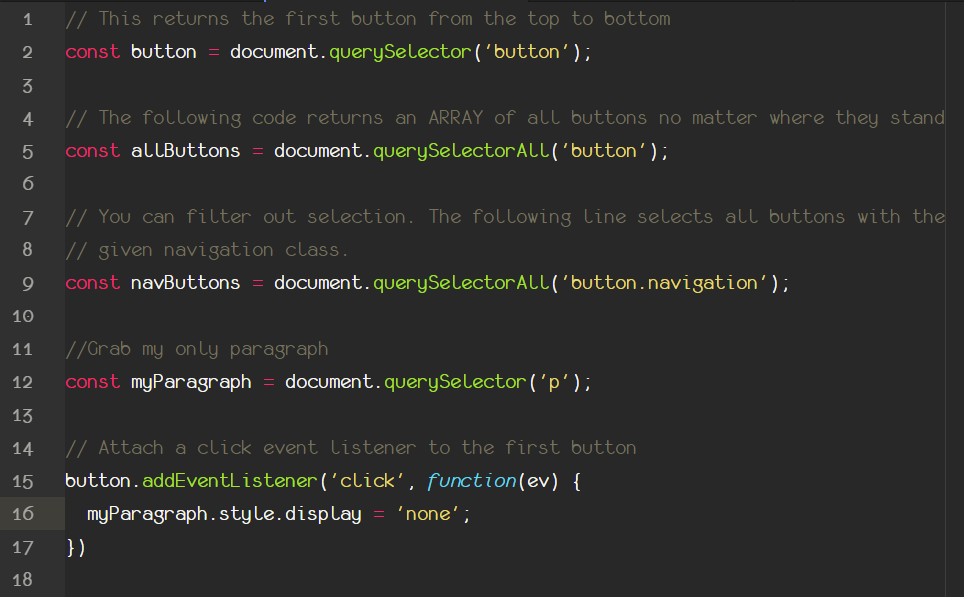
For example we want to hide a paragraph anytime a specific button is clicked.
The previous sentence contains all the information someone is going to need in order to implement this example. The 'Cluedo' questions are still there?
Who triggers the event?
What type of event is that?
What is going to happen anytime this event occurs?
The answer to the first question is 'the button'. You need to grab the specific button that every time is clicked, the paragraph gets vanished. For now let's pretend we have only one button in our HTML page, so we use the querySelector method to grab it and store it in a variable. This happens at line 2.
Then we need to specify the type of the event. In this case is a 'click', this string is passed as a first argument of the addEventListener function that is attached to event target element (in our case the button we grabbed)! This is the answer to the second question.
Regarding the third question, the answer is placed inside the addEventListener function, at the second argument. There we define a function (define, not invoke, the invocation will happen immediately AFTER the event occurs) that will run every time this event is triggered from this element.
In our example above we just console that something was clicked for now.
An event listener can be also removed through the removeEventListener function.
More about event listeners here
Weniger sehen
Kontext
Beschreibung
Keine Merkmale angegeben
Mehr sehen
Different types of events
The type of event you pass it through the first parameter of the addEventListener function. There are tons of different events that javaScript provides. Some of the most common include click, doubleclick, rightclick, mouseover, mouseenter, mouseleave, scroll and many more.
In fact here is the list with all of them. This is like the golden book of DOM as not only shows the events , but also properties of DOM elements that can be changed. Have a look no matter what!
Weniger sehen
Medien
Kontext
Beschreibung
Keine Merkmale angegeben
Mehr sehen
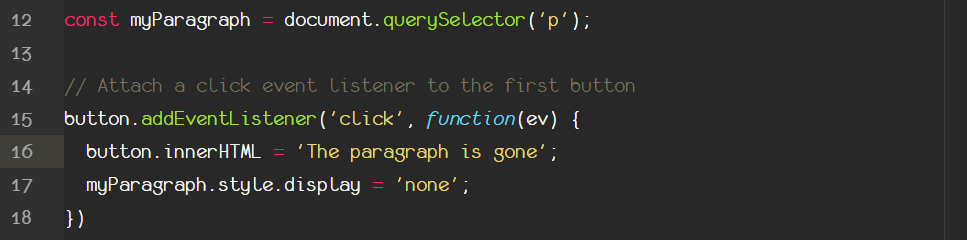
Changing CSS properties of elements
Every HTML DOM element, when taken by javaScript comes with a native style property. This is the 'style' attribute in reality and holds information about the CSS properties of an element.
That means that, when an event occurs, we can change the opacity from an element in order to make it fade in or fade out on the fly. Additionally we can change color, position, size and ALL the known css properties that we know.
The syntax is being shown above. Basically we change the display property of our paragraph (through .style.display) from 'block' to 'none' in order to hide it.
Attention: There are some css properties that take two words, and these are united with a '-' in between. Like background-color etc.
Typing something like element.style.background-color = 'red'; will produce an error, because '-' in JS is the operator for subtraction. So JS as convention deals with these circumstances by using the 'camelCase' syntax.
So the correct implementation will be element.style.backgroundColor = 'red';
* Values of all css properties come in strings when implemented through JS, be careful of the quotes!
But you can find a full guide here!
Weniger sehen
Kontext
Beschreibung
Keine Merkmale angegeben
Mehr sehen
Change the HTML content
JavaScript gives us the opportunity to change and modify the actual html content of an element. Any time an element is grabbed by a JS selector, this object comes automatically with the style property, all the attributes as properties and of course the content itself. That means whatever is inside the opening and the closing tag of an element! How?
By using the innerHTML property that is native to all HTML elements that have content (no images, inputs etc). For example:
You can access the content of an element by typing:
console.log(paragraph.innerHTML);
Or you can change it by assigning it to a new string!
paragraph.innerHTML = 'The text has changed now'.
Thus you can see the actual text changing. You an put this change inside the callback function of an event listener if you like.
What if you want to have the 'now' of the example above substring in bold? Then you can surround the now with the now HTML tag! That's right! The innerHTML property gives you the opportunity to write and inject HTML inside your selected element. Then the output of the DOM will be the following:
The text has changed now and the NOW word is bold!
In addition there is also the innerText property which is exactly the same but only for text (no HTML elements allowed, sorry!). Which is very useful when someone wants to change the text content of an element.
Find out more about changing HTML attributes and content here.
Weniger sehen
Kontext
Beschreibung
Keine Merkmale angegeben
Mehr sehen
DOM-1 Create a toggle list button
Create a list of html elements that is hidden at the beginning but appears when a button is clicked.
This list should toggle after each button click (appear if invisible, disappear when visible).
See the full behavior here!
Weniger sehen
Kontext
Beschreibung
Keine Merkmale angegeben
Mehr sehen
Change HTML attributes
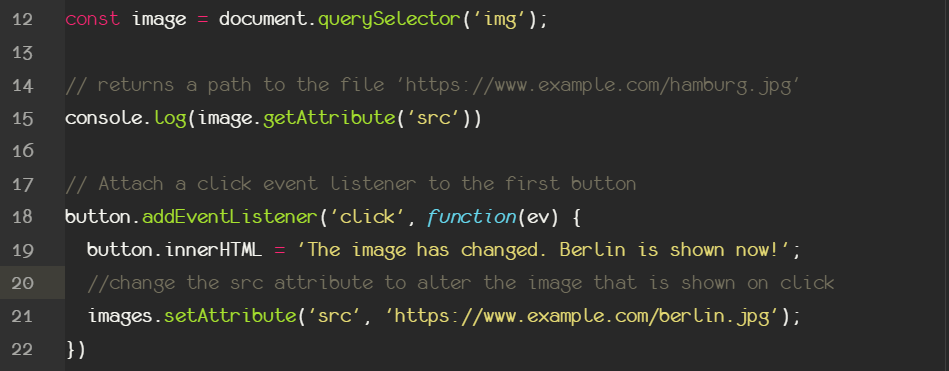
Except HTML content, and CSS properties, in JS we have the ability to change the HTML attributes of an element. For example we can change the src attribute of an image element in order to depict another image after an event.
This is what is happening on the example above as we use the two main functions that deal with HTML attributes.
element.getAttribute(nameOfAttribute). This is a getter function, that reads-only the specified attribute that is passed as a string argument inside the parentheses. This happens at line 15 in our case, as we print the current src attribute's value of the image.
Then on click of the button, we dynamically change the src attribute by using the element.setAttribute(attribute, value) function. The first argument accepts again as string the attribute of the element that is about to change, and the second argument the new, updated value that this attribute will hold.
In our example above on click of the button we change the picture that is being shown from Hamburg to Berlin.
Weniger sehen
Kontext
Beschreibung
Keine Merkmale angegeben
Mehr sehen
DOM-2 Change password's type
Create an input field of type password and single checkbox write after that that says 'show password'.
Normally, when you type the password you shouldn't be able to see anything. Find a way to change this when the checkbox is checked, and change the type of the input from 'password' to 'text'.
Hint: You may want to learn about the checked property of checkboxes that returns a boolean to indicate if the checkbox field is currently checked or not.
See the final result here
Weniger sehen
Kontext
Beschreibung
Keine Merkmale angegeben
Mehr sehen
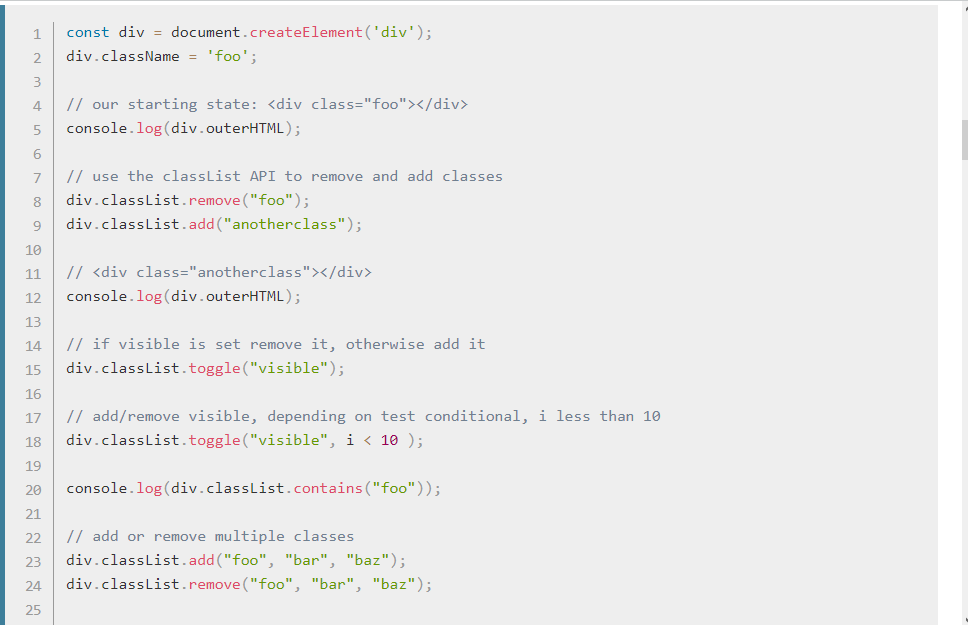
Adding and removing Classes from DOM elements
Web api's give us the opportunity to add and remove css classes from HTML DOM elements after we have selected them. There are multiple functions to chose from for adding a class, removing a class, toggling a class and more.
This is extremely useful because we don't need to add and remove a bunch of css properties when a specific event occurs. We can group them in a CSS class and then add or remove the whole class from an element. The following functions on DOM objects help us significantly to achieve what we want.
let section = document.querySelector('section');
section.classList.add('active') // Add a css class with the name of 'active' to the section elem
section. classList.remove('active') // Remove the 'active' class from section
section.classList.toggle('active') // Add a class if not exist, remove it if it does
section.classList.replace(oldClass, newClass) // This replaces a class with another one
Bear in mind that the classList object is not fully supported in older Internet Explorer versions. For being sure there is old another version that can be used in order to just set a CSS class to an element. This is the by applying element.className = 'classNameHere'.
Check full docs here on MDN
Weniger sehen
Kontext
Beschreibung
Keine Merkmale angegeben
Mehr sehen
DOM-3 Create a modal window box
Create a div that appears always at the center of the page and prompts the user to give his/her e-mail in order to receive our newsletter.
This div is invisible, and should appear only the first time, when the user moves his/her mouse out of the window section (on top of it actually).
Hints: For this exercise you may find useful to learn more about the 'mousemove' event and how to detect every time someone moves it's mouse the current coordinates and where the mouse stands relative to the page (ev.ClientX or ev.clientY for both every axis)
Bear in mind, once executed this event should never execute itself again. So you must find a way to remove the event listener after execution.
See the full effect here
Weniger sehen
Kontext
Beschreibung
Keine Merkmale angegeben
Mehr sehen
DOM-4 Create a photo-carousel
Create a photo carousel section. The carousel must be comprised of at least 4 photos and normally moves from the left side to the right.
Use two arrow handlers to the left and to the right. Feel free to put your photos there.
Bear in mind: When you want to grab multiple elements together you can use the document.querySelectorAll function that returns an ARRAY of elements. Then to apply your changes you must LOOP through each array's element and apply the changes for it as you learned in the arrays section.
Hint: Every time you click one of the handlers you may want to move all the photos a specific amount of px (or %, or whatever you want) to the specified direction.
See the full action here
Weniger sehen
Kontext
Beschreibung
Keine Merkmale angegeben
Mehr sehen
DOM-5 Create Dynamic Pills / Movies
Create a vertical side bar with five list items and side by side a section that contains info about 5 movies. Only one movie section is visible at any given time.
Any time we click a specific list item on the left side the corresponding movie section should appear.
See the full effect here
Bonus: Add an opacity effect to fade-in and fade-out each section.
Weniger sehen
Kontext
Beschreibung
Keine Merkmale angegeben
Mehr sehen
DOM-6 Create a dropdown menu content
Create a navbar that contains 5 list items (in my case movies' titles). Every movie title, when clicked, should reveal a list of the three main actors, and links that navigate the user to the official imdb page of this actor.
If clicked to another movie title, the previous one closes, and the new one, opens.
Every link when clicked must appear a different dropdown menu.
hint: You may want to create a class like 'shown' to make the dropdown list visible. When the link is clicked you may want to toggle this class to the menu that belongs to the link that was clicked (ev.target maybe helps in this case to identify which element is clicked?). You may find also useful if you can select children of elements through JS.
Bonus: When clicked everywhere else, all the open dropdown lists should be hidden again.
If you get stuck on this, you may want to see what event.stopPropagation() can do.
See full result here
Weniger sehen
Kontext
Beschreibung
Keine Merkmale angegeben
Mehr sehen
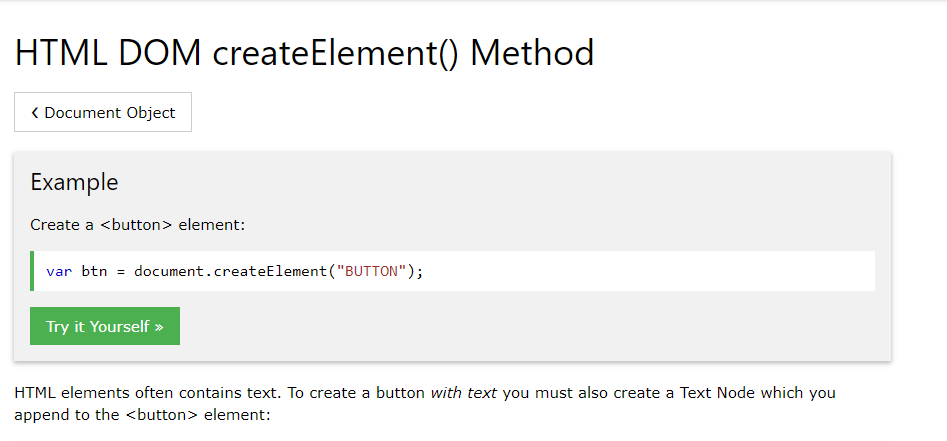
Create Element
You can always create a new element on the fly with the document method like document.createElement('H3');
This will create a new H3 element but still you need to put it in the document. In order to achieve it you need to use one of the append element methods and explicitly specified on which part of the document the brand new created element will be inserted.
Additionally you can remove an element by using the document.removeElement('H3').
Find all the document methods here.
Weniger sehen
Kontext
Beschreibung
Keine Merkmale angegeben
Mehr sehen
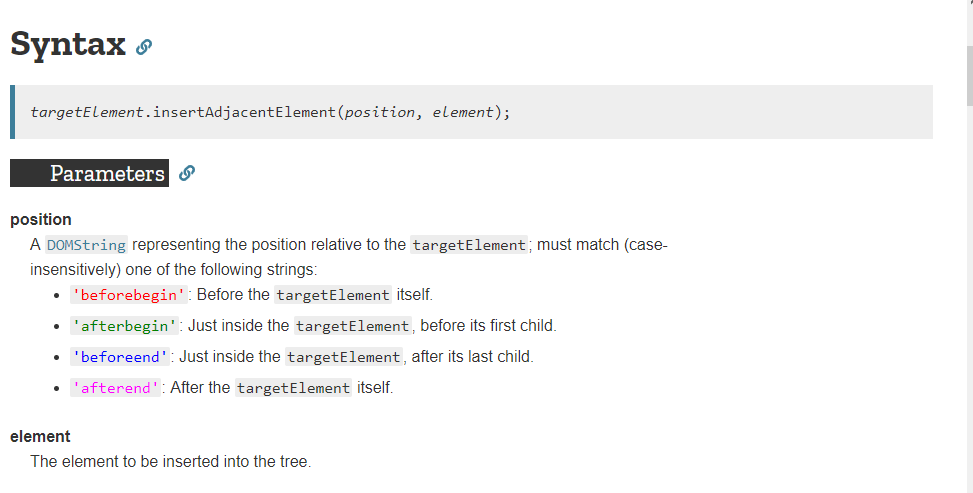
Insert Adjacent HTML
Instead consoling the message after you created it, and after you have identified the problem, you may want to show the message to the user. A common technique is to insert an element exactly below the input field that produced an error.
You can do this either with: insertAdjacentElement or insertAdjacentHTML
Weniger sehen
Kontext
Beschreibung
Keine Merkmale angegeben
Mehr sehen
DOM-7 Animated text
Create an animated version of a text that as it shown here.
Put your own string in a variable and then create an element with a letter of this string every 100ms. Don't forget to append it to the DOM every time.
Hint: Find more on how to execute code every specific period of time with the setInterval function.
Weniger sehen
Kontext
Beschreibung
Keine Merkmale angegeben
Mehr sehen
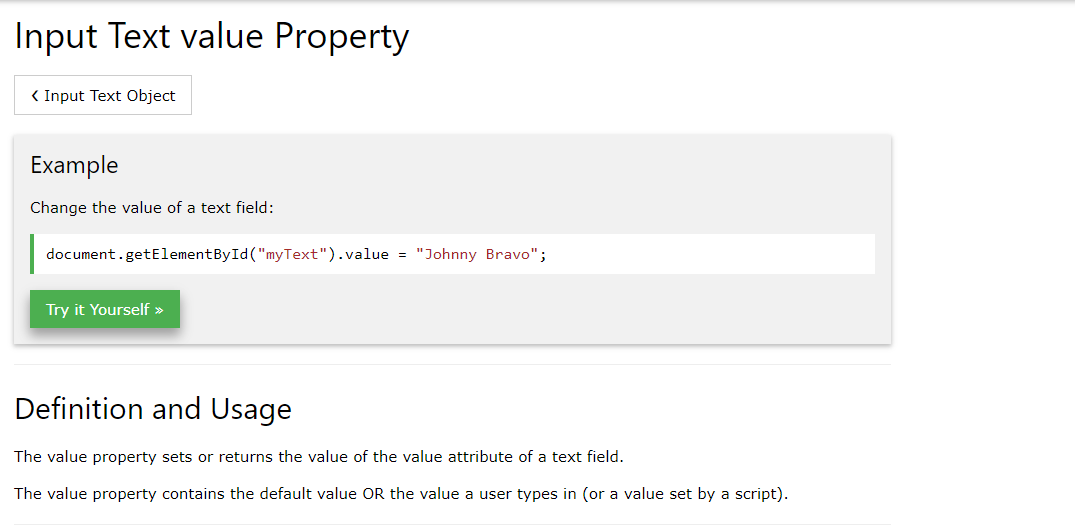
Getting a value from an input field
Input fields in HTML can hold values. They may have no content but what we can grab is the content that lies inside the text areas. These are called values and we can grab them through the value property of the element object.
For example, if you have an and inside you have written your name ('Jake' in this case), then what you can do is grab this value (which is always a string) by selecting the element (document.querySelector('input').value // This returns 'Jake').
You can store the value into a variable, manipulate the variable as always and return something different to the user based on the initial value. Bear in mind, the value that is coming off from these input fields is always a string.
Same applies for any kind of input or form elements in general, textareas, select fields and in general any kind of form elements (no checkboxes or radio buttons, you need to have access to the .checked property as discussed before).
Weniger sehen
Kontext
Beschreibung
Keine Merkmale angegeben
Mehr sehen
DOM-8 Create a todo list application
Create an application by using only HTML, CSS and JS, that has an input text field inside a form and a button for submitting. The user should be able to write any task he wants into the input field and see the task as a list item below.
Any time the form is submitted (by either hitting enter on the field, or by clicking the button) a new list item should be created with the text of the content of the input field.
The more tasks you add, the more list items appear.
Take a look at the full result here.
Bonus: Every list item should have a 'delete' button, when clicked it should delete the list item. The 'delete' button should be created inside every list item.
Hint: You may want to check the submit event first, how to access the target of an event, and it's parent element as well. By default every time a form is submitted the information, and all values of the form are sent to the designated target and the page is reloaded. This is the default behavior of a submit event. To change this behavior maybe you want to prevent the default behavior at the first line of your submit event listener.
Weniger sehen
Kontext
Beschreibung
Keine Merkmale angegeben
Mehr sehen
DOM-9 Create a CV form-generated Page
Create a form that accepts the following fields:
An input of type text where someone can put his name.
An input of type data where someone can put his birthday date
An input of type file where someone can choose a photo from it's computer
Two color inputs. The first is the primary color and is going to be used as the background color for created section later.
The second is the secondary color and is going to be the font-color for all the text that is going to be put inside the section later.
A textarea where someone can type anything he wants.
A list of checkboxes where the user can check his skills. These will be depicted.
And two buttons. The one is for submitting the info, the other for resetting the fields to an empty state.
When submitting a section should be created with all the gathering information from the fields as shown here!
Bonus: Put a button to the right corner of each section if you want to delete this section.
Weniger sehen