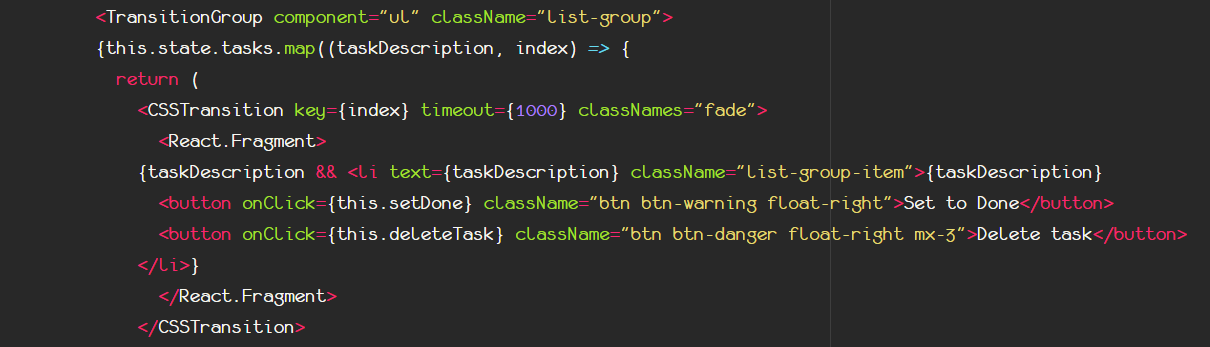
16.b React Transitions and Animations Public

16.b React Transitions and Animations

Kostas Diakogiannis
Course by Kostas Diakogiannis, updated more than 1 year ago Contributors

Description

An introduction to libraries that allow us to perform transitions and animations to react elements or group of elements.

Module Information

No tags specified

Context

Course's Objectives 1. To learn how to use the react-transition library to perform animations and transitions 2. To understand what the TransitionGroup component does, and when should be used in order to perform animations to group of elements. 3. To understand the CSSTransition component, and why we should use it for performing transitions and animations to solo elements and not groups. 4. To connect all of them with CSS classes.
Show less
No tags specified

Context

React Transitions and Animations What if we want to perform animations or transitions to JSX elements? There are react-libraries that help us performing these tasks. For exampling we can perform a transition or an animation, exactly the same way, we would do it in css, when something mounts to or unmounts from the DOM. The goals is to try to add an animation touch to every list item that is created or deleted by the previous todo list exercise. We use the ‘react-transition-group’  module in order to achieve this effect. First we need to install it: npm install --save react-transition-group Then we need to import two modules. import { CSSTransition, TransitionGroup } from 'react-transition-group' Specifically we need two different components, the CSSTransition component which can perform a transition or animation to a solo element, and the TransitionGroup component which can handle the same task but for a group of elements.  Let's see how.
Show less
No tags specified

Context

The TransitionGroup component Let's try to enrich our existing todo application,by applying some transitions and animations within it.  In our case we are going to use both components since we are going to fade in and fade out all the li elements inside our ul. The first thing we want to do is to identify the elements we want to apply the transition and replace the parent element of these (in our case the  ul element) with the given component from the library (TransitionGroup) exactly as the code shows above. This semantically is for the DOM an empty component that just notifies React that all the children of this can be transitioned when mounting or unmounting from the DOM.
Show less
No tags specified

Context

The CSS Transition component Then we need to apply transition to each element. Inside the map we put what is depicted by the image. The CSSTransition component is the first element that comes from the map function and wraps everything within. We put the key property because the CSSTransition component is the first outer element of the map function. The timeout specifies after how many milliseconds each list item will be mounted and unmounted to and by the DOM. Last but not least we give a className to the classNames attribute.
Show less
No tags specified

Context

Connecting together Overall the big picture will look like this image above. Don’t forget to close appropriately the corresponding tags for the CSSTransition and the TransitionGroup components. Like the picture shown above.
Show less
No tags specified

Context

Transition Classes   Then the only thing we must do is to configure these 4 classes, that represent the 4 different stages of an element. Take notice that we have named our class in our CSSTransition component as ‘fade’. This name could be anything but from this name, 4 different classes will be created for every li now: 
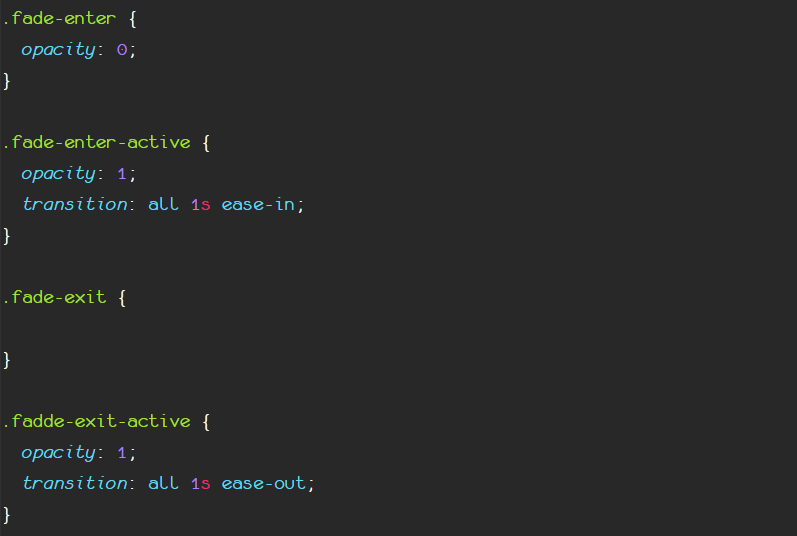
.fade-enter => When the element is about to mount to the DOM .fade-enter-active => When the element is has mounted to the DOM  The duration between .fade-enter and .fade-enter-active is going to be the timeout duration you have defined there. Be careful! This is not the transition or animation duration, this will be defined through css inside the appropriate classes! This is the amount of time, react is going to wait in order to mount an element to the DOM.The same way for unmounting, two new classes exist: .fade-exit => When the element is about to unmount from DOM .fade-exit-active => When the elements was succesfully unmounted from DOM. Now we just configure this classes in order to achieve the transition effect!Take care, that transition takes place at the end of each phase and not the beginning as normal css!!! You initialize the opacity to 0, and then you transition the opacity to 1 after the end of each phase. Normally the duration must be the same with the timeout. At the end we end up with something like the image above. Everything should work now, and everytime a list-item is created on the fly instead of just popping itself to the DOM is faded in. On exit (on deleted) is faded-out. The transition lasts for one second, and after the second React mounts and unmounts. Advice: It is highly recommended, that you use a css animation library like the animate.css, which is a rich library providing functions for many and different animations. So instead of applying your own functionality (opacity change etc) inside your css classes, you can use existing animation functionality to achieve very nice effects.
Show less
Show full summary Hide full summary