74455
16.c React Routing and Single Page Apps

Description
Module Information
Description
No tags specified
Show more
Course's Objectives
1. To understand what single page applications are, against traditional web apps.
2. To understand how to perform client-side routing.
3. What is a browserRouter? What are the routes components? How do we get a match?
4. What are the NavLink components? What is the difference with the normal HTML links?
5. How to perform client-side redirections using the redirect component?
6. What are the component's lifecycle methods? Why are they used for?
6. How to pick a route from a group of possible routes with the switch component?
Show less
Context
Description
No tags specified
Show more
SPA vs Traditional Web Page
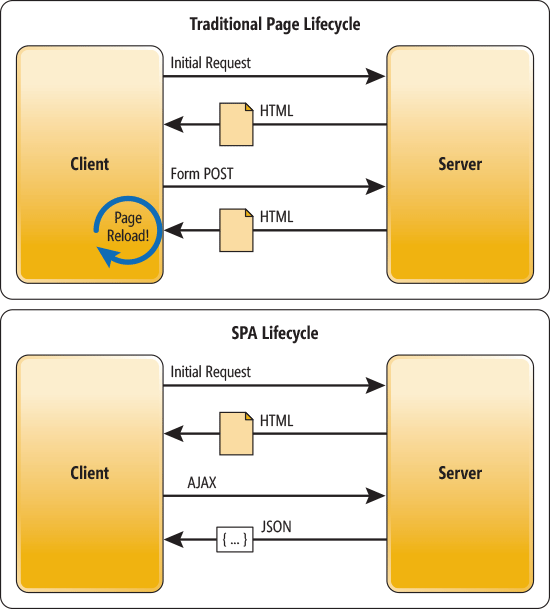
Until know everything we have seen serves a specific architecture model. Up to this point, we were creating HTML files, and we were navigating from one HTML file to the next one through links (anchor tags). This style of software architecture is called a ‘multi-page-application’. Any time we want to navigate into a different file, we make an external request to the server and the server responds by serving another static HTML file, exactly like the above image shows. Although this seemed to work quite well until recently , we put a lot of load to our server’s shoulder. Normally we would like to reduce some of this load, and put as much as possible work to the browser, since we have only one server to serve all users, but every user has a dedicated browser.
For that reason, comes another software architecture style to the rescue. The Single Page Applications or SPA’s. The main idea behind this architecture is that the server serves only one HTML file to the client which contains all different react components and versions (we call them ‘routes’) of the same file. Then we put route links instead of normal links that change the route url in the client. Then we specify which component (or JSX elements) are going to be displayed under this url route. This technique has a tremendous advantage since we don’t need to make an external request to the server any time we navigate. Everything happens on the client (browser) side and we don’t need to reload the page. So everything is faster.
Although routing is a powerful feature that comes with almost every client-side js framework these days, there is also a con. In order to serve only one HTML file and include these different versions (routes) that the users is going to probably need during his navigation to our site, we need to fetch everything within the original request. That means that the original request to the server for the one and only HTML file (the index.html probably) is going to contain all the possible routes that the user is going to use or not. Thus the initial request typically is going to be served slower than a MPA (multi-page app).
After that obstacle is surpassed, everything runs smoothly within the browser environment. External requests can additionally be made to the server (AJAX calls etc) but only to fetch and exchange data (mostly to JSON format) and not whole HTML files, as is depicted to the below image. Let’s take a look on how we can implement such a functionality.
Show less
Media
Context
Description
No tags specified
Show more
Installing and using the react-router-dom
In order to implement client-side routing we need first to install and import the react-router-dom library. In terminal hit:
npm install --save react-router-dom
Then we need to import some components like shown above in order to start implementing. Let's examine these imported components and what are they used for.
<BrowserRouter> (or the <HashRouter for some purposes) is the parent element. Anytime we want to implement different routes, we need to nest them inside the <BrowserRouter> component.
The <NavLink> component is equivalent to the <a>. Instead of reloading and fetching a new HTML page, changes the URL navigation to the given attribute (through the “to” attribute).
The <Route> indicates which component (or JSX elements) is going to be shown under a given route. This is specified through the 'path' attribute and the component (or render for JSX) atttributes, respectively.
Show less
Context
Description
No tags specified
Show more
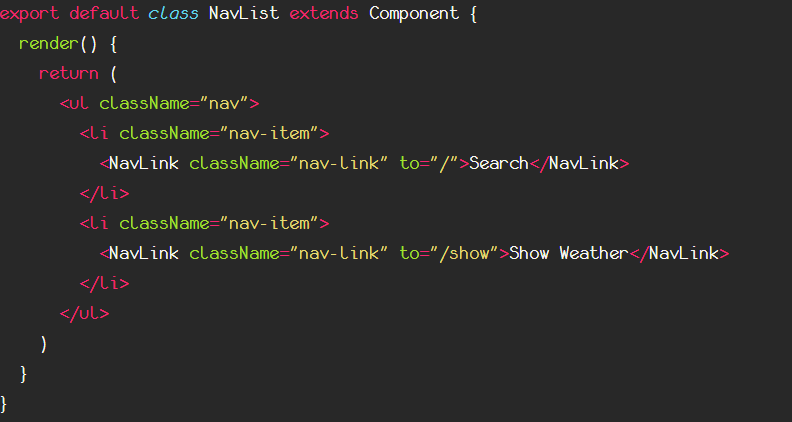
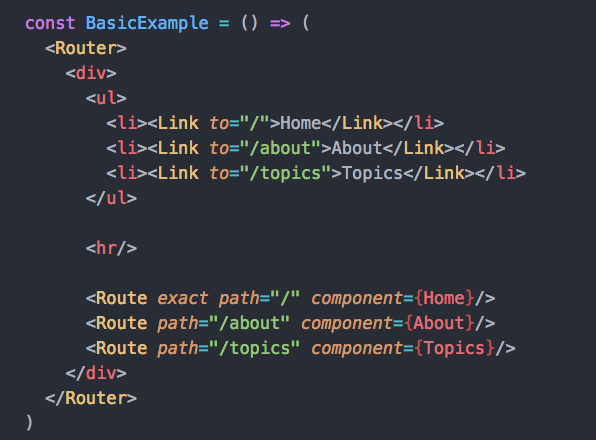
Implement the route links
As you can see above we have two routing links which change the URL to respective addresses when clicked. We use the NavLink component and the to attribute to indicate where the click of this link should get the user. The first link sends the user to the home initial page, where the second to the /show route.
What is going to be shown to the page under these circumstances, it is defined through every route component inside the BrowserRouter.
Show less
Context
Description
No tags specified
Show more
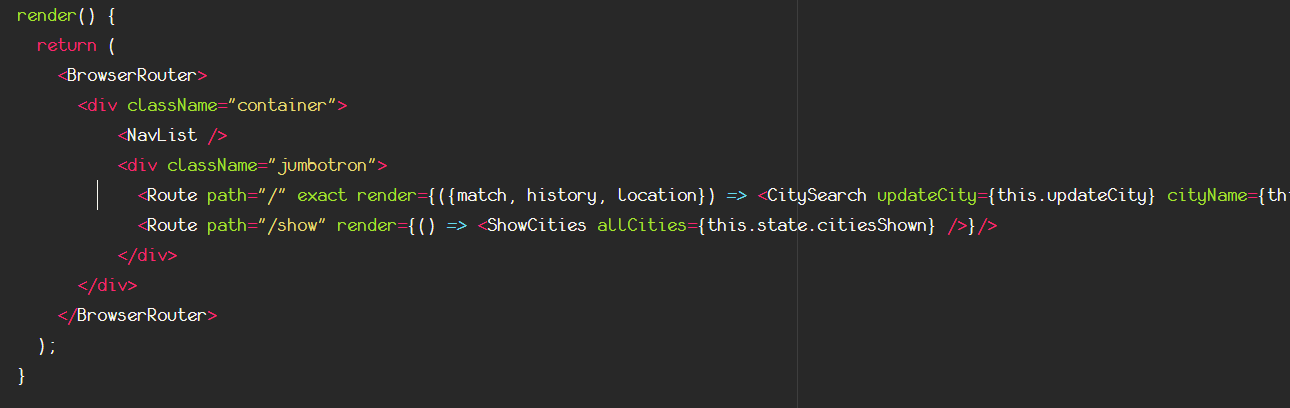
Implementing routes
As mentioned before, after defining the NavLinks and where they should get us on click, we need to define what is going to be depicted for every route accordingly.
To make a long story short, the NavLink, changes the url location, the BrowserRouter finds the corresponding route for this url location based on the path attribute of the component.
In our case when the first link is clicked we show (via the render method) the component (don’t worry about the parameters inside the arrow function for now).
When the second link is clicked (we navigate to the /show) we bring to life the component. You can also use the component attribute instead of the render, in case you don't want to show JSX elements, but a whole component.
Although here we need to pass also some props inside every component, and we use the render method, that accepts an arrow function. This function then renders the component or pure JSX if you want.
Attention: Pay attention to the exact keyword inside a Route component. If exact is there, that means that the to attribute of a NavLink must match exactly the path attribute of the Route component. If the keyword is not there, then a partial match is possible. (ex.
path = '/home' will also be executed even when the to = '/home/somethingElse' due to partial match.)
Show less
Context
Description
No tags specified
Show more
Redirecting users
What if we want to redirect the user programmatically? Without a click event on a link?
Well, there are couple of ways to do that. The one is through pushing a new url path to history.
But for now we are going to use the <Redirect /> component. First we need to import this component from the react-router-dom library, exactly like the other components at the top of the file. Then we place the component inside some render function of a class component like any other JSX element. and every time this render function is executed we redirect the user to the new URL.
The code above when executed will redirect the user to the /home.
Hint: Most often, the redirect component is combined with a conditional rendering. So we don't redirect always, but only when something on state changes.
Show less
Context
Description
No tags specified
Show more
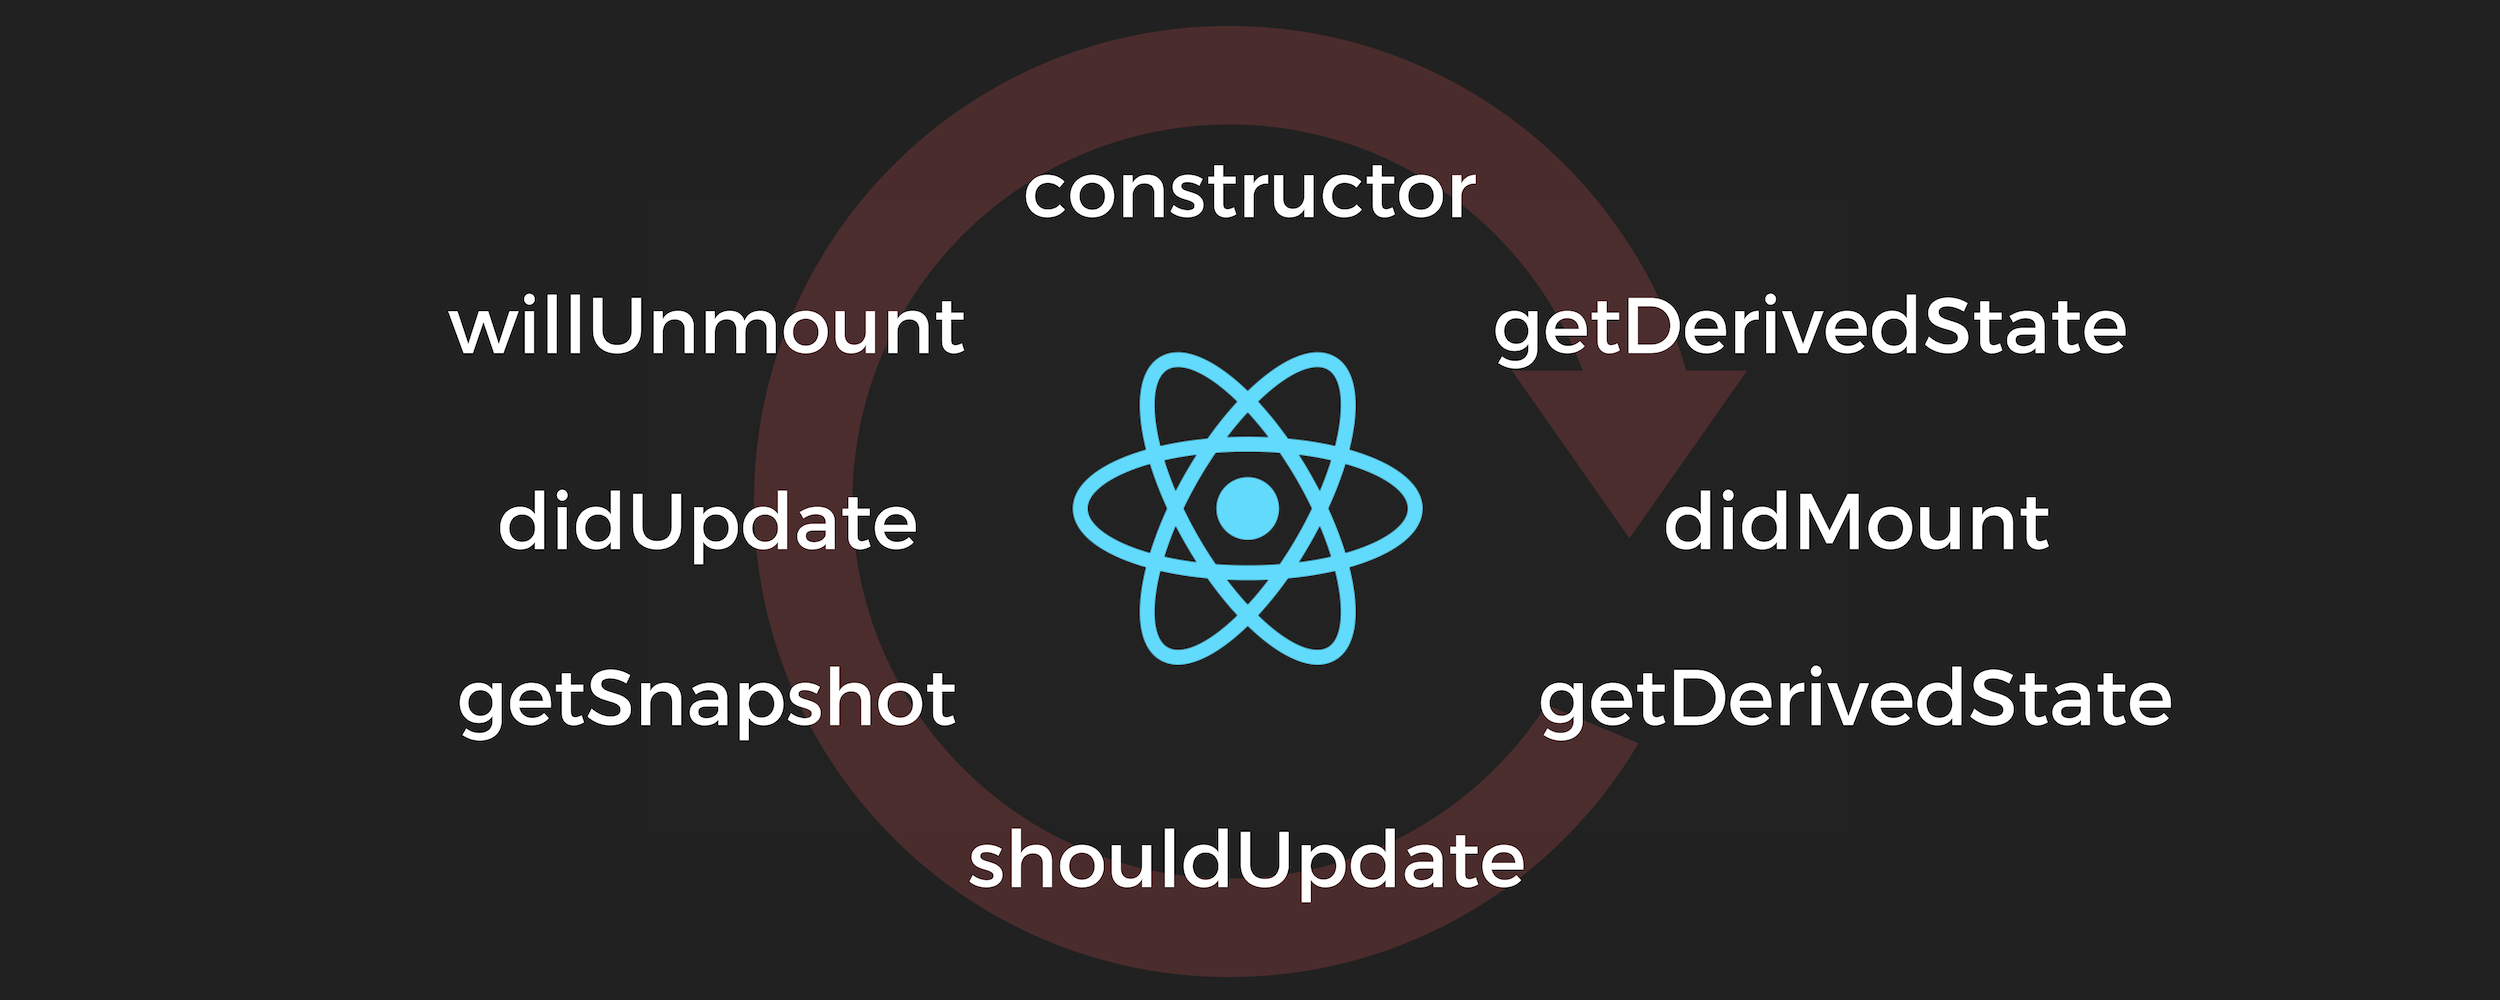
Redirecting and Lifecycle methods
Imagine you click on a NavLink that gets you to render a specific component. This component is rendered and it is a temporary page, that should be depicted only for 5 seconds after render, and then it should redirect the user to another page.
Although possibly you have already thought, to implement redirect conditionally and change the variable state, how are you going to count 5 seconds, immediately after the component was rendered?
Well it seems, that every component has built-in some methods that happen and execute secretly at specific times during a component's lifecycle. For example we can execute a specific function any time a component has mounted to the DOM, or exactly before mounting, or even after. These methods are called lifecycle methods, and come natively with every react component.
Their names can be found above and to the link if you want to learn more about them. For now we will use the componentDidMount lifecycle method in order to count 5 seconds immediately after the component mounted to the DOM and redirect.
Let's take a look how.
Show less
Context
Description
No tags specified
Show more
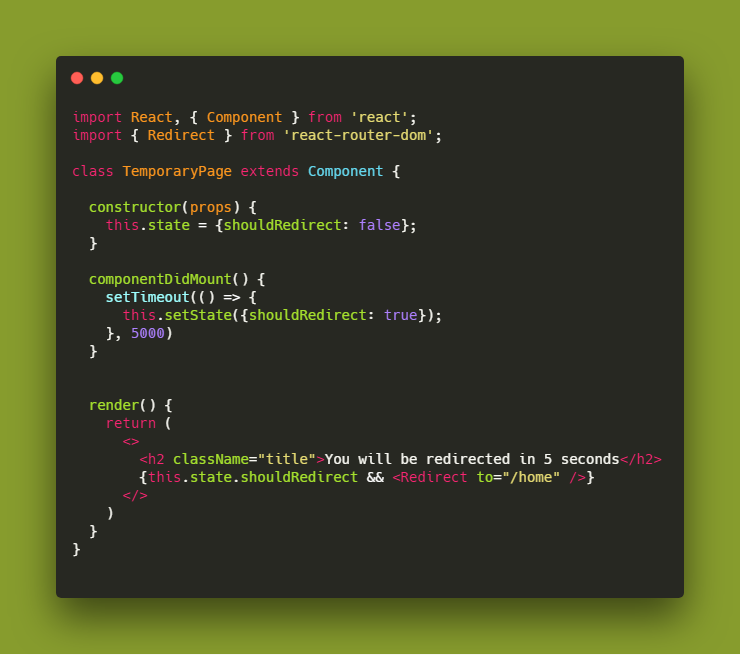
Redirecting with lifecycle solution
The answer can be found to the code above.
First inside the render function of the component, we inject the redirect to /home, but take care, this will be executed only when the shouldRedirect variable of component's state is set to true.
This is initialized as false, but then every time this component renders, we set a timeout function, and after 5 seconds we change a state's variable. We use the componentDidMount lifecycle method for achieving this.
The change of state will execute the render function with the new variables' values, and this will trigger the redirect component, which will lead the user to the /home page.
Show less
Context
Description
No tags specified
Show more
Reset the state after unmount
The previous solution works well for now, but generates a specific problem.
Now that the shouldRedirect is set to true, will stay like that forever. That means if we navigate to this component again, we are going to redirect immediately and not after 5 seconds, since the value is true and this fact will trigger the Redirect component.
What you should do, is reset the shouldRedirect state's value again to back to false, immediately after the component unmounts.
Hint: Maybe you will find componentWillUnmount lifecycle method extremely useful here.
Show less
Context
Description
No tags specified
Show more
The Switch component
Sometimes we want to show only one route from a group of routes. Of course we can specify the “exact” path and thus ensure that no route can be depicted accidentally as a partial match, but what if we want to group routes and select to show ONLY the first match?
Then we can use the <Switch> component and nest routes inside of it. The nested routes are going to be evaluated one by one, and once there is a match, it will be the selected route. Then the evaluation of the other remaining routes stops.
In this example without having the switch, anytime we were either on the /home or on the /different we would render the corresponding component AND the <ExampleOne /> as well (due to partial matching). With the Switch component we render ONLY the first match.
Be careful! In our case, and because we have no exact keyword, regardless of which one of the three routes is the active route (the current url), we will depict always the <ExampleOne /> component.
Why? Because since these three routes are inside a switch keyword, the first match will be depicted. Regardless if we have clicked on the link that gets us to just /, or to /home, or /different. The first (with just a /), evaluates to true due to partial match. (maybe you want to put an exact keyword there to avoid this issue). The others will not be evaluated at all!
Show less
Context
Description
No tags specified
Show more
Wrap up and going further
Routing and SPA’s are a powerful feature of client-side architecture, and although we covered some basics, it is highly recommended to look for further resources and topics, like dynamic routes, params, the match, history and location objects etc.
If you want to learn more, you can start the journey here:
Build a single page app for beginners.
And take a bit of a deeper step here on how to navigate programmatically through routing.
React-router-params
Show less
Context
Description
No tags specified
Show more
RR-1. Create a blog template with react
Create a clone of this project
This website is an SPA, with three main routes.
The home page is static and has only a welcome message.
The /create has a form where we can create a post.
After every post is created , we get ourselves redirected to the /show route, which shows all the post that were created. Every post should depict the information about who the author of the post is, when the post was created, the title and the content of it.
Bonus: Every post should have a link which should redirect to a dedicated page for this blog post only!
Hint: Learn more about how to create routes with params and how to parse route params with a match.params statement.
Show less
Context
Description
No tags specified
Show more
RR-2. Imitate login React SPA
Create a clone of this Single Page Application
This SPA should imitate a login behavior. At the beginning the user faces a form that accepts only a given username and password (something that will be defined by you). If the combination is incorrect a paragraph message is depicted below (you can put something invalid to see how it works).
If the combination works, then the user is authenticated, and is redirected to the users main page. There are three routes (not important) with some text, and a logout button.
This button, when clicked, should redirect the user, to a temporary page, and after 5 seconds at the starting form page. Completely logged out. The user should no longer have access to the user main page route unless he gives again the correct username and password.
Show less