76210
17. Node.js Environment

Description
No tags specified
Module Information
Description
No tags specified
Show more
Course's Objectives
1. The learner understands that node.js is another place to run JavaScript outside browser
2. The learner learns how to install node.js and nvm to handle for different node versions
3. The learner gets familiar with the REPL environment and how to run JS statements there
4. The learner executes it's first script through node.js console
5. The learner understands stability indexes and what do they mean
6. The learner finds out what process arguments are and they parameterize a script
7. The learner understands how to use node.js core modules with the require function.
8. The learner learns how to deal with files and folders by using the 'fs' and 'path' modules
9. The learner understands the need of asynchronous node.js ops, due to single-thread node
10. The learner learns about utility helper functions to make his life easier.
11. The learner learns more about the different ways to read and write files with buffers and streams.
12. The learner finds out how a standalone script (or a server side app) can also be client and request data from an external API through axios package. The learner also understands the difference between core modules and external NPM modules, and how to install and include the latter.
13. Final Node.js project, the learner must create a CLI application to put everything to use.
Show less
Context
Description
No tags specified
Show more
What is Node.js?
But then what is node.js? Node.js is a piece of software that was written by Ryan Dahl back in 2009. This software is a runtime environment that can read and execute JavaScript code. Exactly the same way a browser can read and execute JavaScript, only without having the ability to render anything into the page. Think of it like the 'console' tab in chrome developer tools.
That reshaped the web development field, because since then we have the opportunity to write JavaScript code outside the browser. That means that someone who up to that time knew HTML, CSS and JavaScript and was working only as a front end developer, didn't have the need anymore to learn a new language to become a full stack developer, only learn some new concepts, with the same syntax.
That is awesome! Does that mean that node.js is another JavaScript framework like react? The answer is no! Node.js is an execution environment and not a framework, that means is a (mainly) C++ program that must be installed on your operating system and can read and execute JS code. It offers of course some JavaScript API's (modules) that allow you to write code that is meant to run outside the browser, such as dealing with files in filesystem, creating http-servers, talking to databases and even more.
In fact node.js acts like a basis that on top of that you can install a framework of your choice, that will help you to achieve a task. There are packages for everything, some examples are cylon.js for robotics, electron.js for making desktop applications, react-native for hybrid mobile applications and more.
Node.js made possible to create any type of application with pure web technologies, and transformed JavaScript into a general purpose language (like Java, python etc).
Can i get an amen?
Show less
Context
Description
No tags specified
Show more
Node, NPM and NVM
Next step is to install Node.js. If you haven't already done it, go to the official Node.js page and install the latest stable version (what is 'recommended for most users'). At this point this version is the 10.15.3. The page will automatically detect your operating system and will give you the necessary versions.
After this process is finished, you will have installed not only Node.js but also couple of other things that come with it.
The one is NPM (or Node Package Manager). NPM is the Node's go to distribution system for installing all the packages we will need to build our applications. You can create everything also from the beginning, on your own, but why reinventing the wheel when someone has already built a sophisticated tool to speed up the construction and development phase.
In npmjs.org you can find information about all the modules and packages that other people have published for you to use them, and why not you can also publish your own package!
Additionally you can install optionally the nvm (Node Version Manager) in case you want to switch to different Node.js versions between projects. NVM installation differs from OS to OS so make sure on finding the correct current way for your operating system.
Ok! The setup is ready! Let's go and run some JS code out of the browser.
Show less
Context
Description
No tags specified
Show more
The REPL interface
Let's run some JavaScript code after all this setup, shall we? Before we open files normally with our favorite text editor, let's get familiar with the REPL interface. You can search for node.js in the all programs. Node.js comes with this command line like interface built in. There we can execute JavaScript statements exactly as we would like with a JS file.
This is the Read-Evaluate-Print-Loop (or REPL for abbreviation) environment.
We are not going to spend much time here, since mostly we are going to implement our code within JavaScript files, but it's good to spend a minute or two to understand that node is just an execution context.
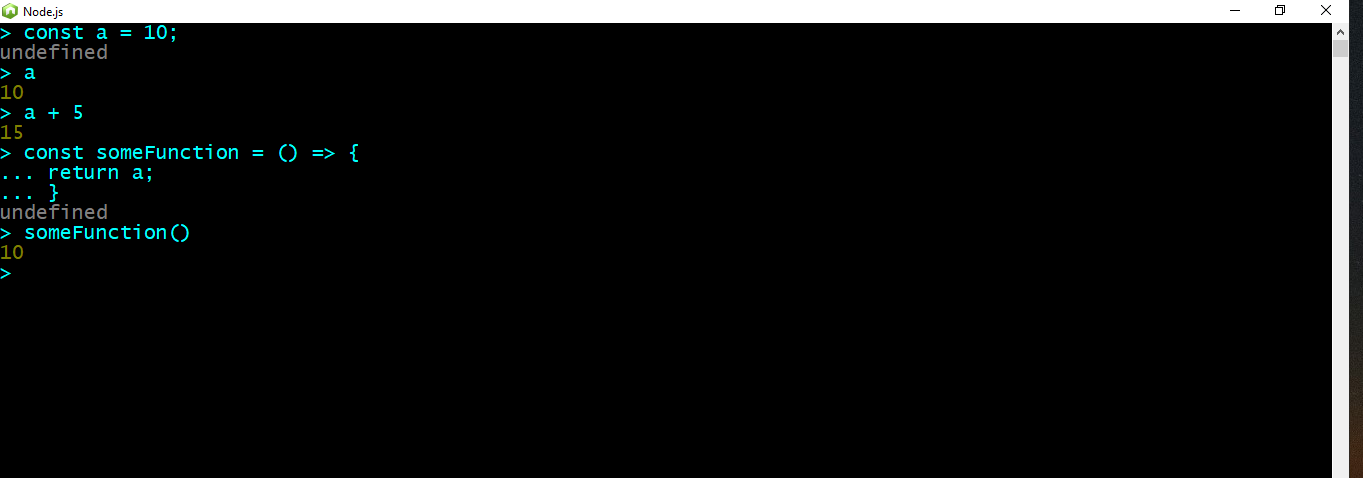
For getting familiar, at the first line try to create a new variable (the syntax is JavaScript as always) and store a valid value to it. Then hit enter. A line after just type the name of the variable and hit enter. What do you observe? Node stored the value into the variable and printed it when you asked for it.
After that, feel free to play around, by creating a function that returns the previous variable. Don't be scared to go multi line as long as you open the block of code and then hitting enter as shown above.
You can use normally the REPL interface for evaluating fast and quickly JavaScript expressions (such as regular expressions, complex comparisons and more)but not for real development purposes.
Show less
Context
Description
No tags specified
Show more
First Node.js Script
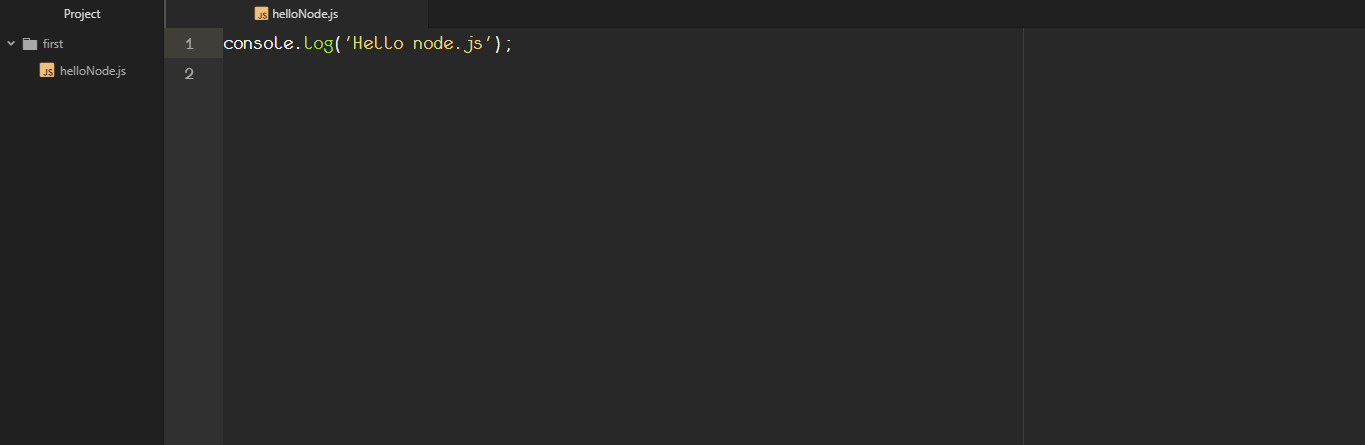
Time is up to implement our first JavaScript code that will be executed from node.js interpreter and not browser. Let's create a new folder, and inside a new JS file (i named it 'helloNode.js' ).
Inside that file i will log to the node.js console the string 'Hello Node.js'. Simple as that. Now it's time to execute this file from top to bottom (exactly like in the browser, the synchronous way) through node.js
Let's see how we can do that.
Show less
Context
Description
No tags specified
Show more
Execute from Node
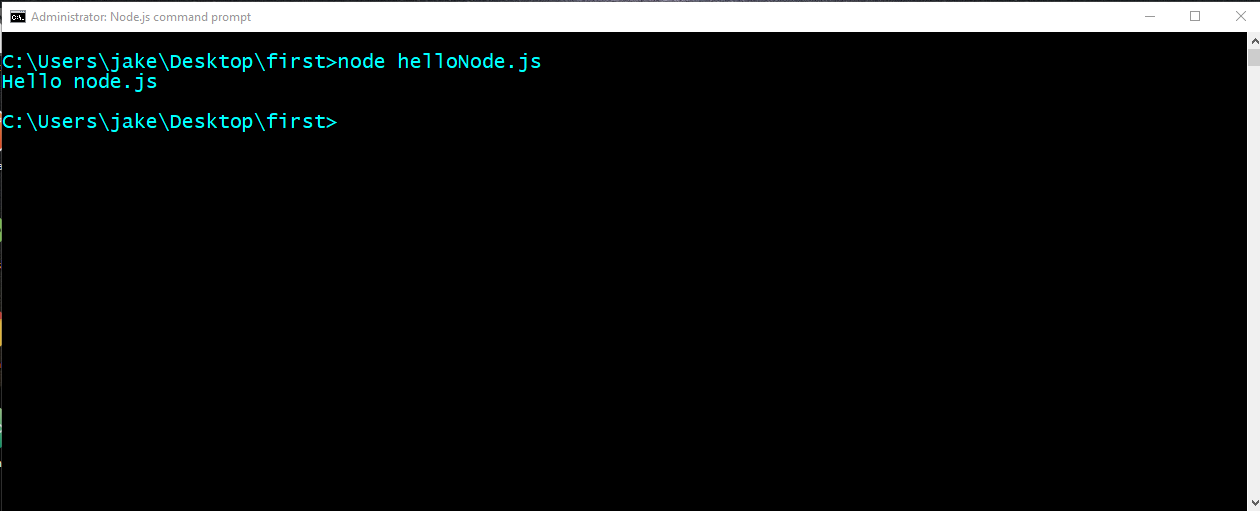
In order to execute a file from top to bottom we need to open our terminal (any terminal will do the job, i use the node.js command prompt here) navigate to the folder where the file we want to execute stands and hit 'node ' and the name of the file we want to execute.
If you do that you will see that the string we wanted to print, has been printed. Success!
You can still put more JavaScript expressions and log statements to see the result!
Show less
Context
Description
No tags specified
Show more
Stability Indexes
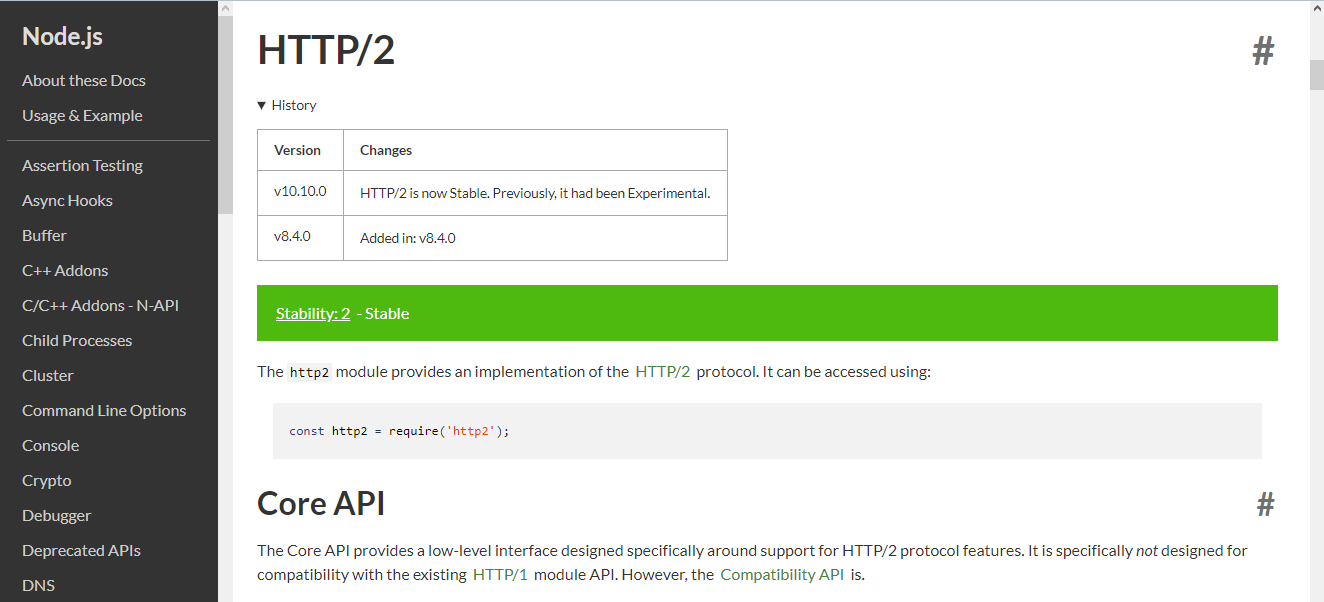
1. When you want to read node.js documentation about a specific feature, node.js provide an easy information about the current status of this feature. The stability index.
This is a number between 0, 1 and 2, that symbolizes how mature the given node.js module is. This is only for the core node.js modules, and not the ones that we download and install externally from NPM (we will talk about the difference later). What do these numbers symbolize then?
0 means deprecated feature and it's usage should be avoided.
1 means experimental. Not fully stable but latest node.js versions should run with it.
2 means stable and it's the safest index to go with.
Additionally, on history section of each core module you can see, when the history of the module's status, the dates the module was included to node.js and the date it became standard (if not yet in experimental) as the picture shows.
Check node.js docs for more here.
Show less
Context
Description
No tags specified
Show more
Process Arguments
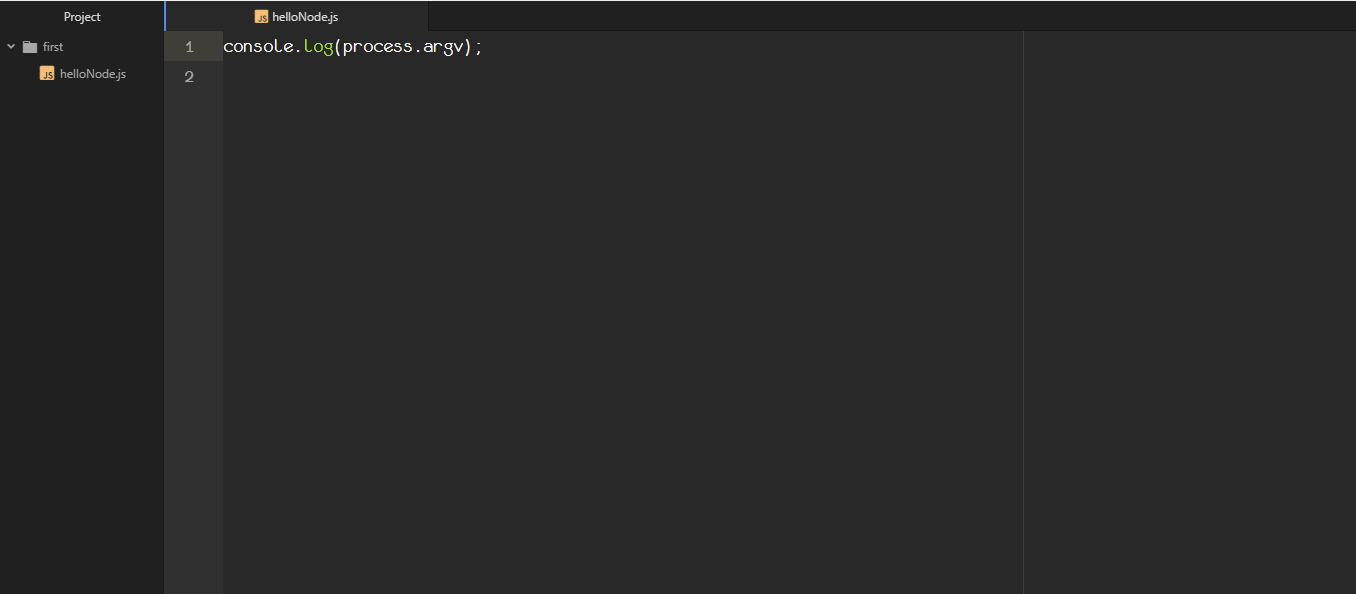
Now let us dive deeper into node.js world. Inside the same file, let's try to write the code above. Execute it again from console. What do you see?
Well what you see is an array with 2 elements. And more specific 2 paths. But what are these? What have we logged to the console? What is this process.argv?
Well, in order to answer this questions we need to understand that every time we execute a node.js script from the command line we initialize a new process, with a unique process id. The process object (you can log it, but it's big) contains all the necessary information the current execution. Information about the process, the memory that is used, in order for this script to be executed and more.
Ok. But then what is this argv array? This stands for argument values. Well it seems that we can parameterize a whole script by passing arguments in command line every time we execute the script. This piece of information will travel inside the file and will be placed wherever the process.argv[given_index_here] is used. Exactly like we can parameterize a function with function arguments, only in this case it's for the whole script.
But now we didn't pass any arguments, right? What are these two values? It seems that node.js has already 2 argument values as defaults. The first one is the path to where the executable file for node.js has been saved to our system, and the second argument is the path to the current executed file. After that we can add more arguments and access them by index array as usual.
Attention: process.argv values inside this array are always in format of string. A conversion must be made inside the script if you want to perform another operation.
Let's see couple of examples.
Show less
Context
Description
No tags specified
Show more
NE-1.process-argv
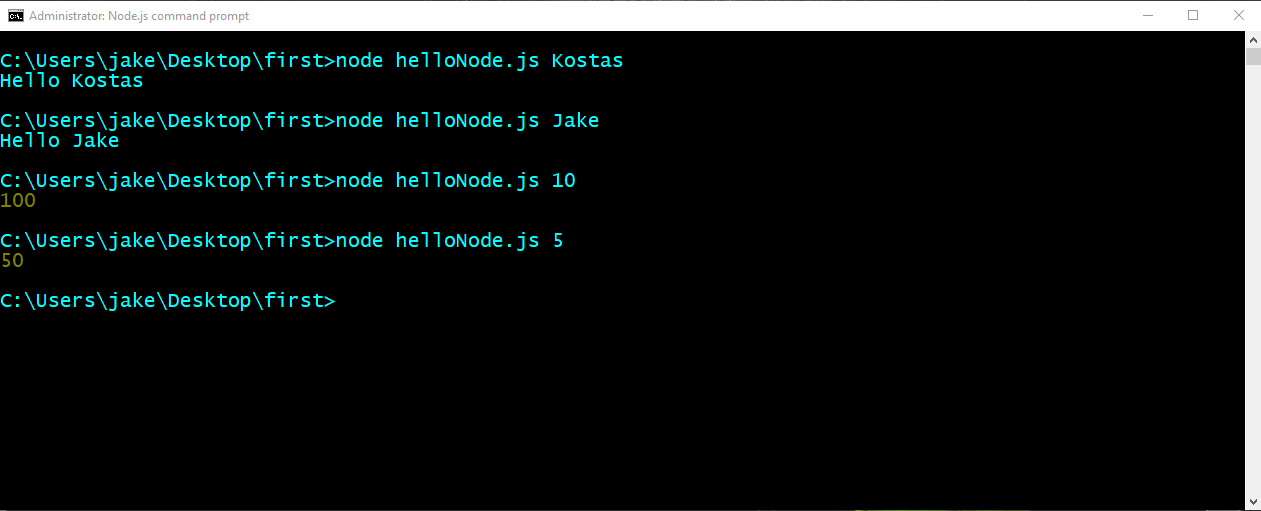
Take a look at the execution attempts from the picture above. There first two executions is one example, and the next two another one. Try to figure out what is happening and have the same results when executing again.
Use the process.argv in order to achieve that.
Show less
Context
Description
No tags specified
Show more
The require function
What if we want to modularize our code. To split our code into separate files, export them and then import them where we want to use them further?
We have seen this concept before with React, right? The answer is yes! The concept is the same, the only difference is the execution context. Now because we are not inside a browser, the way we export and import things change.
Node.js offers a native functionality for this and the ES6 way of importing and exporting will not help us here.
In order to export something we use the module.exports expression and we assign to it whatever we want to export. Syntax looks like following:
// Exported file (let us name it export.js)
const a = 10;
module.exports = a;
// import file (let us name it import.js)
const a = require('../path/to/yourfile/export.js');
console.log(a) // This prints 10
Require here corresponds to WHATEVER the specified file that is passed as a string argument inside the function exports. That means whatever the module.exports of that file exports.
A file can export many things, a function, a number, a boolean , an array or an object. Anything is possible, but if you want to export more than value you have to include them either in an array or an object (most commonly used method the second as we will see later).
Show less
Context
Description
No tags specified
Show more
NE-2.process arguments favorite topic exercise
Create an external json file and name it students.json. This json file should be an array of objects. Each object should contain information about each participant of the class, and more specifically a field with the firstName of the participant, his nationality and his favorite tech subject. The subject could be anything like 'React', 'Node' or more general like 'JavaScript', 'Ruby' and more.
Inside the same folder create another javascript file that will be executed from node.js terminal.
Inside your script file, import at the first line the json file by using the require method you have previously learned.
Write a script that reads the process argument values, this should be the name of the participant, and the script should print to the console the favorite topic of the selected participant.
If the name that was provided as a process argument is not included in any of the objects inside the JSON array, the script should print to the console that 'There is no participant with such name'.
Bonus: Try to find also participants regardless of if you have passed the name in argument UPPERCASE, lowercase or camelCase.
Show less
Context
Description
No tags specified
Show more
Node.js Core modules and the dealing with files
Node.js is not a web framework, but rather a whole execution environment as we have already mentioned before. That means that it contains also modules that deal with files, talk to databases, collect data from microcontrollers and more.
So how is it possible to read and/or write data from and into a file with node.js. The answer is simple. Through the fs core module that Node.js natively provides. All we need to do is to import the module into our script and make use of the function the module provides.
During the next chapters we will focus on the basic functions, reading from a file, writing to a file, the synchronous and the asynchronous way. But then if you would like to learn more (how to rename or delete a file programmatically, change permissions and more) you are very welcomed to read the official node.js fs module documentation (this is for the version 10.16.0).
Show less
Context
Description
No tags specified
Show more
Node.js core modules
The fs module is what we call a core module. That means no prior installation is required as it comes within node.js nature. The only thing we need to do in order to start using it, is to import it on top of our script. Then we can call any function this module contains. For node.js we use the require function to import it as is shown above.
Show less
Context
Description
No tags specified
Show more
Read a file's contents
Now we have imported the fs module, we can work with files. Let's create a .txt file inside the same folder, and fill it with some text and save the file.
We will try to read the contents of this file and log it to the console through node.js.
For that purpose we will use the fs.readFileSync function, which accepts the path of the file as an argument, and then we will log it's contents as it's shown above.
This is the synchronous way, that means that while the execution of the reading is taking place, our whole script is blocked and can't execute further.
Show less
Context
Description
No tags specified
Show more
Reading file's contents async
We can also perform filesystem operations asynchronously, as the fs module gives us this opportunity. So we will write the same code as before, but in this case we are NOT going to block our whole script from going further.
This is very efficient since node.js is a single-threaded runtime environment and there is no possibility to split a script into different threads in order to achieve parallelism and perform multiple tasks simultaneously.
The way we would achieve the same effect with node.js is by performing asynchronous operations whenever possible.
That's why we will use the fs.readFile that normally accepts a callback as a second argument. Now because we don't want to mess with callback hell, or the pyramid of doom we will use the promisified way of these functions through the fs.promises.
Fs.promises is a collection of asynchronous filesystem functions, but instead of implemented with the callback way, the have been wrapped inside promises. So we can use them inside an async/await function as it is shown above.
If you are not sure, regarding the difference between async/await, callbacks and promise.then syntax, then it would be better to read again the asynchronous chapter of the vanillaJS, where these topics are thoroughly explained.
Attention: Async/await and the fs.promises module are stable while we are writing the current lines (for node.js versin 10 and after). Be careful if you are using an older node.js version (before 10, you will have to use the util.promisify module instead of fs.promise) and before node.js version 7.6 the .then syntax in favor of async/await.
Show less
Context
Description
No tags specified
Show more
Writing to a file
Now it is time to write to a file.
We will create a string variable with some text of our choice, and we will try to write the content of this text into an empty file.
First let's remove the previous content from the .txt file. Then after creating the text inside our script we will use the writeFileSync function to write to a file synchronously as it is shown above. When the operation is finished, we can check the content's of the .txt file by opening it. It should have the text you have defined.
A massive success!!
Show less
Context
Description
No tags specified
Show more
Write to a file async
Exactly like we have done with reading the file, we will use the fs.promise module to write to a file asynchronously and don't block our script from further execution. For that we will use the fs.write function of the filesystem and will wrap it as previous into a promise (in order to avoid callback hell) as it is shown above.
Give it a go and test that your file contains what you want.
Show less
Context
Description
No tags specified
Show more
Append to a file
Massive success again! But wait a minute, if you observed really closely, you may have figured out, that the second time the contents of the file overwrote what the file already had from the first time. That means any time we write to a file, we first delete it's contents and we write on a white canvas from the beginning.
But what if i don't want to delete the content the file currently has? What if i just want to add content to the already existing one?
Then instead of the fs.writeFile (or fs.writeFileSync and it's equivalent functions) we use the fs.appendFile (fs.appendFileSync etc) and wrap it into a promise.
This will append the content to the content of the existing file, or it will even create a file from scratch if this file does not exist! Pretty cool uh?
Show less
Context
Description
No tags specified
Show more
NE-3. Read/Write from one file to another
Now it's your time to put into practice all the little things you have learned!
Create a txt (or doc file) with some content, some text. Write a script that reads the contents of this file and pastes it into another .txt file.
For now just writing, and NOT appending it's fine. Since we don't want to have a duplicated content.
Try to do this the non-blocking node.js way with promisifying the fs module's functions, and use the core path module to locate the files.
Show less
Context
Description
No tags specified
Show more
NE-4. Read from a console, write to a file
Well done, now we will make a bit of combination of working with the filesystem, and working with node.js process arguments.
So what you will be asked to do, is write a script that when executed from node.js command line interface, accepts a process argument (more than three if it is more than one words), grabs the text after the `node index.js` and appends it into a file. See the execution example above.
Put every new text in a new line if you can as a small bonus.
Show less
Context
Description
No tags specified
Show more
NPM packages, making requests with Axios
Up to this point we have used only node.js core modules to achieve our goals and accomplish our tasks. But what if we want to do more than simply handling things within the filesystem?
What if we want to get data from another server, connect to a database, store and retrieve information from there, connect to sensors and many many more. Then although it is possible to do everything within the strict node.js core, it will take time and effort, and it doesn't make any sense to reinvent the wheel.
That's why we will use npm registry again to install external packages that will take a lot of development pain away from us. If you don't remember what npm registry is or how to install packages as dependencies, or dev-dependencies you are very welcomed to visit the react.js part and learn more about this there. NPM is the cornerstone of managing JavaScript modules (equivalent to anaconda for python, or the gem store for ruby if you are familiar).
In our next task we will focus on creating a script that makes requests to public api's and brings data from there. Exactly like we did it with the fetch API when we were working on the browser. With node.js we will not use the fetch API though (as it is solely browser oriented solution) but a package that is called axios and can perform many http requests exactly like the fetch, inside and outside the browser.
Then, after we have installed axios package, and imported it into our script, we can start making requests to api's by parameterizing the options of each request (request's method, url endpoint, data to send etc.) exactly like we did with fetch.
If you want to learn more about the axios api and the possible functions it provides, check the docs here.
In our case we will use axios to make a get request to our usual openweathermap api and bring data for a given city. We will use the same url endpoints as when we were working on the weather app during our front end projects. In this case as you can see above, we ask for the current weather and more precisely for the temperature of the day for Hamburg, Germany. Then we print this sliced piece of info to the console.
Piece of cake, right?
Show less
Context
Description
No tags specified
Show more
NE-5. OpenWeather API with process.argv and file writing
OK! Let's try to make a final assessment of what we have learned on all basic node.js skills.
We will try to combine everything in one exercise. You will have to run a script from node.js command line that will be of the form `node index.js rome` and this will bring all the information for the current weather from Rome and will write it (append it) into a new line of a .txt file.
If you run again with another city, then the name of the city and the temperature of it for that day should be written in a new line below the previous one. So the format of your .txt after 5 request to Berlin, Stockholm, Hamburg, Beijing, Tokyo should like like this:
Berlin 15°c
Stockholm 11°c
Hamburg 13°c
Beijing 17°c
Tokyo 9°c
Have fun!
Show less