6431058
Description
Flashcards by John Dedios, updated more than 1 year ago
|
|
Created by John Dedios
over 7 years ago
|
|
| Question | Answer |
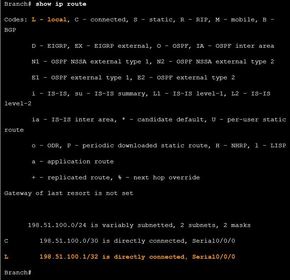
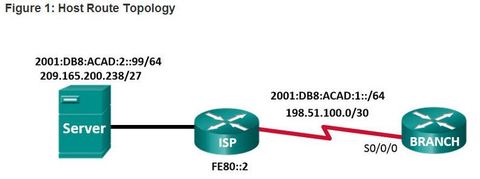
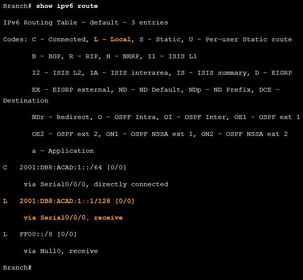
| Automatically Installed Local Host Routes ** A host route is where the destination address is a specific device IP with a subnet mask of /32 for IPv4 or /128 for IPv6. There are three ways a host route can be added to the routing table: - Automatically installed when an IP address is configured on the router - Configured as a static host route - Host route automatically obtained through other methods | Cisco IOS automatically installs a host route, also known as a local host route, when an interface address is configured on the router. A host route allows for a more efficient process for packets that are directed to the router itself, rather than for packet forwarding. This is in addition to the connected route, designated with a C in the routing table for the network address of the interface. When an active interface on a router is configured with an IP address, a local host route is automatically added to the routing table. The local routes are marked with “L” in the output of the routing table. |
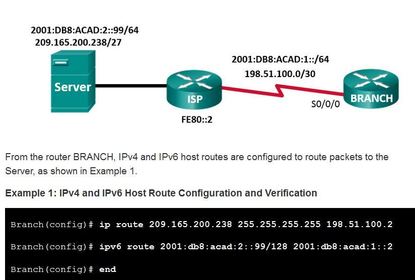
| Manually Configured Host Routes A host route can be a manually configured static route to direct traffic to a specific destination device, such as an authentication server ** The static route uses a destination IP address and a 255.255.255.255 (/32) mask for IPv4 host routes and a /128 prefix length for IPv6 host routes | |
| Manually Configured Host Routes ** For IPv6 static routes, the next-hop address can be the link-local address of the adjacent router. However, you must specify an interface type and an interface number when using a link-local address as the next hop | |
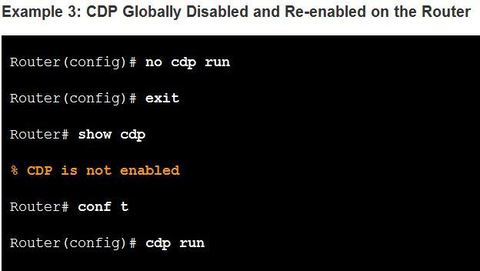
| Configure and Verify CDP Ej: ? to disabled CDP for all the interfaces on the device For Cisco devices, CDP is enabled by default. For security reasons, it may be desirable to disable CDP on a network device globally, or per interface. To enable CDP globally for all the supported interfaces on the device, enter "cdp run" in the global configuration mode. ** To disable CDP on a specific interface, such as the interface facing an ISP, enter no cdp enable in the interface configuration mode. | |
| Configure and Verify CDP Ej: ? To verify the status of CDP and display a list of neighbors Currently, this device does not have any neighbors because it is not physically connected to any devices | |
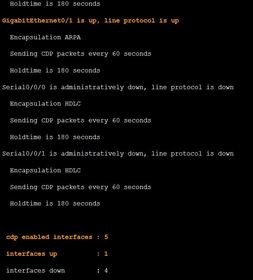
| Configure and Verify CDP Use the "show cdp interface" command to display the interfaces that are CDP enabled on a device. The status of each interface is also displayed. Ej: shows that five interfaces are CDP enabled on the router with only one active connection to another device. | |
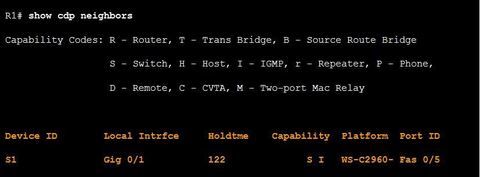
| Discover Devices Using CDP Ej: Port identifier - The name of the local and remote port (Gig 0/1 and Fas 0/5, respectively) - Capabilities list - Whether the device is a router or a switch (S for switch; I for IGMP is beyond scope for this course) | |
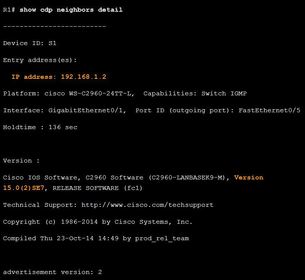
| Discover Devices Using CDP Ej: ? command can also provide information, such as the neighbors’ IOS version and IP address - VTP Management Domain - Native VLAN - Duplex - Management address(es) | |
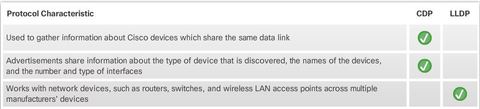
| LLDP ** Cisco devices also support Link Layer Discovery Protocol (LLDP), which is a vendor neutral neighbor discovery protocol similar to CDP. Depending on the device, LLDP may be enabled by default. To enable LLDP globally on a Cisco network device, enter "lldp run" command in the global configuration mode | LLDP works with network devices, such as routers, switches, and wireless LAN access points. This protocol advertises its identity and capabilities to other devices and receives the information from a physically connected Layer 2 device. |
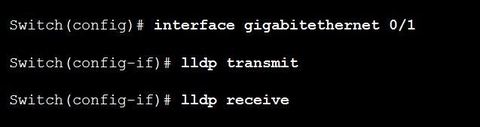
| Configure and Verify LLDP Ej: Similar to CDP, LLDP can be configured on specific interfaces. However, LLDP must be configured separately to transmit and receive LLDP packets; "no lldp run" interface commnand "show lldp" | |
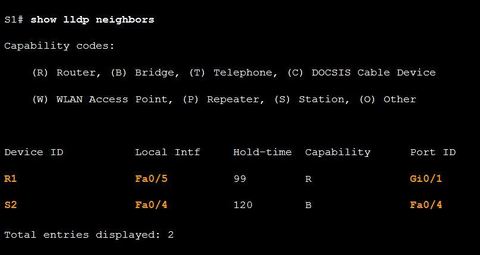
| Discover Devices Using LLDP Ej: With LLDP enabled, device neighbors can be discovered using the xxx command The letter B under capability for S2 represents a Bridge. For this output, the word bridge can also mean switch. "show lldp neighbors detail" | |
| Setting the System Clock When the time is not synchronized between devices, it will be impossible to determine the order of the events and the cause of an event. Typically, the date and time settings on a router or switch can be set using one of two methods: 1. Manually configure the date and time 2. Configure the Network Time Protocol (NTP) | 2. Ej: R1# clock set 20:36:00 dec 11 2015 Even in a small network environment, the manual method is not ideal. If a router reboots, how will it get an accurate date and timestamp? 2. NTP - allows routers on the network to synchronize their time settings with an NTP server. A group of NTP clients that obtain time and date information from a single source have more consistent time settings |
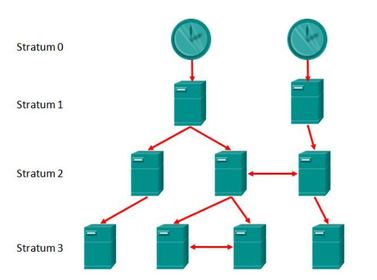
| NTP Operation Each level in this hierarchical system is called a stratum. The stratum level is defined as the number of hop counts from the authoritative source. Smaller stratum numbers indicate that the server is closer to the authorized time source than larger stratum numbers. The larger the stratum number, the lower the stratum level. ** The max hop count is 15. Stratum 16, the lowest stratum level, indicates that a device is unsynchronized. Time servers on the same stratum level can be configured to act as a peer with other time servers on the same stratum level for backup or verification of time. | |
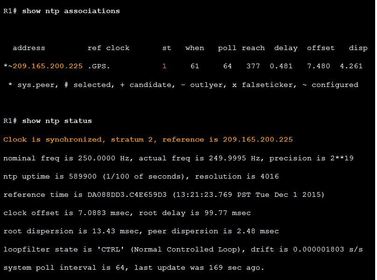
| Configure and Verify NTP Ej: ? command displays the current time on the software clock and the time source is also displayed Ej: the software clock has been manually configured. "ntp server (ip-address) " | |
| Configure and Verify NTP Ej: ? commands to verify that R1 is synchronized with the NTP server at 209.165.200.225 Notice that R1 is synchronized with a stratum 1 NTP server at 209.165.200.225, which is synchronized with a GPS clock. R1 is now a stratum 2 device synchronized with the NTP server at 209.165.220.225. | |
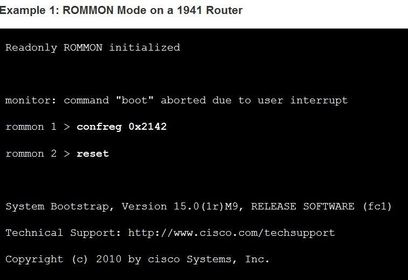
| Password Recovery Passwords on devices are used to prevent unauthorized access. For encrypted passwords, such as the enable secret passwords, the passwords must be replaced after recovery. Depending on the device, the detailed procedure for password recovery varies; however, all the password recovery procedures follow the same principle: | Step 1. Enter the ROMMON mode. Step 2. Change the configuration register to 0x2142 to ignore the startup config file. Step 3. Make necessary changes to the original startup config file. Step 4. Save the new configuration. |
| Password Recovery Console access to the device through a terminal or terminal emulator software on a PC is required for password recovery. The terminal settings to access the device are: - 9600 baud rate - No parity - 8 data bits - 1 stop bit - No flow control | ** With console access, a user can access the ROMMON mode by using a break sequence during the boot up process or removing the external flash memory when the device is powered off. Note: The break sequence for PuTTY is Ctrl+Break. A list of standard break key sequences for other terminal emulators and operating systems can be found at: http://www.cisco.com/c/en/us/support/docs/routers/10000-series-routers/12818-61.html |
| Password Recovery The ROMMON software supports some basic commands, such as confreg. The confreg 0x2142 command allows the user to set the configuration register to 0x2142. With the configuration register at 0x2142, the device will ignore the startup config file during startup. The startup config file is where the forgotten passwords are stored. After setting the configuration register to 0x2142, type reset at the prompt to restart the device. Enter the break sequence while the device is rebooting and decompressing the IOS. | |
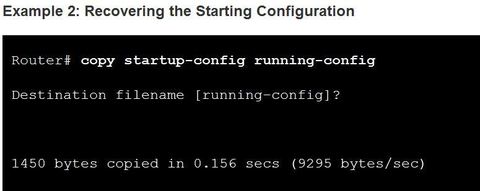
| Password Recovery Ej: After the device has finished reloading, copy the startup-config to running-config CAUTION: Do not enter "copy running-config startup-config" This command erases your original startup configuration. | |
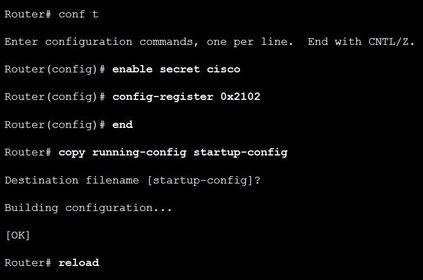
| Password Recovery Because you are in privileged EXEC mode, you can now configure all the necessary passwords. After the new passwords are configured, change the configuration register back to 0x2102 using the "config-register 0x2102" command in the global configuration mode. Save the running-config to startup-config and reload the device The device now uses the newly configured passwords for authentication. Be sure to use show commands to verify that all the configurations are still in place |
Want to create your own Flashcards for free with GoConqr? Learn more.