Description
|
|
Created by Christine Su
over 9 years ago
|
|
Page 1
Examination Techniques (4):1. Inspection2. Palpation3. Percussion4. Auscultation
Inspection:The process of concentrated watching.What do you do?- Starts from when you first see pt until they leave- Go slowly- Systematic approach to provide frameworkWhat do you need?- Adequate lighting- Ask them to undress if you need them to
What do you inspect?- Body build - Nutrition state - Gross deformity- Posture- Hygiene/Grooming - Cleanliness - Body Odors - Appropriate dress (gives us idea of socioeconomic status)- Gait - Coordination of mvmt and balance- Signs of illness - Pain or distress - Breathing patterns- Affect, Attitude, Mood (listen and watch)- Cognitive Function (making sense, converse with the patient)
Palpation:Examination through touchingWhat are you trying to find out?- Texture- Temperature- Moisture- Organ location and size- Pressing on them - tenderness or pain?- Vibration or pulsation (e.g. heart)- Rigidity or spasticity- Crepitation - crackling or rattling sound- Cogwheeling - difficult to move joints around- Are there lumps or masses?- Swelling
Hand Surfaces you can use to palpate:1. Fingertips2. Grasping with thump and finger3. Dorsal Surface (back of hand)4. Metacarpophalangeal Joints and Ulnar Surface (side of hand with pinky)1. What are fingertips used for? - Fine tactile discrimination like: - skin texture - swelling - pulsation - lumps2. Grasping? - Shape - Consistency - (squishy, hard) - Movability3. Back of hand? - Temperature (qualitative)4. Side of hand (pinky) - can tell vibrations - heart murmurs can be so loud that can cause vib
Different palpation techniques:Light palpationDeep palpationBimanual palpation1. Light palpation: Depth: 1 cm Push down to level of abs Circular motion Before deep palpation Can be done with one hand Feeling skin and underneath 2. Deep palpation: Depth: 4 cm Palpate organs or masses Get underneath abs Two hands One time in each 4 quadrant (divide abs into four) Uncomfortable for patient which is necessary 3. Bimanual palpation: Both hands used to enclose the body part or organ being examined Used to palpate: Kidneys Spleen Uterus
Percussion:Tapping on patient's skin to assess the structures underneathWhat are you looking for through percussing?- Find location of organ by finding borders- Determining the density of a structure
Techniques of percussion:Direct percussionStriking the finger or hand directly against the bodyIndirect percussion Use non-dominant hand for stability against body with fingers slightly spread Place distal phalanx of middle finger firmly on the body surface (finger pad) Make sure other fingers don't touch body, just the middle finger Snap the wrist of your hammer hand (dominant hand) downward onto tip of middle finger Tap should be sharp and rapid so you don't dampen the sound
What are some Common Percussion Errors?- Not enough pressure with finger placed on body- Wrist is not snapping motion- Not moving whole hand while tapping- Striking with finger pad of hammer instead of fingertip
Percussion Sounds:TympanicHyperresonantResonantDullFlatDescriptions of the percussion sounds:Hyperresonant- Very loud- Low-pitched- Long duration- Boom-like- Indicates emphysema (hyperinflation of lung)Tympanic- Loud- High-pitched- Moderate duration- Drum-like- Indicates Gastric BubbleResonant- Loud- Low-pitched- Long duration- Hollow- Indicates normal lungFlat- Moderate intensity- High-pitched- Short- Very dull quality- Muscle (dense)Dull- Soft-moderate intensity- Moderate-high pitched- Moderate duration- Thud-like- Indicates liver or spleen
Auscultation:Listening to sounds produced by the body, most often with a stethoscope
Process of auscultation:- Need quiet environment- Place stethoscope on naked skin- Listen for characteristics of sounds (intensity, pitch, duration, quality)- Close your eyes to focus- Practice isolating sounds- Want entire diaphragm placed against skin (flat)
Parts of Acoustic Stethoscope:- Closed cylinder that transmits sound waves from the source to the ear (no amplification)- Ear pieces occludes meatus (outer ear)- When held away from you, ear pieces should fit groove of nose to project sound to tympanic membrane- Tubing 12-18 inches- Diaphragm - high pitched sounds- Bell - low pitched soundsChest piece:if one sided:lay against body lightly to get low soundPush firmly turns into diaphragm
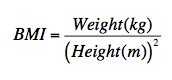
Body Stature:Measurements:- Height- Weight- Body Mass Index (BMI)
Height and weight does not distinguish between fat & muscleBMI does: BMI = wt (kg)/ ht^2 (m)
What BMI indicates:18.5 - 24.925.0-29.930.0 - 39.940+
underweightnormaloverweightobeseextremely obese
WHO Categoryunderweightnormaloverweightclass I obesity (30.0-34.9)class II obesity (35.0 - 39.9)class III obesity (40+)
Waist-to-hip Ratio:Waist - smallest circumference below rib cage and above iliac crestHip - largest circumference of the buttW:H Ratio predicting increased risk for obesity-related disease and early mortality:Men - 1Women - 0.8
Body Fat %:Procedures:- Skin fold (intra-abdominal fat)- Bioelectrical impedance analysis (takes amount of water there is in your body to figure out how much fat is there too)
DescriptionEssential FatAthletesFitnessAverageObese
Women10-13%14-20%25-31%25-31%+32%
Men2-5%6-13%18-24%18-24%+25%
Measuring Vital Signs:- Radial Pulse- Respiratory Rate- Temperature- Blood Pressure
Radial Pulse:- On the thumb side of wrist (peripheral measurement of HR)- What is normal? - 60-100 bpmTechnique:- Use pads of 2nd & 3rd fingers- Palpate radial pulse on thumb side of wrist- Count at least 30 seconds- Light/medium pressureLook for:- Rhythm- Amplitude (how strong pulse is)
Respiratory Rate:- Number of ins/exp cycles per min- Do not tell the patient when you are doing this
AgeNeonate1 year2 years8-10 years12-14 years16 yearsAdult
Normal Resp. Rate30-4020-4025-3220-2618-2212-2012-20
Temperature:What temperature does your body need?37.2 C (99 F) in the coreTake peripheral temperatures - close to core, hotter the temperatureDiurnal cycle of 1-1.5 degrees F- low in morning- high in late afternoon or early eveningWomen ovulation to menses:- Rise in temp 0.5-1 degree FWhat increases your temperature?- Moderate/hard exercise- FeverVariations occur in infants and young children because they have less effective heat regulation.Same with elders bc less capacity to vent heat.Temperature lower in adults (~ 36.2 C/97.2 F)
Sites to measure temperature:Oral: (37/98.6)- posterior sublingual pockets underneath tongue- keep lips closed- wait 15 minutes if patient drank something hot or coldRectal: (37.5/99.5)- Uncommon, last resort- Comatose/confused, shock, unable to close mouth- Lubricate- 1 inch is enoughTympanic Membrane and Temporal Artery: (37.5/99.5)- same vascular supply as hypothalamus- Hypothalamus regulates temp- Uses infrared sensorsAxilla: (36.5/97.7)- Armpit- Common, but not accurate or precise- Place arm firmly against side
Fever:- add 0.5 C to normal- add 0.9 F to normal
Types of Thermometers:- Glass Mercury- Electronic- Tympanic- Temporal
Comparing Thermometers:Mercury:- Sterilize/disposable sheath- Mercury can be broken- Slow (3-4 minutes to read)- Get mercury down to 95 F firstElectronic:- Oral, axillary, rectal- Disposable tip/sheathTympanic:- ear- senses infrared emissions of tympanic membranes- shares same vascular supply as hypothalamusTemporal:- infrared- use temporal artery on forehead- clean with alcohol wipe before use- easy to clean, no mucous membrane
Temporal Artery How-To:Scan Across forehead in straight line (close to forehead)Pick it up, scan below ear between mandible and sternocleidomastoidThermometer will find highest temp.- Forehead accessible/accurate- Forehead diaphoresis (sweating) causes: - Vasodilation - Low temperature (inaccurate)- Area behind earlobe last to sweat- Earlobe only accurate with 100% vasodilation
Measuring Blood Pressure:Blood pressure is the force of the blood pushing against vessel wall.SBP - systolic - max pressure during ventricular contractionDBP - diastolic - min pressure during ventricular fillingPulse Pressure: the difference between systolic and diastolic pressures- representative of stroke volume (how much blood in a contraction)MAP (mean arterial pressure):MAP is the pressure forcing blood into the tissues, averaged over cardiac cycle (taking into account SBP and DBP). Minimum MAP to successfully perfuse organs: 60MAP = [(2 x DBP) + SBP]/3
What affects blood pressure?- Cardiac Output- Vessel wall resistance- Blood volume- Elasticity of vessels (calcifications)- Viscosity of blood (thickness may be due to increased platelets)
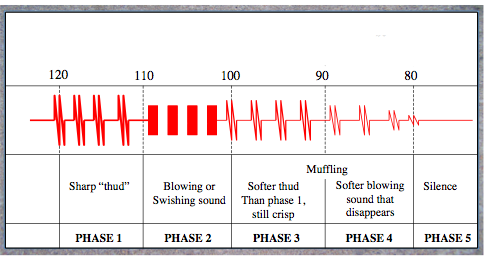
Procedure:Blow up bladder to create tourniquet (cut off blood flow)Hear auscultatory sounds during turbulent flowFirst sound is SBPLast sound is DBP- Palpate brachial artery- Antecubital crease - place bladder 2-3 cm above over brachial artery- pump 20-30 mmHg above palpable SBP- slowly deflate and listen for Korotkoff Sounds I and V (2-3 mmHg/sec)How to record:- body position- which arm?- cuff size
Cuff Size:Adultswidth: 40% of mid-upper arm circumferencelength: encircle 80% of armChildren:width: 2/3 of mid-upper armlength: 100% encircle
What happens if wrong cuff size?Too large: underestimate bpToo small: overestimate bp
Patient Prep:- No smoking/caffeine 30 min prior- Rest for at least 5 min- Feet flat on floor- Back supported- Arm slightly flexed, supported at heart level
What is auscultatory gap?In some patients (mostly older), you cannot hear pulse between phases 1 & 2, which can be dangerous because the bp measurement would be a lot lower than it really is.Auscultatory gap is caused by systolic hypertension or sever aortic regurgitation.So, take a palpable systolic first. Can still feel, even though can't hear.Feel brachial or radial pulse and find the place where you can't feel the pulse anymore and pump it up 20-30 mmHg higher. Then feel for the first pulse (SBP) and then immediately deflate.
Measure bp in both arms and take the higher measurement.Do both arms twice until you get 5 mm Hg reading. Wait 30-60 seconds between readings. Average the measurements.
Why can't I hear sounds?- wrong placement of steth- steth diaphragm not flat- venous engorgementSolutions:- raise arm while inflate, lower when listening for bp- inflate cuff, pt makes a fist a few times, then listen for bp
Orthostatic hypotension:SBP DBP when stand upCaused by: beta blockers, diuretics, loss of vol (blood donation), laying too long
White coat htn:10-20% pts
EXAMINATION TECHNIQUES AND VITAL SIGNS
Want to create your own Notes for free with GoConqr? Learn more.