74469
16.d Redux

Description
No tags specified
Module Information
Description
No tags specified
Show more
Course's Objectives
1. The learner understands why redux exists and the problem that it solves.
2. The learner understands how redux works and it's lifecycle. Also understands which purpose all the different parts fulfill (the store, the reducer, the actions and how to dispatch).
3. The learner knows methods, for never mutating the state, and create a safe copy before change something to it.
4. The learner learns how to connect redux with an existing react application, by using the react-redux module.
5. The learner understands how to wrap all components under the same shelter, by creating a store and using it under the Provider component.
6. The learner learns how to map local component's props to state variables, in order to have everything centralized and globalized, by using the connect function and it's arguments.
Show less
Context
Description
No tags specified
Show more
What is Redux?
Redux is a software that manages state in a centralized way.
Think a little bit how state is managed in React. Every component is subscribed to it's own local state. But what if we want to pass some values from one's component state to another component?
We would do that through props as we saw in React core module. What if we want to continue passing these values on level more down? Then we would do it again with props and again.
That means, even before we start composing our components, we need to take care about the hierarchy and which component is going to be at the top of the pyramid, and which are going to go to bottom levels. Furthermore, if a change of state occurs in one component at the bottom levels, there is no way that this info will travel directly to it's siblings components, without first passing from the top of the pyramid or a common parent component at least. This can be very difficult to maintain or to structure beforehand.
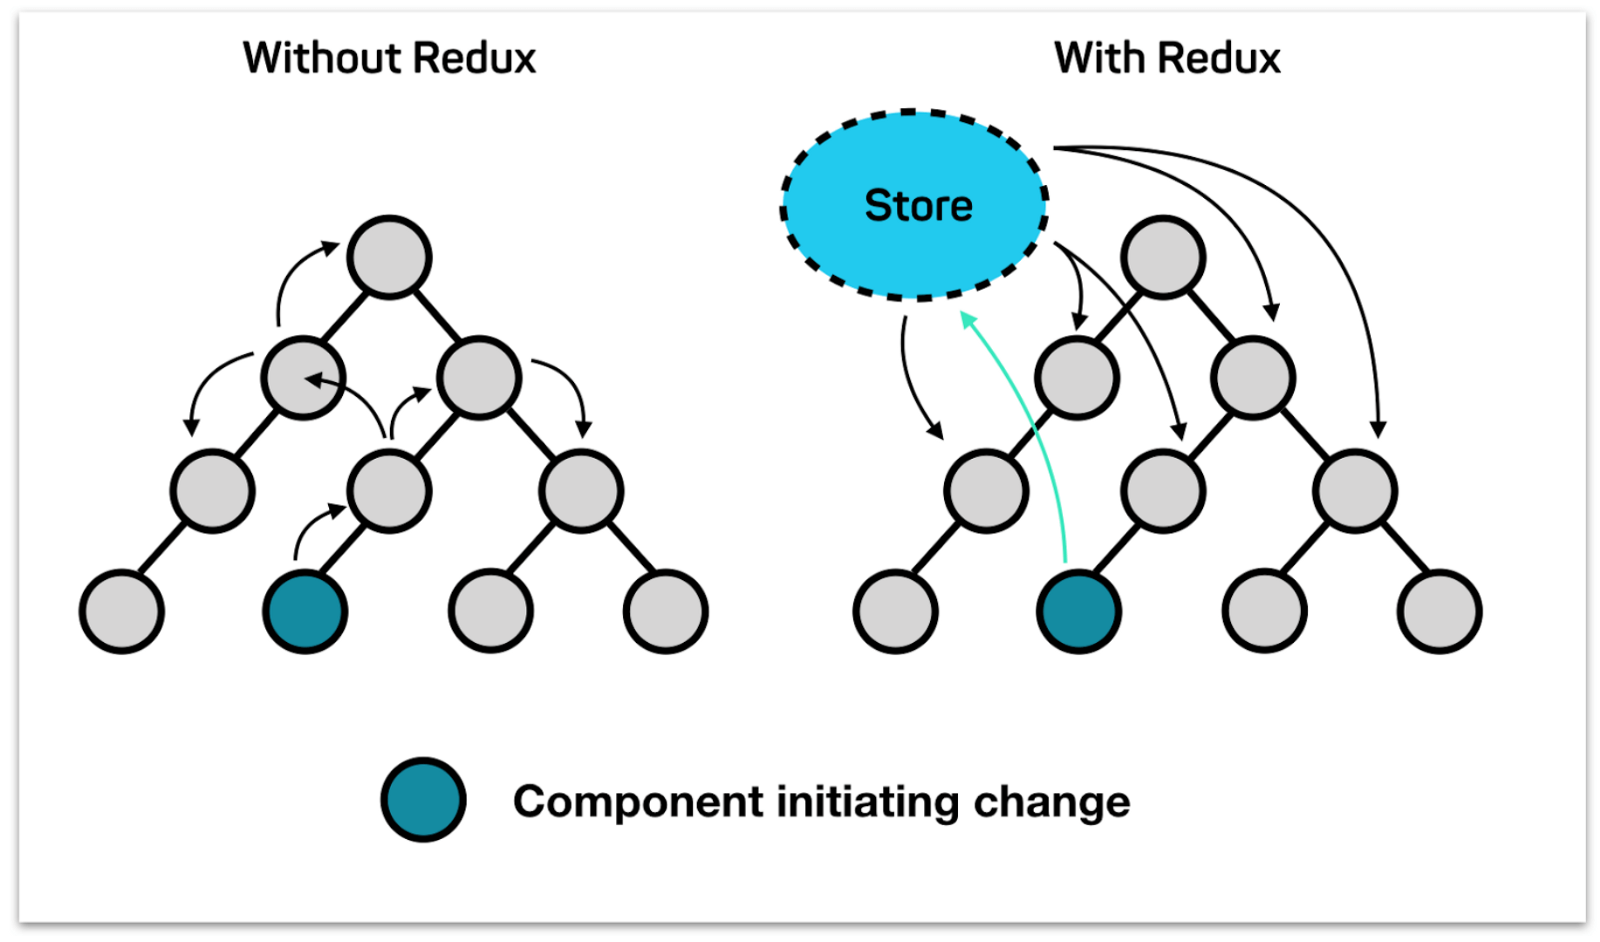
This is where redux comes to the rescue! Redux offers a centralized (or global) place where the state of the whole application will be stored. Then all the components can have direct access to this state without intermediate components to interfere. Exactly like the second schema on the right side above depicts.
When a change in one component occurs, this updates the central state, and automatically all the components who subscribe to this central state get updated.
Let's see how Redux works from inside though.
Show less
Context
Description
No tags specified
Show more
Redux abstracted example
Let's see an example and try to understand how redux works under the hood.
Imagine there is a 4-member family. And they have a common balance (a cashier were they store money). The balance holds the money.
There are two types of actions that can be made, either a deposit to the balance, so to put some money there, or a withdraw, to get some money out of the balance.
The family has trusted the father to listen to these two actions and actually perform them. Attention: The father's only job is to manage these actions, he is not capable to decide that a deposit should be made though! Only the mother, the son and the daughter can decide that either a deposit or a withdraw should be made.
Then they just inform the father, that he must execute unquestioningly the corresponding action. He is like the bank manager, and the other three are the clients.
At the end though he is the person who puts the money, or takes the money off the balance.
Once the balance is updated, all the people who have subscribed to it (that means who have access to it) like the mother, the son and the daughter they can see the updated balance (or the updated state if you prefer).
Now how is this related to Redux? Let's see a slide further.
Show less
Flowchart
An abstracted example about how redux basic inner cycle
Context
Description
No tags specified
Show more
A Redux Overview
So let's take a look at the schema above. Actually as a shape of operations described, nothing changes. Let's analyze one by one the metaphors we used and how they apply to the redux's functionality.
Instead of the balance, we have the actual state. This is centralized and it can contain more than one variables and their respective values (in form of an object or array eventually). These values when changed produce an updated state.
The state, that is centralized now with redux, can be changed only by the reducer function (the father before). The reducer is a function that decides which part of state should be updated and how every time it receives an action triggered by some component.
The components trigger these actions (via a click of a button or submit of a form or any other type of event), and then, they have to inform the reducer, that this action should be made. That means that this action should be dispatched accordingly.
Once the state has been updated by the reducer, the components who subscribe to the state, receive the updated values of the state, and they depict it.
This is all good theory until now. But how can we actually implement this functionality with redux? Let's find out.
Show less
Flowchart
An abstracted example about how redux basic inner cycle
Context
Description
No tags specified
Show more
First Steps and creating the Redux Store
So in our example, we will try to write the code for accomplishing the family balance example we had before.
At this point you must learn that redux is not strictly connected with react or with any other framework for that matter. Is completely an independent software.
For our example now, we will focus solely on redux and how redux works apart from react. This will make us understand it's core basics really easier and faster. The main functionality of redux can be applied later alongside with any framework of our choice.
Later on, we will implement the same example by using react as a framework and redux as a state management and we will connect the two of them. But for now let's focus solely on Redux and execute it from node.js.
Create a new project folder, and initialize an npm repository there.
Then install redux by typing: npm install --save redux
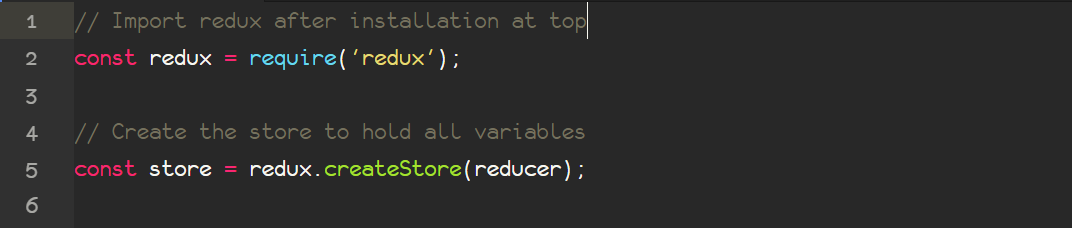
After you have installed it's time to create our only file named redux.js and import redux with the node.js style at the top of it.
The first thing we need to do, is to actually create a redux store. This is going to be the place that will hold, not only the state, but also the functionality for changing and updating the state, the necessary actions that will have to be dispatched and many more.
We create a new store by using the redux's createStore function that accepts one parameter. This is going to be the reducer function (or the manager, or the father in our case) as it shown above.
The next step is to actually implement the reducer function, but for now we will take a step aside and we will create the actions. Later we will implement the reducer function.
Show less
Context
Description
No tags specified
Show more
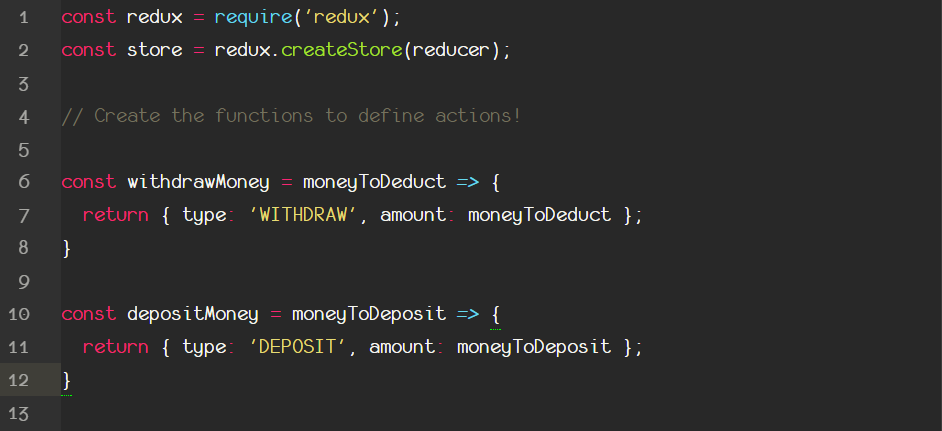
Let's create some actions
Let's create some actions. Until now we now, that there are two types of operations we would like to happen. The deposit action, and the withdraw action.
Actions are actually objects that are returned from functions. These functions can be called whenever we want and we can associate them with an event (click of a mouse etc). But for now as you can see above they return always an object with a type property that accepts a string, and additional properties that represent values of data that will be passed to the reducer.
In our case, think that the type property is a mandatory property because the reducer (the father or the manager) must somehow recognize which type of operation it must execute. This piece of info it is stored in a form of a string inside the type property of an action object. The other properties are optional, but in this case we would like also to pass not only the name of the action that should be dispatched but also the amount of money that should be either deducted from the balance (state) or added there.
Show less
Context
Description
No tags specified
Show more
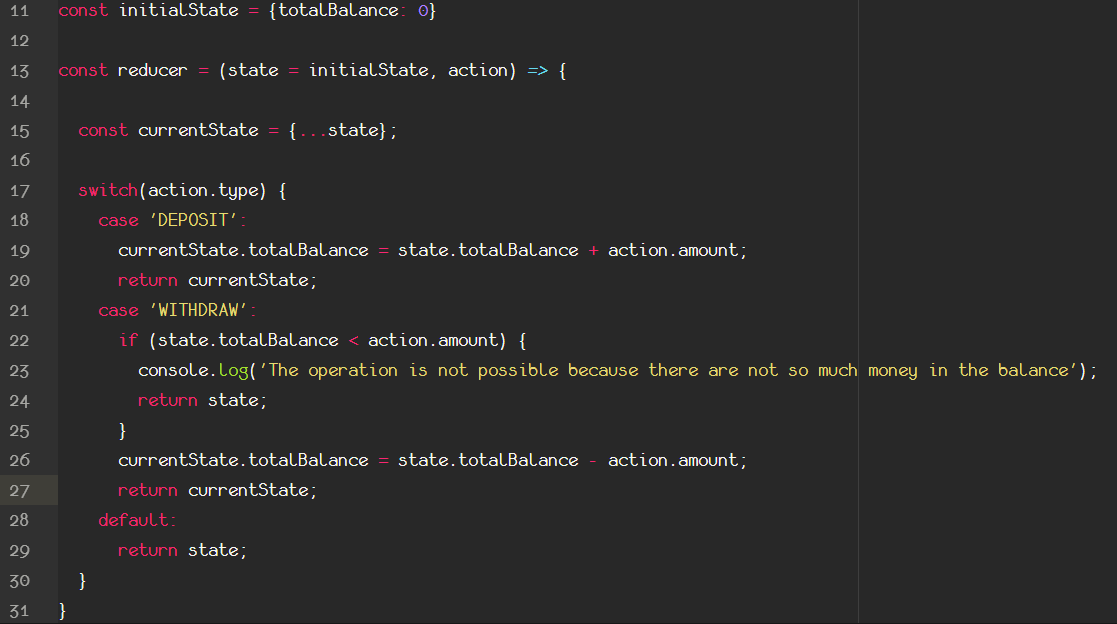
The reducer function and state initialize
Then since we have already created our store, and our actions, it is time to create the state, the balance in our example.
For now this will hold only a single value, but it can possibly hold as many as we want. So after our actions in our script we will initialize our state. These are going to be the initial values of state. We want to set our balance cashier of the family to 0$. So it is completely empty at the beginning. And we do this at line 12. You can name the variable as you like.
But then, later we create our reducer function. This function, can accept many different actions and it is responsible to execute them accordingly. As you can see above, reducer (it has to be named like that, because this is how we passed it as an argument inside the createStore function), accepts two mandatory arguments. The one is the state, because the reducer's job is to perform operations on state, and the other is the action, because the reducer must know somehow what has to be done on state (deposit or withdraw?).
So as a first argument, we pass a default value, which is the already initialized state 2 lines above. Then we implement a switch-case pattern, to execute different code depending of the type property of the triggered action.
Remember! The action object is passed as a second parameter, and we check the type property to execute accordingly. In both cases we use the amount property either to deduct or to add to the current state.
The reducer at ALL CASES must return the updated state at the end of it.
Attention: Since this is ready, place the line of code where you create the actual store, AFTER the definition of the reducer function. That's because the reducer it is used inside the createStore and it has to be defined before thus.
In the case of deduction (or withdraw) we have also implemented a small bonus task, to prevent someone to withdraw more money than they exist.
Attention again: Don't forget to add a default case, where the state is just returned. This will be executed when the action's type was not recognized.
Show less
Context
Description
No tags specified
Show more
Don't mutate state
All this is good, and now we have a fully functional reducer function that listens to actions and performs accordingly.
But wait a minute, what exactly is happening at line 16? What is this currentState variable and why do we use this all the time and not the state variable which we have defined as an argument?
Well, to keep it simply and to make a long story short, redux suggests NOT to make alterations, changes or modifications directly on change, but better to create a copy of it, make the changes there, and then return this new updated state! This technique is called not mutating the state, so not directly affect it. Redux will have unexpected results if you try to change values directly in state, and sometimes you will not get the values of the updated state but of the previous one!
Thus we use the spread operator, in order to create a fresh brand new state object, but with the same properties and values of the previous state. Then, and since the new currentState object points to a completely difference place in system's memory, we safely change anything we want there, and return this object. Once this object is returned, this is going to be the state object for the next time the reducer function will be called to it's job.
But how exactly can we call the reducer function and actually connect it with the actions functions?
Let's find out.
Show less
Context
Description
No tags specified
Show more
Dispatching Actions
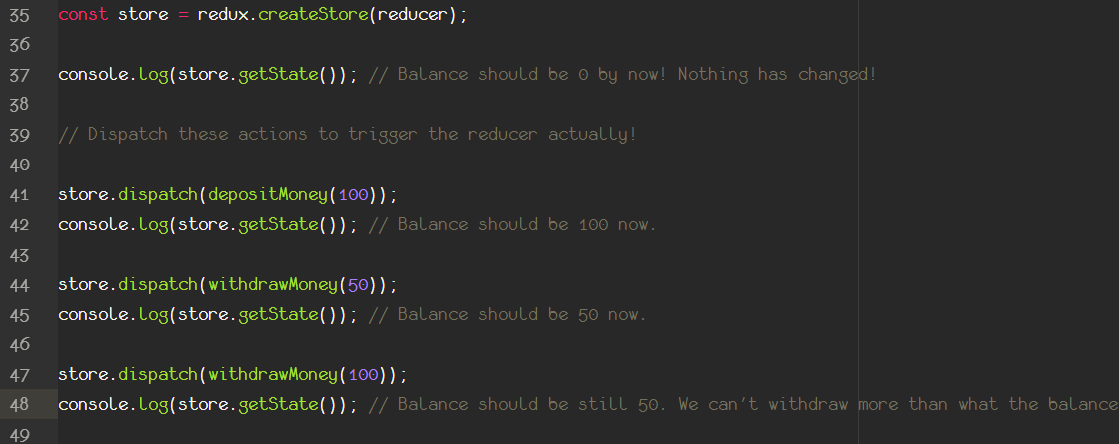
Before actually dispatch and apply withdraw or deposit actions, let's take a look at how we can see the current state of our application and it's values.
This can be done by using the getState() function that is provided from our store. This has access to the state that is returned lately by the reducer function of this store.
If you console.log(store.getState()) at the bottom of your script you will probably be able to see an object with a property of currentBalance set to 0 like that:
{currentBalance: 0}
Then after that line, we will actually call the action functions we created. Now normally this is not something that in a real case scenario you would like to do it manually, but you will want to associate it with an event (like a mouse click, a hover, a scroll event etc). But for now we will just do it manually by calling the action.
How? Just by wrapping the action's function name inside the store's dispatch method as shown above. The dispatch method connects the action function that is passed as an argument with the store and it's reducer. Then the type of the action is passed (alongside with the amount of money in this case) and the reducer finds the corresponding code inside it's own switch-case to execute the corresponding code.
Now after every dispatch, if you console.log and get the current state you can see the values of the state and of the currentBalance change accordingly!
You made it!
Show less
Context
Description
No tags specified
Show more
Subscribe function
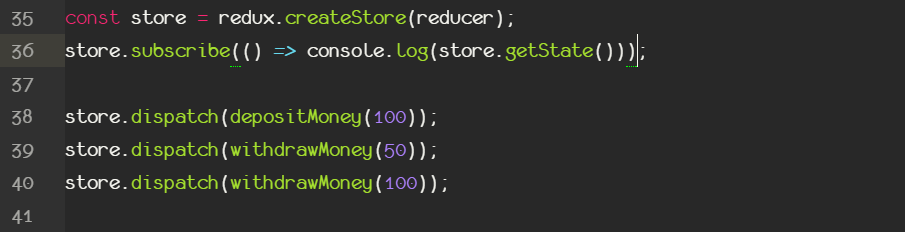
What you have done is already impressive, but it can get a little bit better or more efficient to be more accurate.
If you notice, after every dispatch, we want to take a look and see what the current state is, thus we print it the console. If you want something to happen after every dispatch is triggered, you can create a hook, by using the stores subscribe method.
As shown above the subscribe method of a store accepts a callback function that will be executed any time a dispatch method of the same store is called, immediately after it.
Important note: You must define the subscribe BEFORE any dispatch, in order to see everything. The subscribe's callback will be executed every time a dispatch method, that has been defined AFTER subscription, is called. The previous ones will be ignored.
Show less
Context
Description
No tags specified
Show more
The react-redux library
Now it's time to make these things actually matter and put them into practice! It's time to connect redux with a react application and components.
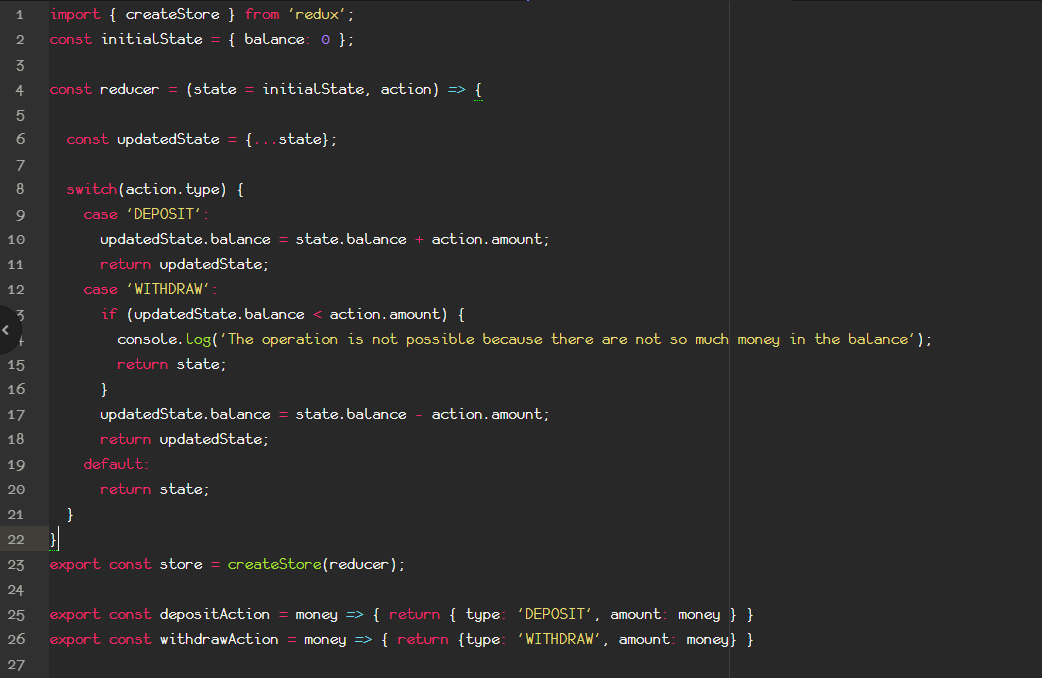
Well actually we will do exactly the same as before, but now with react.
In a new folder use the create-react-app script in order to generate a react application. After pruning and cutting or deleting the unnecessary code, start by creating a file inside our src folder, named redux.js.
We need first to install 2 packages, redux and react-redux which is the module that connects redux state management's functionality with react components. Do it from NPM.
This is going to be the place where we again create our store, with tons of similarities as before but also some differences. Let's take a look.
First of all we need to import the createStore function from redux the ES6 way (no node.js require method is applied here, this is going to be executed by the browser remember!).
Other than that all the other aspects remain the same!
We initialize state, we pass it as a default parameter to our reducer function that accepts couple of actions and executes accordingly, by updating the state. We make a copy of the state on top of the reducer and we always return a state after each case.
Directly after we create our store, by using the imported createStore function, and passing the fresh created reduce function as the only parameter.
As usually at last we define couple of action creators functions, that return an object with the type parameter and the deposit amount, or the withdraw amount respectively.
We don't need to make dispatch here, as these functions will be executed directly from a react component on a click event. We will see how later.
Show less
Context
Description
No tags specified
Show more
The Provider Component
Our goal is to have a heading that depicts the actual balance, and two buttons that for now the will make a deposit of 50 dollars, or a withdraw of 50 dollars. And we will use redux for that. Every button will be in a different component and the heading will be on a component on it's own.
So all components will directly connect with the state object in the redux.js file and make changes there, and the heading will pull any changes. How? Let's see.
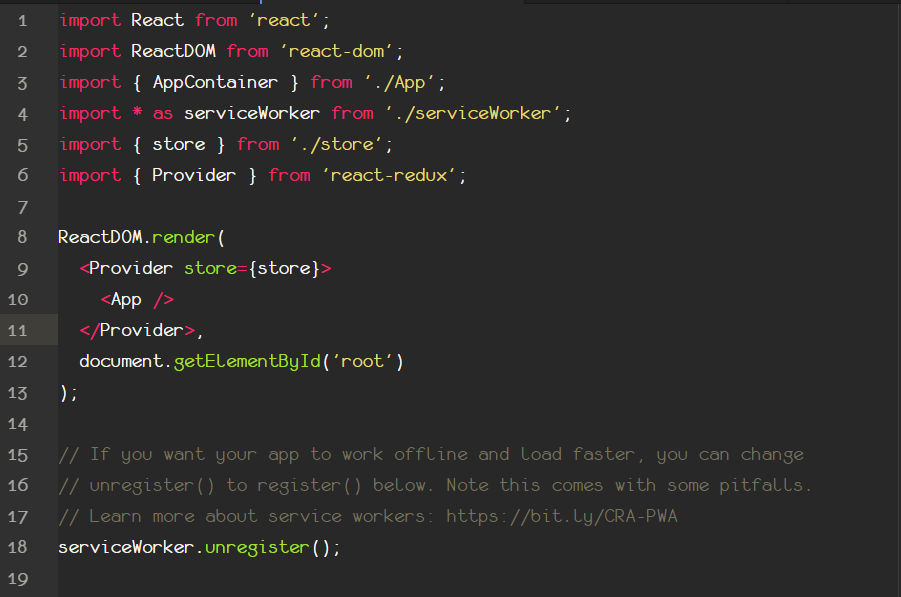
First of all we need to wrap all of our application components under the same shelter. And to define that all of them from now they will have a centralized state. Thus, we need to go to our index.js file and inside the ReactDOM.render function to wrap the <App /> component, with the <Provider /> component.
The Provider component, comes from the react-redux module and accepts a prop named store, we set this equal to the store variable we have created from the redux.js file (export it from there, and import it to the index.js) exactly as shown above.
At the end, your index.js file should look something like the code above.
Show less
Context
Description
No tags specified
Show more
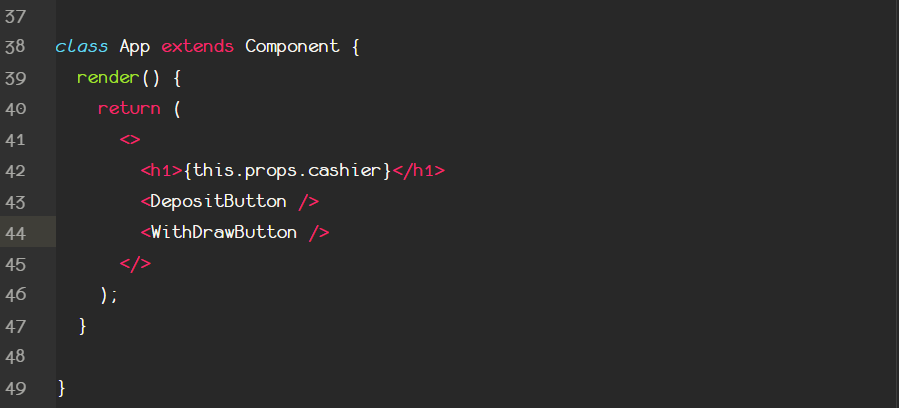
Configure our App Component
Above by taking a look at the code you can see how the App component's structure will be.
A heading that will depict a value from props. And two other components, that they include button to change the state.
The first thing we must do is to connect the cashier prop of the component to the balance property of the centralized state in our redux.js. So any time this balance property changes, the cashier prop changes, so the heading depicts a different value.
Let's see how we can connect a component's props, to redux's state!
Show less
Context
Description
No tags specified
Show more
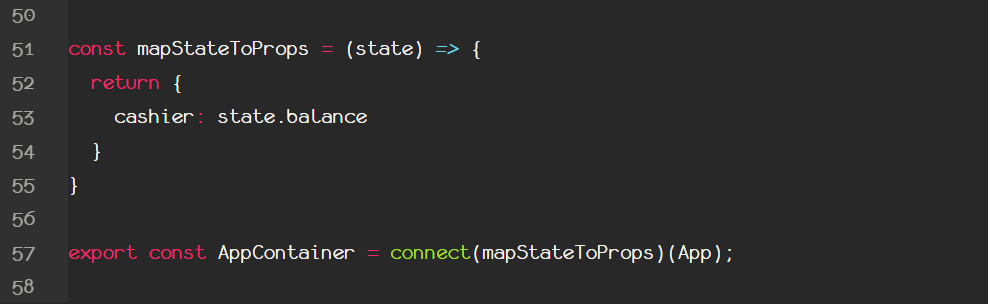
mapStateToProps and connect
Actually there is a way to connect a component's props to redux's global state. And this is by creating a function. You can name the function as you like, but most of the times as a convention you will see it named as mapStateToProps.
This accepts one argument, which represents the state of the provider, under whose authority the current component is (the App component was wrapped under provider, who is completely connected to the store through the store property, remember?).
Then this function returns an object, with the local props of the App component as properties and the properties of redux's state as values. This takes place at line 53. From that line and after, the App component's cashier prop is bound to the state's balance property. Right?
Well, almost! we need to do something else also for the actual connection to happen.
What does the function we just created to have the power to create a map between the props and the state?
The answer is the place that this function is going to be put, thus we put it as a FIRST argument inside the connect function.
The connect function must be imported exactly like that from the react-redux component, and accepts two arguments. For the second we will talk later, but the first is a function which returns an object, that acts like a map between component's props and redux's state. After the connection, and because the connect function must return a new component with that superpower, inside the new parentheses we put the component that these props are coming from (the component that we want to connect with redux's state in other words, the App).
This new component named AppContainer will be exported and used now inside the provider in the index.js file. The App component has fulfilled it's purpose.
Show less
Context
Description
No tags specified
Show more
mapDispatchToProps and connect
During the previous lesson, we managed to connect a component's props, with corresponding variables in global state under a new component, by using the connect function to return this new component, which used an existing component as template and makes the connection with the redux store at the same time.
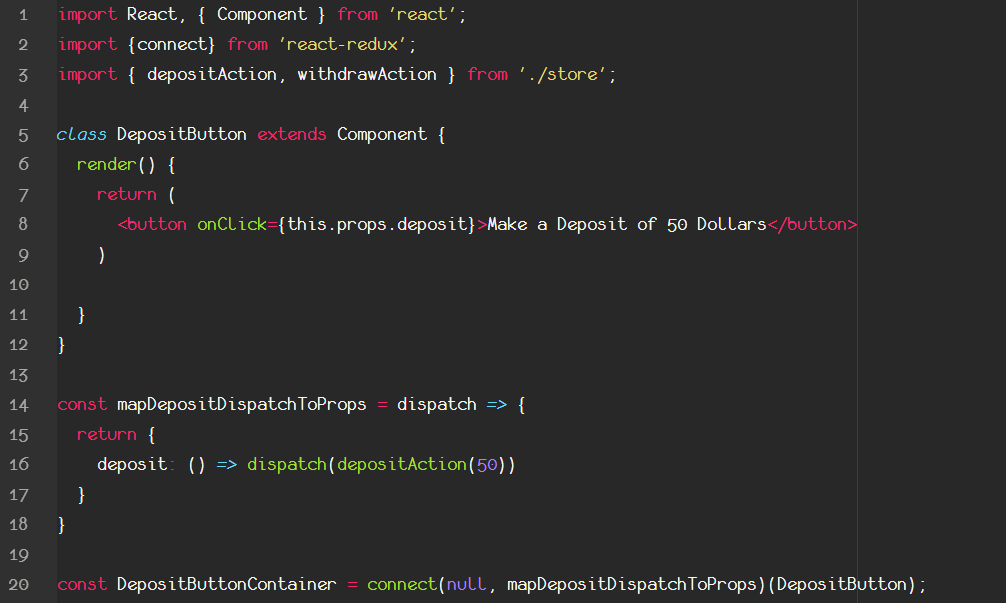
The second step, is to actually connect component's functions, to change the variables in the global state. The logic is very similar. We will attempt to do it with a new DepositButton component, that renders a single button component, which when clicked, executes a function. This function is connected with redux state, and actually triggers a dispatch of the depositAction function (which actually is taken by the reducer and adds 50 dollars) to the account.
How? Simply by using another function, which again you can name as you like but as a convention usually is named something like mapDispatchToProps. This function accepts an argument, which is the dispatch function, and returns an object that holds local component's function props, and arrow functions that dispatch corresponding actions as values. Exactly as shown above.
Thus anytime, the button is clicked, the depositAction with argument of 50 (for 50 dollars) is dispatched and the reducer updates the state accordingly.
Attention: Don't forget to import the action functions to the app.js file in order to place them inside the dispatch!
Then exactly like before we create a new fresh component which is returned from the connect function. This component does NOT have props mapped to state though, so the first argument will be left as null (but MUST be there!!), the second argument will be the function that maps dispatch to props, and as usual inside the second parentheses the component where all these things happen as base.
Attention again! Don't forget to place the new fresh component inside the App component, below the heading now!
Show less
Context
Description
No tags specified
Show more
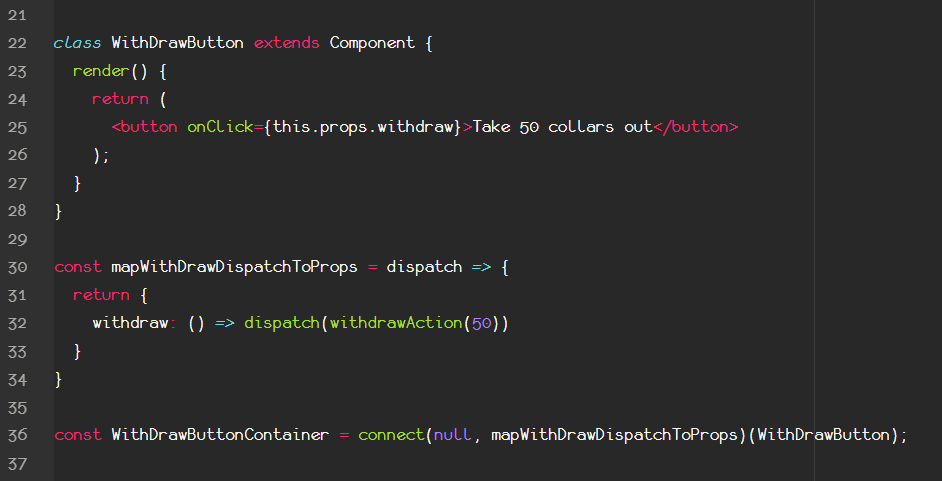
Finalizing and withdrawing
By applying exactly the same functionality we did for making a deposit, we create another component, dispatch it's withdraw prop to the withdrawAction and return out of it a new container component, which will be put inside the App component's render function exactly as the code shows above.
Be careful not to name your functions the same if they are inside the same file.
At the end of it anything should work and you should have two buttons, that each either adds or subtracts from the total balance. Without any local state and without caring about the component's parent-child-sibling hierarchy structure. Good Job!
At the end the result should be something like that.
Show less
Context
Description
No tags specified
Show more
RD-1. Add input field for deposit and withdraw
Let's try to have an exercise, instead of just adding or taking 50 dollars as a fixed value, try to take this number from an input field.
So create a new component, that renders only one input field. This input should be of type number, and it's value, should be stored in centralized state anytime, the value changes. Then when we clicked the corresponding buttons, the function should trigger the dispatch action by the value this field has at the time.
After clicking, reset the field's value back to 0.
Show less
Context
Description
No tags specified