
Notizen
Chapter 9 Notes
Inhalt der Notizen (7)
Seite 1
9.1 Linux Processes
Seite 2
9.2 Viewing Processes
Although several Linux utilities can view processes, the most versatile and common is the ps command. Without arguments, the ps command simply displays a list of processes that are running in the current shell.
ps command - The command used to obtain information about processes currently running on the system.
The following example shows the output of this command while the user is logged in to tty2:
To find out more about these processes, you could instead use the –f, or full, option to the ps command, as shown next:

This listing provides more information about each process. It displays the user who started the process (UID), the PPID, the time it was started (STIME), as well as the CPU utilization (C), which starts at zero and is incremented with each processor cycle that the process runs on the CPU.
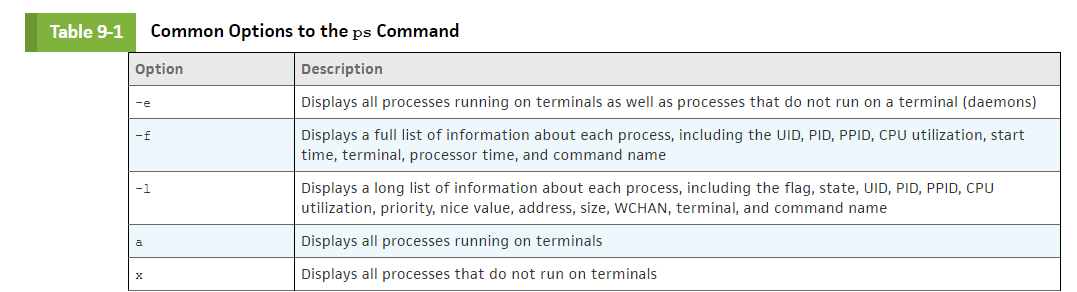
Because daemon processes are not associated with a terminal, they are not displayed by the ps –f command. To display an entire list of processes across all terminals and including daemons, you can add the –e option to any ps command, as shown in the following output:
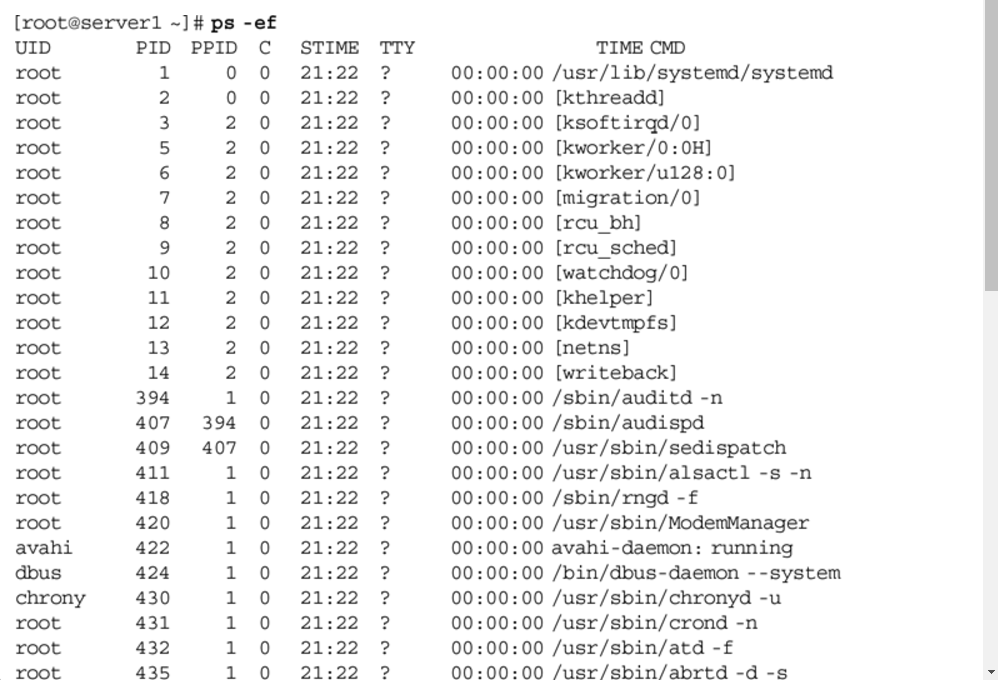
As shown in the preceding output, the kernel thread daemon (kthreadd)has a PID of 2 and starts most subprocesses within the actual Linux kernel because those subprocesses have a PPID of 2, whereas the init daemon (/usr/lib/systemd/systemd, ) starts most other daemons because those daemons have a PPID of 1. In addition, there is a ? in the TTY column for daemons and kernel subprocesses because they do not run on a terminal.
Because the output of the ps -ef command can be several hundred lines long on a Linux server, you usually pipe its output to the less command to send the output to the terminal screen page-by-page, or to the grep command, which can be used to display lines containing only certain information. For example, to display only the BASH shells on the system, you could use the following command:

The –e and –f options are the most common options used with the ps command; however, many other options are available. The -l option to the ps command lists even more information about each process than the –f option. An example of using this option to view the processes in the terminal tty2 is shown in the following output:

The process flag (F) indicates particular features of the process; the flag of 4 in the preceding output indicates that the root user ran the process. The process state (S) column is the most valuable to systems administrators because it indicates what the process is currently doing. If a process is not being run on the processor at the current time, you see an S (sleeping) in the process state column; processes are in this state most of the time, as seen with bash in the preceding output. You will see an R in this column if the process is currently running on the processor, or a T if it has stopped or is being traced by another process.
process state - The current state of the process on the processor; most processes are in the sleeping or running state.
In addition to these, you might also see a Z in this column, indicating a zombie process. When a process finishes executing, the parent process must check to see if it executed successfully and then release the child process’s PID so that it can be used again. While a process is waiting for its parent process to release the PID, the process is said to be in a zombie state, because it has finished but still retains a PID.
zombie process - A process that has finished executing but whose parent has not yet released its PID; the zombie still retains a spot in the kernel’s process table.
On a busy Linux server, zombie processes can accumulate and prevent new processes from being created; if this occurs, you can simply kill the parent process of the zombies, as discussed in the next section.
Note: Zombie processes are also known as defunct processes. To view a list of zombie processes on your entire system, you could use the
ps -el | grep Z command.
Process priority (PRI) is the priority used by the kernel for the process; it is measured between 0 (high priority) and 127 (low priority). The nice value (NI) can be used to affect the process priority indirectly; it is measured between -20 (a greater chance of a high priority) and 19 (a greater chance of a lower priority).
Process priority (PRI) - A number assigned to a process, used to determine how many time slices on the processor that process will receive; the higher the number, the lower the priority.
The ADDR in the preceding output indicates the memory address of the process, whereas the WCHAN indicates what the process is waiting for while sleeping. In addition, the size of the process in memory (SZ) is listed and measured in kilobytes; often, it is roughly equivalent to the size of the executable file on the filesystem.
Some options to the ps command are not prefixed by a dash character; these are referred to as Berkeley-style options. The two most common of these are the a option, which lists all processes across terminals, and the x option, which lists processes that do not run on a terminal, as shown in the following output for the first 10 processes on the system:
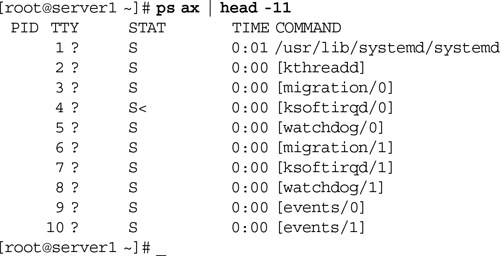
The columns just listed are equivalent to those discussed earlier; however, the process state column is identified with STAT and might contain additional characters to indicate the full nature of the process state. For example, a W indicates that the process has no contents in memory, a < symbol indicates a high-priority process, and an N indicates a low-priority process.
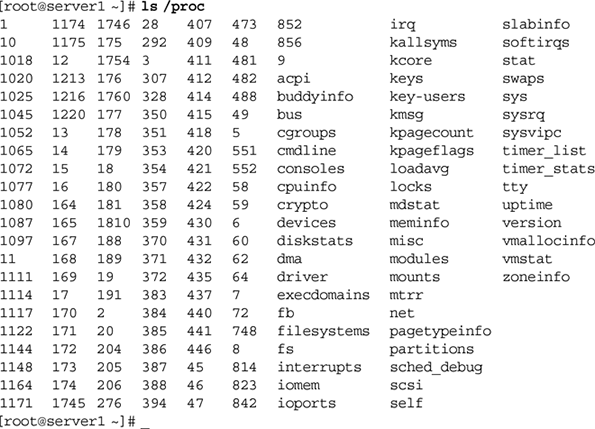
The ps command is not the only command that can view process information. The kernel exports all process information subdirectories under the /proc directory. Each subdirectory is named for the PID of the process that it contains information for, as shown in the following output:
The pstree command displays the lineage of a process by tracing its PPIDs until the init daemon. The first 26 lines of this command are shown in the following output:
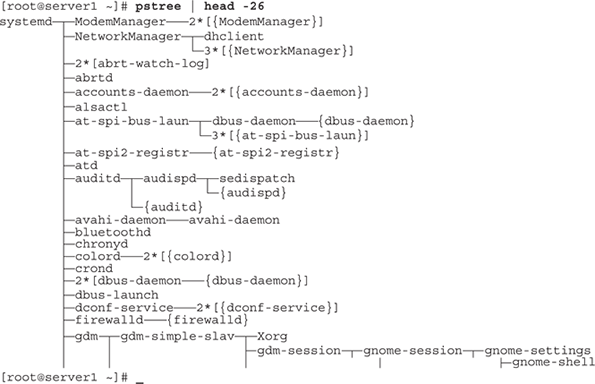
pstree command - A command that displays processes according to their lineage, starting from the init daemon.
The most common program used to display processes, aside from ps, is the top command. The top command displays an interactive screen listing processes organized by processor time. Processes that use the most processor time are listed at the top of the screen.
top command - The command used to give real-time information about the most active processes on the system; it can also be used to renice or kill processes.
An example of the screen that appears when you type the top command is shown next:
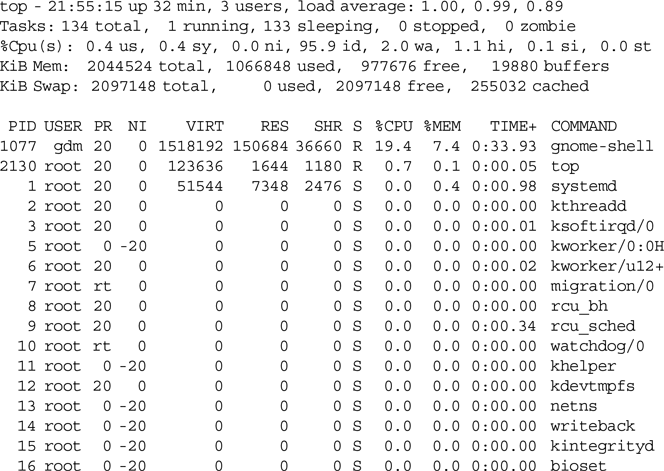
Note that the top command displays many of the same columns that the pscommand does, yet it contains a summary paragraph at the top of the screen and a cursor between the summary paragraph and the process list.
You might come across a process that has encountered an error during execution and continuously uses up system resources. These processes are referred to as rogue processes and appear at the top of the listing produced by the top command. The top command can also be used to change the priority of processes or kill them. Thus, you can stop rogue processes from the top command immediately after they are identified.
rogue processes - A process that has become faulty in some way and continues to consume far more system resources than it should.
Seite 3
9.3 Killing Processes
As indicated earlier, a large number of rogue and zombie processes use up system resources. When system performance suffers due to these processes, you should send them a kill signal, which terminates a process.
kill signal - The type of signal sent to a process by the kill command; different kill signals affect processes in different ways.
The most common command used to send kill signals is the kill command. All told, the kill command can send 64 different kill signals to a process. Each of these kill signals operates in a different manner.
kill command - The command used to kill or terminate a process.
To view the different kill signal names and associated numbers, you can use the –l option to the killcommand, as shown in the following output:
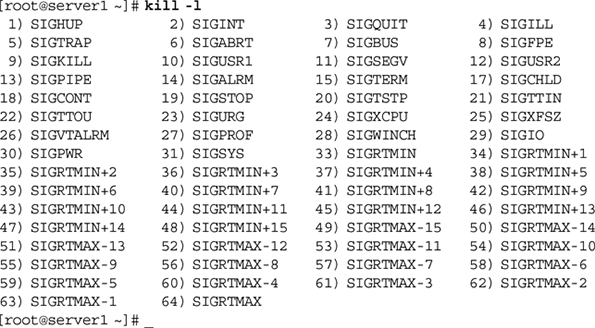
Most of the kill signals listed in the preceding output are not useful for systems administrators. The five most common kill signals used for administration are listed in Table 9-2.
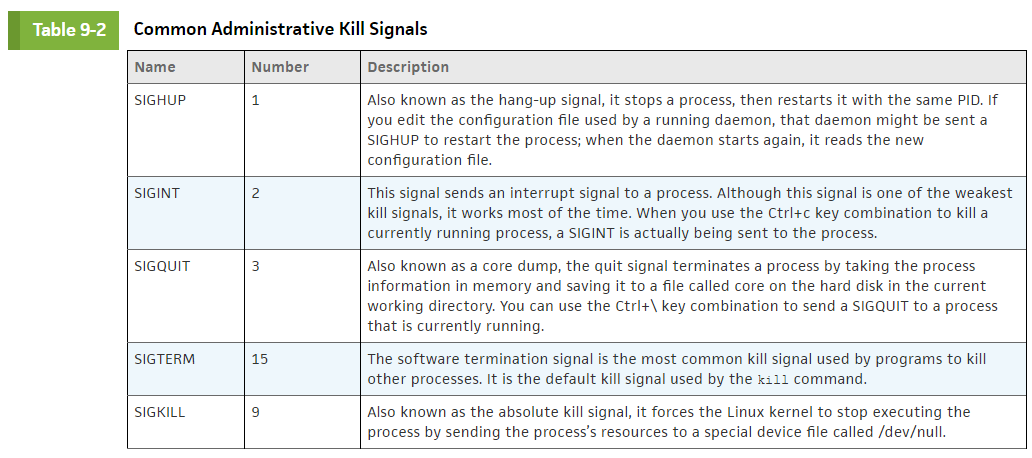
To send a kill signal to a process, you specify the kill signal to send as an option to the kill command, followed by the appropriate PID of the process. For example, to send a SIGQUIT to a process called sample, you could use the following commands to locate and terminate the process:
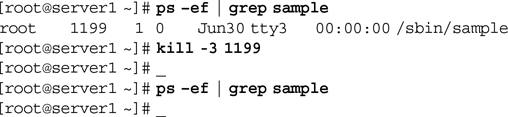
Note: The kill -SIGQUIT 1199 command does the same thing as the kill -3 1199command shown in the preceding output.
Note: If you do not specify the kill signal when using the kill command, the killcommand uses the default kill signal, the SIGTERM signal.
Some processes have the ability to ignore, or trap, certain kill signals that are sent to them. The only kill signal that cannot be trapped by any process is the SIGKILL. Thus, if a SIGINT, SIGQUIT, and SIGTERM do not terminate a stubborn process, you can use a SIGKILL to terminate it. However, you should only use SIGKILL as a last resort because it prevents a process from closing temporary files and other resources properly.
trap - The process of ignoring a kill signal.
If you send a kill signal to a process that has children, the parent process terminates all of its child processes before terminating itself. Thus, to kill several related processes, you can simply send a kill signal to their parent process. In addition, to kill a zombie process, it is often necessary to send a kill signal to its parent process.
Another command that can be used to send kill signals to processes is the killall command. The killall command works similarly to the killcommand in that it takes the kill signal as an option; however, it uses the process name to kill instead of the PID. This allows multiple processes of the same name to be killed in one command.
killall command - The command that kills all instances of a process by command name.
An example of using the killallcommand to send a SIGQUIT to multiple sample processes is shown in the following output:
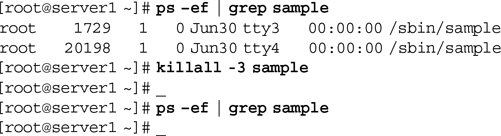
Note: As with the kill command, if you do not specify the kill signal when using the killall command, it sends a SIGTERM signal by default.
In addition to the kill and killall commands, the top command can be used to kill processes. While in the top utility, simply press the k key and supply the appropriate PID and kill signal when prompted.
Seite 4
9.4 Process Execution
You can execute three main types of Linux commands:
Binary programs
Shell scripts
Shell functions
Most commands, such as ls, find, and grep, are binary programs that exist on the filesystem until executed. They were written in a certain programming language and compiled into a binary format that only the computer can understand.
Other commands, such as cd and exit, are built in to the BASH shell running in memory, and they are called shell functions.
Shell scripts can also contain a list of binary programs, shell functions, and special constructs for the shell to execute in order.
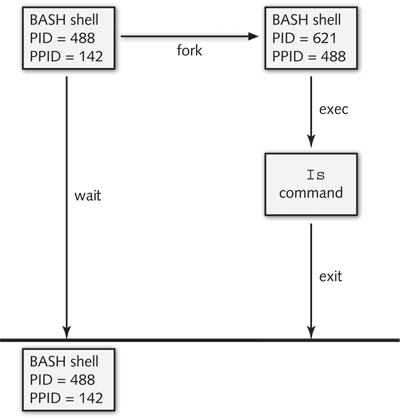
When executing compiled programs or shell scripts, the BASH shell that interprets the command you typed creates a new BASH shell. This creation of a new subshell is known as forking and is carried out by the fork function in the BASH shell.
forking - The act of creating a new BASH shell child process from a parent BASH shell process.
The new subshell then executes the binary program or shell script using its exec function. After the binary program or shell script has completed, the new BASH shell uses its exit function to kill itself and return control to the original BASH shell. The original BASH shell uses its wait function to wait for the new BASH shell to carry out the aforementioned tasks before returning a prompt to the user. Figure 9-3 depicts this process when a user types the ls command at the command line.
Seite 5
9.5 Running Processes in the Background
As discussed earlier, the BASH shell creates, or forks, a subshell to execute most commands on the Linux system. Unfortunately, the original BASH shell must wait for the command in the subshell to finish before displaying a shell prompt to accept new commands. Commands run in this fashion are known as foreground processes.
foreground process - A process for which the BASH shell that executed it must wait for its termination
Alternatively, you can omit the wait function shown in Figure 9-3 by appending an ampersand (&) character to the command. Commands run in this fashion are known as background processes. When a command is run in the background, the shell immediately returns the shell prompt for the user to enter another command.
background process - A process that does not require the BASH shell to wait for its termination. Upon execution, the user receives the BASH shell prompt immediately.
To run the sample command in the background, you can enter the following command:
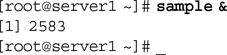
Note: Space characters between the command and the ampersand (&) are optional. In other words, the command sample& is equivalent to the command sample &used in the preceding output.
The shell returns the PID (2583 in the preceding example) and the background job ID (1 in the preceding example) so that you can manipulate the background job after it has been run.
After the process has been started, you can use the ps command to view the PID or the jobs command to view the background job ID, as shown in the following output:
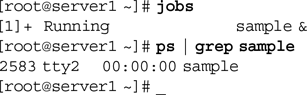
jobs command - The command used to see the list of background processes running in the current shell.
To terminate the background process, you can send a kill signal to the PID (as shown earlier in this chapter), or you can send a kill signal to the background job ID. Background job IDs must be prefixed with a % character. To send the sample background process created earlier a SIGINT signal, you could use the following kill command:
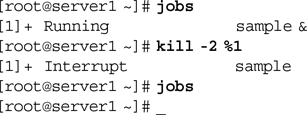
Note: You can also use the killall -2 sample command or the top utility to terminate the sample background process used in the preceding example.
After a background process has been started, you can move it to the foreground by using the foreground (fg) command followed by the background job ID. Similarly, you can pause a foreground process by using the Ctrl+z key combination. You can then send the process to the background with the background (bg) command. The Ctrl+z key combination assigns the foreground process a background job ID that is then used as an argument to the bg command. To start a sample process in the background and move it to the foreground, then pause it and move it to the background again, you can use the following commands:
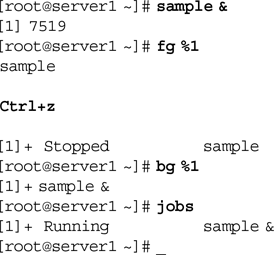
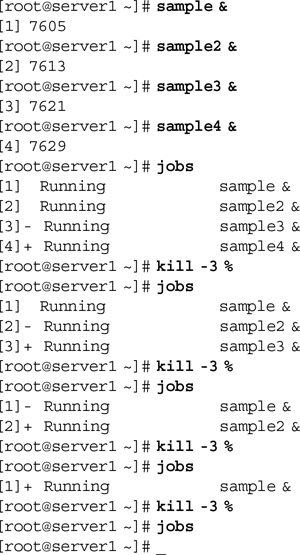
When there are multiple background processes executing in the shell, the jobs command indicates the most recent one with a + symbol, and the second most recent one with a − symbol. If you place the % notation in a command without specifying the background job ID, the command operates on the most recent background process. An example of this is shown in the following output, in which four sample processes are started and sent SIGQUIT kill signals using the % notation:
Seite 6
9.6 Process Priorities
Recall that Linux is a multitasking operating system. Because most computers contain only a single CPU, Linux executes small amounts of each process on the processor in series. This makes it seem to the user as if processes are executing simultaneously. The amount of time a process has to use the CPU is called a time slice; the more time slices a process has, the more time it has to execute on the CPU and the faster it executes.
time slice - The amount of time a process is given on a CPU in a multiprocessing operating system.
Time slices are typically measured in milliseconds. Thus, several hundred processes can be executing on the processor in a single second.
The ps -l command lists the Linux kernel priority (PRI) of a process. This value is directly related to the amount of time slices a process has on the CPU. A PRI of 0 is the most likely to get time slices on the CPU, and a PRI of 127 is the least likely to receive time slices on the CPU. An example of this command is shown next:
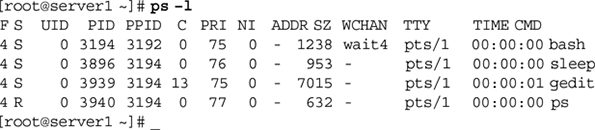
You cannot change the PRI directly, but you can influence it indirectly by assigning a certain nice value to a process. A negative nice value increases the likelihood that the process will receive more time slices, whereas a positive nice value does the opposite. The range of nice values is depicted in Figure 9-4.
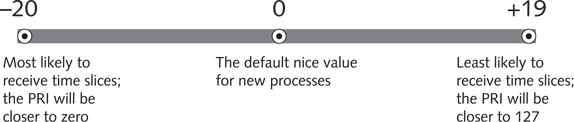
All users can be “nice” to other users of the same computer by lowering the priority of their own processes by increasing their nice value. However, only the root user has the ability to increase the priority of a process by lowering its nice value.
Takeaway: Only Root Users can decrease nice value, but All Other Users can increase their nice value
Processes are started with a nice value of 0 by default, as shown in the NI column of the previous ps -l output. To start a process with a nice value of +19 (low priority), you can use the nice command and specify the nice value using the -n option and the command to start. If the -n option is omitted, a nice value of +10 is assumed. To start the ps -l command with a nice value of +19, you can issue the following command:
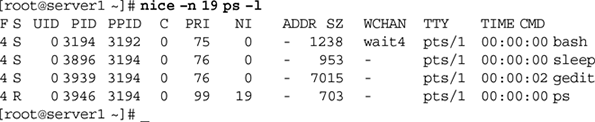
Notice from the preceding output that NI is 19 for the ps command, as compared to 0 for the bash, sleep, and gedit commands. Furthermore, the PRI of 99 for the ps command results in fewer time slices than the PRI of 76 for the sleep and gedit commands and the PRI of 75 for the bash shell.
Conversely, to increase the priority of the ps -l command, you can use the following command:
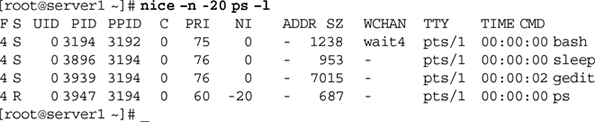
Note from the preceding output that the nice value of -20 for the pscommand resulted in a PRI of 60, which is more likely to receive time slices than the PRI of 76 for the sleep and gedit commands and the PRI of 75 for the bash shell.
After a process has been started, you can change its priority by using the renice command and specifying the change to the nice value, as well as the PID of the processes to change.
renice - The command used to alter the nice value of a process currently running on the system.
Suppose, for example, three sample processes are currently executing on a terminal:
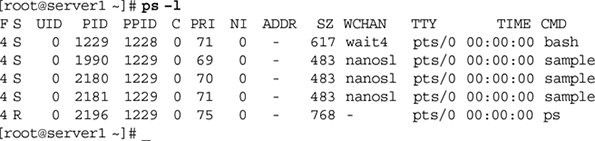
To lower priority of the first two sample processes by changing the nice value from 0 to +15 and view the new values, you can execute the following commands:
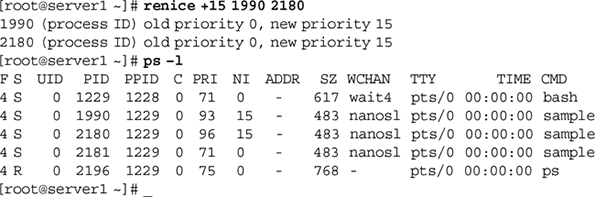
Note: You can also use the top utility to change the nice value of a running process. Simply press the r key, then supply the PID and the nice value when prompted.
Note: As with the nice command, only the root user can change the nice value to a negative value using the renice command.
The root user can use the renice command to change the priority of all processes that are owned by a certain user or group. To change the nice value to +15 for all processes owned by the users mary and bob, you could execute the command renice +15 -u mary bob at the command prompt. Similarly, to change the nice value to +15 for all processes started by members of the group sys, you could execute the command renice +15 -g sys at the command prompt.
Seite 7
9.7 Scheduling Commands
You can use two different daemons to schedule commands: the at daemon (atd) and the cron daemon (crond). The at daemon can be used to schedule a command to execute once in the future, whereas the cron daemon is used to schedule a command to execute repeatedly in the future.
atd (at daemon) - The system daemon that executes tasks at a future time; it is configured with the at command.
crond (cron daemon) - The system daemon that executes tasks repetitively in the future and that is configured using cron tables.
9.7a Scheduling Commands with atd
To schedule a command or set of commands for execution at a later time by the at daemon, you can specify the time as an argument to the at command; some common time formats used with the at command are listed in Table 9-3.
at command - The command used to schedule commands and tasks to run at a preset time in the future.
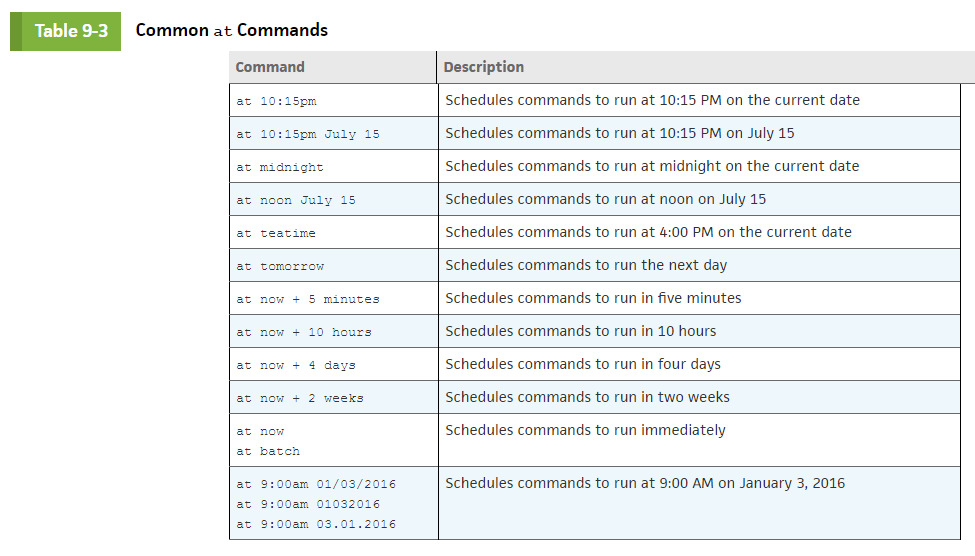
After being invoked, the at command displays an at> prompt allowing you to type commands to be executed, one per line. After the commands have been entered, use the Crtl+d key combination to schedule the commands using atd.
Note: The at daemon uses the current shell’s environment when executing scheduled commands. The shell environment and scheduled commands are stored in the /var/spool/at directory on Fedora systems and the /var/spool/cron/atjobsdirectory on Ubuntu systems.
To schedule the commands date and who to run at 10:15 PM on July 15th, you can use the following commands:
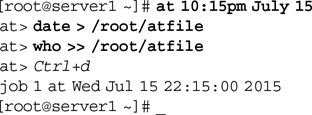
As shown in the preceding output, the at command returns an at job ID. You can use this ID to query or remove the scheduled command. To display a list of at job IDs, you can specify the -l option to the at command:

Note: Alternatively, you can use the atq command to see scheduled at jobs. The atq command is simply a shortcut to the at -l command.
Note: When running the at -l command, a regular user only sees his own scheduled at jobs; however, the root user sees all scheduled at jobs.
To see the contents of the at job listed in the previous output alongside the shell environment at the time the at job was scheduled, you can use the -coption to the at command and specify the appropriate at job ID:
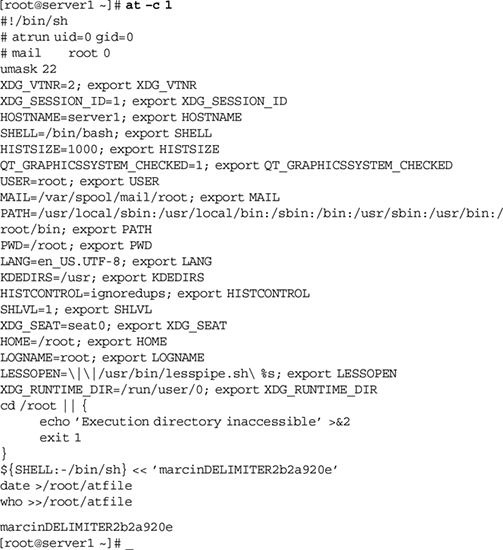
To remove the at job used in the preceding example, simply specify the -d option to the at command, followed by the appropriate at job ID, as shown in the following output:
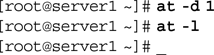
Alternatively, you can use the atrm 1 command to remove the first at job. The atrm command is simply a shortcut to the at –d command.
9.7b Scheduling Commands with cron
The at daemon is useful for scheduling tasks that occur on a certain date in the future but is ill suited for scheduling repetitive tasks
The cron daemon is better suited for repetitive tasks because it uses configuration files called cron tables to specify when a command should be executed.
cron tables - A file specifying tasks to be run by the cron daemon; there are user cron tables and system cron tables.
A cron table includes six fields separated by space or tab characters. The first five fields specify the times to run the command, and the sixth field is the absolute pathname to the command to be executed.
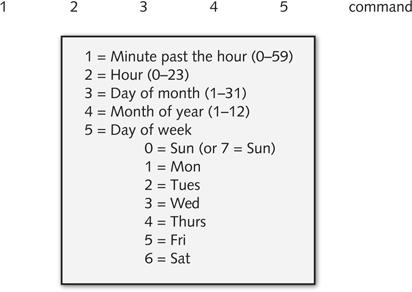
The first field in Figure 9-6 specifies the minute past the hour. Because the command must be run at 20 minutes and 40 minutes past the hour, this field has two values, separated by a comma. The second field specifies the time in 24-hour format, with 5 PM being the 17th hour. The third and fourth fields specify the day of month and month of year, respectively, to run the command. Because the command might run during any month regardless of the day of month, both fields use the * wildcard shell metacharacter to match all values. The final field indicates the day of the week to run the command; as with the first field, the command must be run on multiple days, but a range of days was specified (day 1 to day 5).
Two different types of cron tables are used by the cron daemon: user cron tables and system cron tables.
User cron tables represent tasks that individual users schedule and exist in the /var/spool/cron directory on Fedora systems and the /var/spool/cron/crontabs directory on Ubuntu systems.
System cron tables contain system tasks and exist in the /etc/crontab file as well as the /etc/cron.d directory.
User Cron Tables
On a newly installed Fedora system, all users have the ability to schedule tasks using the cron daemon because the /etc/cron.deny file has no contents. However, if you create an /etc/cron.allow file and add a list of users to it, only those users will be able to schedule tasks using the cron daemon. All other users are denied.
Conversely, you can modify the /etc/cron.deny file to list those users who are denied the ability to schedule tasks. Thus, any users not listed in this file are allowed to schedule tasks only. If both files exist, only the /etc/cron.allow file is processed. If neither file exists, all users are allowed to schedule tasks, which is the case on a newly installed Ubuntu system.
To create or edit a user cron table, you can use the –e option to the crontab command, which opens the vi editor. You can then enter the appropriate cron table entries.
crontab command - The command used to view and edit user cron tables.
When the user saves the changes and quits the vi editor, the information is stored in the file /var/spool/cron/username, where username is the name of the user who executed the crontab –e command.
To list your user cron table, you can use the –l option to the crontab command:
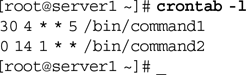
The root user can edit, list, or remove any other user’s cron table by using the –u option to the crontab command followed by the user name. For example, to edit the cron table for the user mary, the root user could use the command crontab –e –u mary at the command prompt. Similarly, to list and remove mary’s cron table, the root user could execute the commands crontab –l –u mary and crontab –r –u mary, respectively.
System Cron Tables
Linux systems are typically scheduled to run many commands during nonbusiness hours. These commands might perform system maintenance, back up data, or run CPU-intensive programs. Most of these commands are scheduled by the cron daemon from entries in the system cron table /etc/crontab, which can only be edited by the root user. The default /etc/crontab file on a Fedora system is shown in the following output:
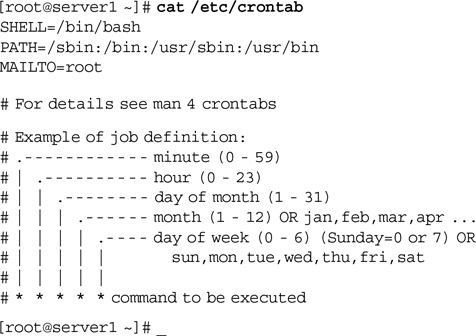
The initial section of the cron table specifies the environment used while executing commands. The remainder of the file contains comments that identify the format of a cron table entry. If you add your own cron table entries to the bottom of this file, they will be executed as the root user.
Alternatively, you may prefix the command within a system cron table entry with the user account that it should be executed as. For example, the /bin/cleanup command shown in the following output will be executed as the apache user:
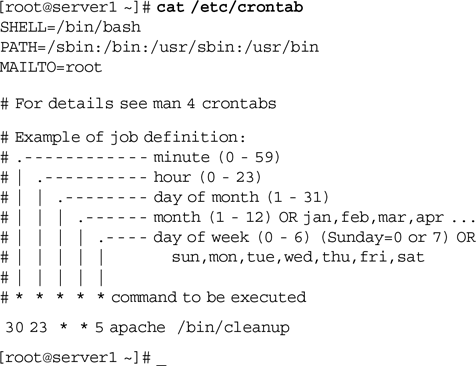
You can also place a cron table with the same information in the /etc/cron.d directory. Any cron tables found in this directory can have the same format as /etc/crontab and are run by the system.
For example, if the sysstat package is installed on your system, the sa1 command is run every 10 minutes as the root user by the cron daemon from the file /etc/cron.d/sysstat, as shown next:
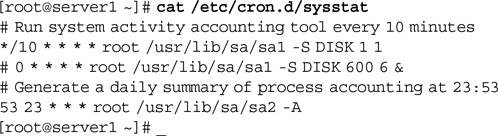
Many administrative tasks are performed on an hourly, daily, weekly, or monthy basis. If you have a task of this type, you don’t need to create a system cron table. Instead, you can place a shell script that runs the appropriate commands in one of the following directories:
Scripts that should be executed hourly in the /etc/cron.hourly/ directory
Scripts that should be executed daily in the /etc/cron.daily/ directory
Scripts that should be executed weekly in the /etc/cron.weekly/ directory
Scripts that should be executed monthly in the /etc/cron.monthly/ directory
On Fedora systems, the cron daemon runs the /etc/cron.d/0hourly script, which executes the contents of the /etc/cron.hourly directory 1 minute past the hour, every hour on the hour. The /etc/cron.hourly/0anacron file starts the anacron daemon, which then executes the contents of the /etc/cron.daily/, /etc/cron.weekly/, and /etc/cron.monthy/ directories at the times specified in /etc/anacrontab.
On Ubuntu systems, cron table entries within the /etc/crontab file are used to execute the contents of the /etc/cron.hourly, /etc/cron.daily/, /etc/cron.weekly/, and /etc/cron.monthy/ directories.
Informationen
- Beschreibung
- Linux Operating System (CIS126DL) (Chapter 9: Managing Linux Processes) Notiz am Chapter 9 Notes, erstellt von Michael Mason am 21/04/2017.
- Erstellt von
- Michael Mason · Apr 2017
- Aktualisiert
- 7 Mär 2018
- Aufrufe
- 0
- Bewertung