Description
|
|
Created by PatrickNoonan
over 12 years ago
|
|
Page 1
DescriptionExamTime's tools have helped countless students create and learn on their own. However, ExamTime's tools can also be utilised by teachers to help create engaging study resources and fun activities both in-class and online.This is a guide for teachers on how to get the most out of ExamTime.This guide will outline a bunch of great ideas and tips on each of our tools. It will showcase how to create resources and how best to use these tools in class.OverviewThe pages tabs along the top are each devoted to a different ExamTime tool. These include: Mindmaps Flashcards Quizzes Notes Study Groups Each tool has their own unique benefits. For example, Flashcards can be better for learning languages while MindMaps couls be used for brainstorming. While each may have their strengths any one of these tools can be of great benefit to students and teachers. They work best when used in conjunction with each other so make sure and take the time read each one. This will ensure you get the most out of ExamTime's tools.
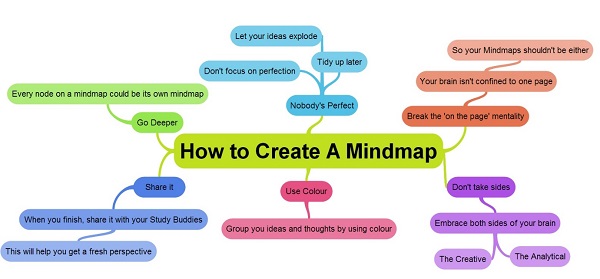
DescriptionThis page explores how you can use Mindmaps in your classroom. We also explore how ExamTime's Mindmapping tool is the perfect companion for the modern teacher as it facilitates for both in-class and online learning. Overview How to create a Mindmap Collaborative Learning Brainstorming How to Create a MindmapClicking on the MindMap button will bring you straight to a new Mind Map Canvas.If you create a Mind Map it will be automatically saved to your General Subject. However, if you have a Subject chosen when you decide to create a Mind Map it will be saved in this subject automatically.Clicking into the central node and typing will automatically rename the MindmapWhen you first enter a Mind Map you will see your central node. Click on this and a small taskbar will appear under it with the following options: If you drag “+” icon out from the node you can create another node. This will be connected to the central node by a thin strand. The ‘T’ icon controls the text within the node; you can make it bigger, bold, italic or change the colour. The coloured circle icon allows you to change the colour of the node and any nodes that are attached to it. Use the slider to pick your colour. The ‘x’ icon deletes the node( and any nodes connected to it). The paperclip icon allows you to attach another resource (Flashcard, Quiz, Note) to a node for easy access. You can also attach a Snippet, which is like a little post-it note for each node. To create a snippet click on the little grey note that appears behind the node. Using MindmapsMindmaps are predominately used for two things 1) Elaborating on and connecting ideas 2) Collaborating with others to brainstorm ideas.These two strands are what you should be using with your class. Mindmaps can be done individually or as a group. You can simply put a word in the central node or even just tell them a general topic and allow them to explore their own ideas. So, for example, if you say to your class 'Everyone pick an area of European History and create a Mindmap on it', some will create Mindmaps exploring Vikings, others exploring The Spanish Inquisition, others exploring World War 2. You can then go around and check each one and give pointers. You could even get your pupils to improve each others Mindmaps.ExamTime offers the unique ability to be able to work on something individually and then seamlessly share this with your friends or groups to help improve. This means you could set up a study group, invite all your pupils and when they finish their mindmaps they can share an editable version of their Mindmaps to the group so that anyone else can take a copy of any other Mindmap and either study it, grade it and even improve upon it.This can be done with all our tools so is a fantastic way of creating good quality and relevant study resources for your class.While having a central concept on which to work is the traditional way of creating Mindmaps they can also be used to brainstorm. The strucutre of a Mindmap allows students and teachers to quickly and visually share ideas, plan events or essays. Mindmaps essentailly are an explosion of ideas. When you have an entire class full of creative students the biggest challenge is having a way of capturing all the ideas; our Mindmap tool allows for this. Try it for yourself and see!Check here for more info on what else you can do with our Mindmaps!
DescriptionThis page explores how you can use Flashcards in your classroom. By exploring how ExamTime's Flashcard maker is the ideal tool for languages and learning key concepts, dates, quotes and more your classroom experience will improve greatly. Overview How to create Flashcards Memorise Key Facts and Dates Perfect for Learning Languages How to Create FlashcardsThe create Flashcard button is located in the drop-down menu. Click on this and you’ll be brought straight to a new Flashcard deck.You will be presented with two boxes. The one on the left is for the front of the card; the one on the right is for the back of the card.You are given the option to insert a Text or an Image. For Text: Click on the boxes and enter whatever text you want and click ‘Add to Deck’. For Images: Click on the Image tab and you’ll be prompted to click the browse button , from here you can search your computer for the image you want to add. Once you have click Add to Deck'.You will see the cards you enter appear below. Once here they are automatically saved so don’t worry about loosing info! You can enter as much cards as you want too.Using FlashcardsMost people think Flashcards are probably best used out of the class and so are of little value to teachers. This couldn't be further from the truth. While it's true that Flashcards are great for students to refresh their memory and improve their recall of certain key facts, a teacher can give direction on which areas to focus on. Teachers can also get great use out of them by preparing a deck of Flashcards and topics and sharing them with their pupils after each lesson. These could be more useful and engaging that simply handing out a summary note. If each student has access to a deck they can study it in their own time, even on the go, and they can also keep track of which ones they've learned.For certain subjects or topics teachers could go more in-depth. For example, when studying foreign languages Flashcards can be a very valuable resource. Did you know that the most common 100 words in any language account for 50% of all spoken communication? Similarly, the most common 1,000 words account for 80%! This means that if a teacher put in the time and effort to create 5 decks with 200 cards in each, students would have access to 80% of the vocabulary they would need! These decks could be used everyday, year after year, for all your language classes.Since most of the content on ExamTime is public this means you can search other teachers and pupils resources and use these in class! Such an approach coupled with the in-class conversations would greatly improve students fluency rates.However, Flashcards aren't just ideal for learning a language. Our tool allows you to add images so these could be utilised for any subject such learning formulas or quotes. As with all our tools it all depends on what you want to study. Once you know that our tools can fit your needs and chances are someone out there has already created a flashcard deck you could use in-class-- which will save you time!Check here for more info on how to actually use the tool in more depth.
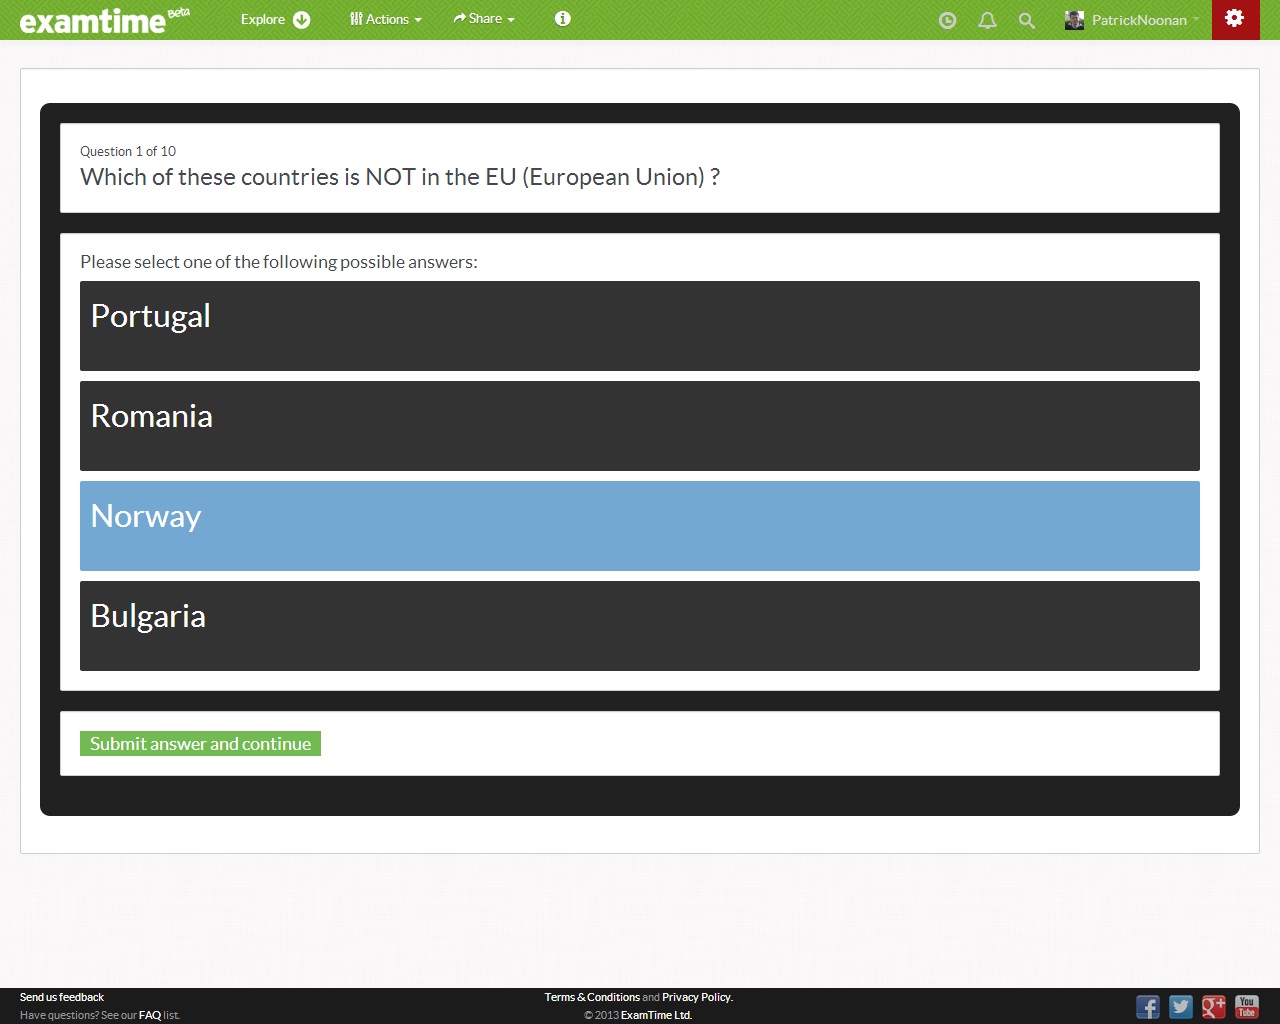
DescriptionThis page explores how you can use Quizzes in your classroom. Our Quiz tool is perfect for testing your class in a fun and competitive way.Overview How to create a Quiz Test your knowledge Get competitive! How to Create a QuizThe create Quizzes button is located in the drop-down menu. Click on this and you’ll be brought straight to a new quiz screenA Quiz is a series of questions. As such when making a Quiz you’ll be asked to create questions which will become a part of your Quiz.Click on the ‘create new question’ button to get started. From here you can pick whether the question has only one correct answer or multiple correct answers. You then enter the question, followed by the answers in the boxes below.Note: You need to mark which answer(s) is correct by clicking the box to right.You start with two answers as default but you can add more answers if you wish by clicking the ‘Add an additional answer’ button under.Using QuizzesMost people, I'm sure, are familiar with quizzes! Some may even have some deep-seated trauma relating to pop-quizzes! However, we think our Quiz tool can be used for a bit of fun! This may sound counter-intuitive but having your class take a quiz online will bring out their competitive streak. Students will vie to get the high score and will be learning without much effort!As ever having ExamTime online and social structure to back up your quizzes will make them more engaging. Your students will be able to create and challenge each other to their own quizzes soon enough. It could even be homework; who ever creates the best quiz wins!While taking a quiz you created yourself can be fun and help you study it is much more fun to take a quiz that someone else has created. In this way pupils competitive natures are used to help them learn key topics.Having the option to share a quiz with a class or a group can be a great way of increasing engagement. While our current Quiz tool doesn't have the ability to measure individual test scores this is something we are currently working on. This means that you'll be able to see who got what score. This means you'll also be able to easily track a students progress online!Check here for more info on how to create a Quiz
DescriptionThis page explores how you can use Notes in your classroom. Modern students expect to be able to utilise the digital resources that are all around us. Our Notes tool allows this.Overview How to create a Note The importance of interactive notes Creating a living note! How to Create a NoteThis whole Guide is an example of what a finished Note can look like!When creating a Note however, the button is located in the drop-down menu. Click on this and you’ll be brought straight to a new Note canvas.Clicking anywhere on the canvas will create a text box. Once you type in this box you can move it around the canvas. You can add multiple text boxes.There a numerous text tools located in the text controls toolbar. These include: Bold Italics Underline Change Size Text Colour Bullet or Number points Insert a link to an external site. Next to your text options are your media options. Here you can embed: videos images audio slideshows upload images from your own PC You can add multiple pages by clicking the '+' icon next to the page tabor delete a page by using the 'X' icon in the corner.Using NotesNotes can be used by students for a variety of reasons such as jotting down key points in class or as they study, summary notes when reading essays or when exams are approaching, even when preparing for projects or essays they are working. In many ways a Note may seem like an individual endeavour. However, we think Notes work best when teachers and students share them. Students have always decided to divide up course work between and then pool their knowledge to save time. What we've done is to streamline this process and to allow teachers to engage in it too! How a teacher could use a note, again is up to them, but we have noticed that most teachers use our Notes as lesson summaries. They share them with the class before or after the lesson. The great thing about our Notes tool is that it's note just text, you can insert video, images, audio, links etc. This means your Note can be living, breathing gateway to a whole host of internet sources. In this way our Notes are interactive and are a truly engaging resource for the modern student. As ever if you share it with your class they can take a copy and add their own resources and extra Notes.Essentially, when used by teachers Notes become prompts or a nudge in the right direction. You can give them foundation of knowledge on which to build. Learning will improve across the class but they can personalised the Notes and make it their own. Each student can progress into which ever avenue they find most interesting.Check here for more info on how to create a Note.
DescriptionThis page explores how you can use Study Groups in your classroom. We also explore how ExamTime's Study Groups tool is the perfect companion for the modern teacher as it facilitates for both in-class and online learning Overview How to create a Study Group The importance of discussion and collaboration Sharing is caring! How to Create a Study GroupGroups do exactly what they say which may sound quite simple but the benefits they can bring are anything but! Plainly speaking, they are a group of users who are all interested in a certain topic. When you are in a group, the pool of knowledge with which you can approach your chosen subject/topic grows vastly.We think groups have the potential to be a great asset to everyone’s learning. Using the collective brains of everyone on ExamTime is a fantastic way of getting the most out of your study.Anyone can create a group and invite whoever they wish to join. It’s up to the person who creates a group to decide who can join. The create button is located on the Dashboard. You simply need to click on the '+' icon and enter the details. Once you are a member of the group you can start discussion, share resources andpost comments. Each Group then becomes its own community where everyone helps everyone else out. You can even share your resources (either as read-only or ‘copy and edit‘) and get all the members of a group to review your resource, add what they think is appropriate and then send it back!Using Study GroupsWhile our other tools allow you to create resources our study groups are more focussed on bringing teachers and students together. Once they are together they can share and discuss resources and this is where the fun happens. Ideas take on a life of their own!Anyone can set up a group and be a member of as many as you like. So as a teacher you could set up a group for each of your classes. Then you could share appropriate resources with each class. You can also start discussion threads in each group. This could be a great way of increasing engagement in ideas and also act as a way of flipping the class room.The concept of the flipped classroom is one which we think could work very well with ExamTime's tools. With ExamTime it would be very easy to share a whole bunch of resources with a class group. They could then study these from home and you could devote class time to ironing out the kinks your students had with the content the night before.Study Groups are also perfect for planning larger projects. Everyone can share and discuss ideas and will be notified when there is any new info in the group. This means they can keep on top of things and always be engaged in the project.The most important thing about groups are the people in them. We simply provide the structure to enable you to learn.
Introduction
Teaching with Mindmaps
Teaching with Flashcards
Teaching With Quizzes
Teaching with Notes
Using Study Groups
Want to create your own Notes for free with GoConqr? Learn more.