
Notas
Chapter 8 Notes
Conteúdo das notas (4)
Página 1
8-1 The Boot Process
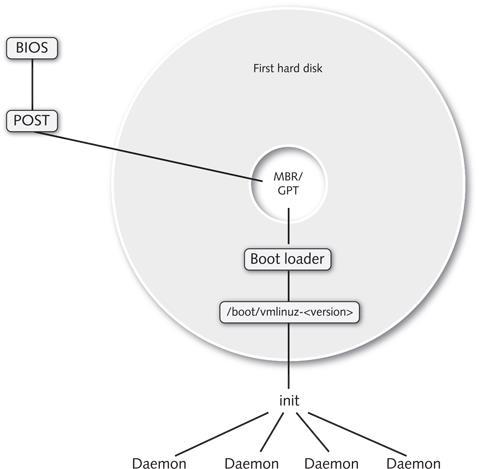
1. When a computer first initializes, the system BIOS performs a Power On Self Test (POST).
POST (Power On Self Test) - An initial series of tests run when a computer is powered on to ensure that hardware components are functional.
The MBR/GPT might contain a boot loader that can then locate and execute the kernel of the operating system. Alternatively, the MBR/GPT might contain a pointer to a partition on the system that contains a boot loader on the first sector; this partition is referred to as the active partition. There can be only one active partition per hard disk.
boot loader - A program used to load an operating system.
active partition - The partition searched for an operating system after the MBR/GPT.
2. The boot loader then executes the Linux kernel from the partition that contains it.
( The Linux kernel is stored in the /boot directory and is named vmlinuz-<kernel version>. )
The Linux kernel then takes over the initialization process by loading deamons into memory.
daemon - A Linux system process that provides a system service, such as for printing, scheduling, and operating system maintenance.
The first daemon process on the system is called the initialize (init) daemon; it is responsible for loading all other daemons on the system required to bring the system to a usable state in which users can log in and interact with services.
initialize (init) daemon - The first process started by the Linux kernel; it is responsible for starting and stopping other daemons.
Página 2
8-2 Boot Loaders
Boot loaders can perform more functions than just initializing the operating system - they can also pass information to the kernel during startup and boot additional operating systems located on the hard disk. The latter is called multi booting.
multi booting - A configuration in which two or more operating systems exist on the hard disk of a computer; the boot loader allows the user to choose which operating system to load at boot time.
Note: Unless virtualization software is used, only one operating system can be active at any one time.
The two most common boot loaders used on Linux systems are LILO, GRUB, and GRUB2.
8-2a LILO (Linux Loader)
Linux Loader (LILO) is the traditional Linux boot loader. Although it is no longer used by most modern Linux distributions, it is often found on other Linux distributions that require a smaller boot loader than GRUB, as well as legacy Linux installations.
Linux Loader (LILO) - A common boot loader used on legacy Linux systems.
When the computer completes the POST and locates the LILO boot loader, a LILO boot: prompt appears. You can then press the Tab key to see a list of operating systems that you can boot. Following this, you can enter the name of an operating system and press Enter to boot the default operating system (usually Linux). Alternatively, you can wait five seconds for the system to boot the default operating system automatically.
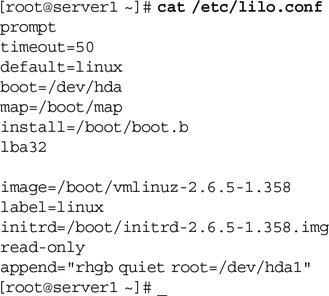
After the operating system is fully loaded, you can configure the LILO boot loader by editing the /etc/lilo.conf file. An example of this file is as follows:
LILO.conf file
The preceding /etc/lilo.conf file indicates that LILO boots the linux kernel /boot/vmlinuz-2.6.5-1.358 provided the user chooses the operating system name linux (label=linux).
Furthermore, the system continues to boot the default operating system (default=linux) if the user does not enter any input for five seconds (timeout=50).
Additionally, the LILO boot loader tells the Linux kernel to use a Red Hat Graphical Boot after it has loaded (rhgb), suppress detailed kernel messages (quiet), and mount the root filesystem on /dev/hda1 (root=/dev/hda1).
Common LILO.conf keywords
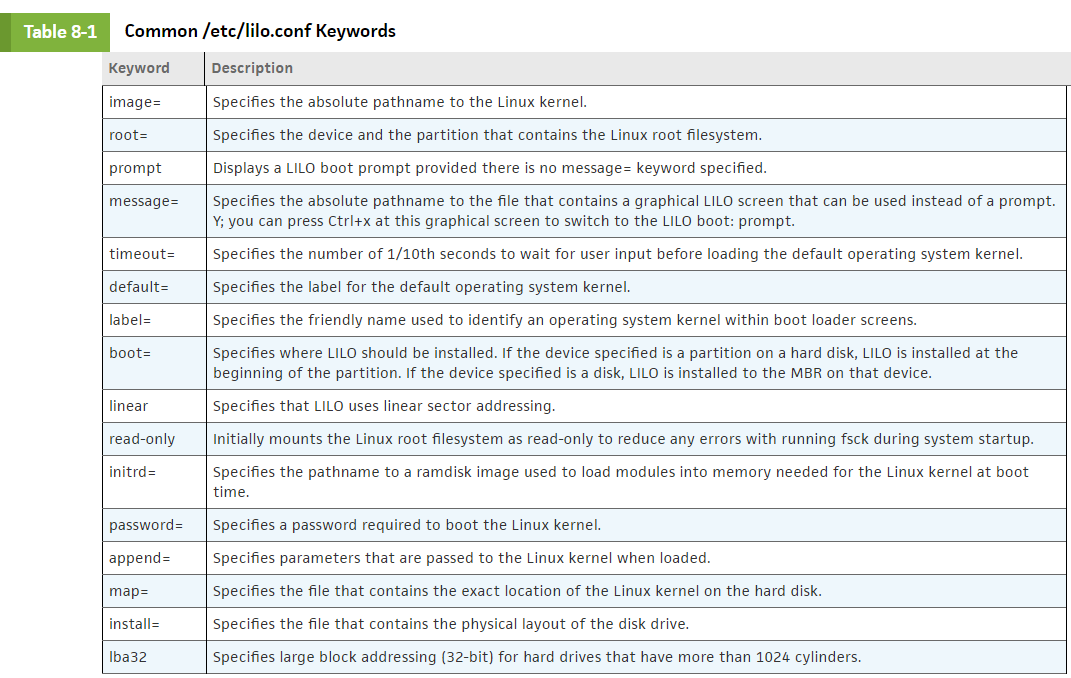
Some keywords commonly used in /etc/lilo.conf, along with their definitions:
Note: As with shell scripts, you can transform a line in /etc/lilo.conf to a comment by preceding it with a # symbol.
The append= statement
If the kernel does not detect the correct system information, you can use the append= keyword in /etc/lilo.conf to pass information to the Linux kernel manually at boot time.
For example, if the Linux kernel did not detect the RAM or hard disk installed in your system properly, you can add the line append="mem=4096M" to /etc/lilo.conf to allow your Linux kernel to recognize that your system has 4096MB of RAM, as well as the line append="hd=2100,16,63" to /etc/lilo.conf to tell your Linux kernel that your hard disk has 2100 cylinders, 16 heads, and 63 sectors.
Reinstalling/Uninstalling LILO
After changing the /etc/lilo.conf file, LILO must be reinstalled using the new information in /etc/lilo.conf for those changes to take effect. To do this, you can use the lilo command.
lilo command - The command used to reinstall the LILO boot loader based on the configuration information in /etc/lilo.conf.
Note: To uninstall LILO from an active partition or the MBR/GPT, you can use the lilo -U command.
ELILO is a version of LILO that is available for computers that use Extensible Firmware Interface (EFI). You can download ELILO from the Internet at www.sourceforge.net/projects/elilo.
ELILO - A boot loader used with computers that support Intel Extensible Firmware Interface (EFI) technology.
8-2b GRUB
GRUB
GRand Unified Bootloader (GRUB) was created in 1999 and originally intended as a replacement boot loader for LILO. It supports the booting of several different operating systems, including Linux, Mac OSX, UNIX, BSD UNIX, Solaris UNIX, and Windows.
Note: Although GRUB is no longer in development, due to the release of GRUB2 in 2012, there are a large number of Linux systems installed in production environments that still use it.
The first major part of the GRUB boot loader (called Stage1) typically resides on the MBR/GPT; the remaining parts of the boot loader (called Stage1.5 and Stage2) reside in the /boot/grub directory. GRUB Stage1 simply points to GRUB Stage1.5, which loads filesystem support and proceeds to load GRUB Stage2. GRUB Stage2 performs the actual boot loader functions and displays a graphical boot loader screen.
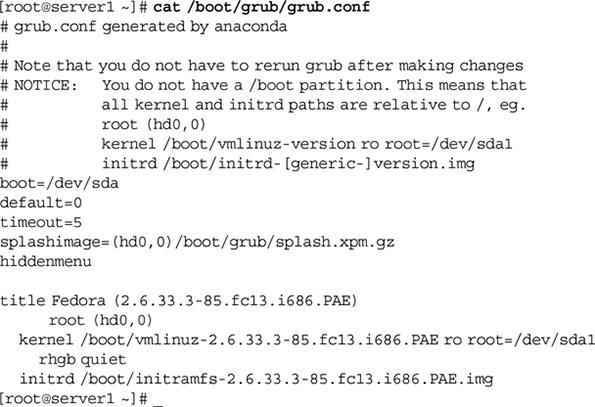
You configure GRUB by editing a configuration file (/boot/grub/grub.conf) that is read directly by the Stage2 boot loader. An example /boot/grub/grub.conf file for a Fedora system is shown next:
Note: Some other Linux distributions, such as Ubuntu Linux, use a /boot/grub/menu.lst file in place of /boot/grub/grub.conf to hold GRUB configuration.
GRUB & Hard Disks / Partitions
To understand the entries in the /boot/grub/grub.conf file, you must first understand how GRUB refers to partitions on hard disks. Hard disks and partitions on those hard disks are identified by numbers in the following format: (hd,).
The (hd0,0) notation in the preceding /boot/grub/grub.conf file refers to the first hard disk on the system (regardless of whether it is SCSI, SATA, or PATA) and the first partition on that hard disk, respectively.
Similarly, the second partition on the first hard disk is referred to as (hd0,1)
The fourth partition on the third hard disk is referred to as (hd2,3).
GRUB root partition - The partition containing the second stage of the GRUB boot loader and the GRUB configuration file.
Note: If your system has a separate partition mounted to /boot, GRUB refers to the file /boot/grub/grub.conf as /grub/grub.conf. If your system does not have a separate filesystem for the /boot directory, this file is simply referred to as /boot/grub/grub.conf in GRUB.
GRUB.conf file
The example /boot/grub/grub.conf file shown earlier displays a graphical boot screen (splashimage=(hd0,0)/boot/grub/splash.xpm.gz) and boots the default operating system kernel on the first hard drive (default=0) in 5 seconds (timeout=5) without showing any additional menus (hiddenmenu). The default operating system kernel is located on the GRUB root filesystem (root (hd0,0)) and is called /boot/vmlinuz-2.6.33.3-85.fc13.i686.PAE.
The kernel then mounts the root filesystem on /dev/sda1 (root=/dev/sda1) initially as read-only (ro) to avoid problems with the fsck command and uses a ramdisk image to load modules into RAM that are needed at boot time (initrd /boot/initramfs-2.6.33.3-85.fc13.i686.PAE.img)
All other keywords present on the kernel line within /boot/grub/grub.conf are used to pass information to the kernel from the GRUB boot loader. For example, the keyword rhgb (Red Hat Graphical Boot) tells the Linux kernel to use a graphical boot screen as it is loading daemons, and the keyword quiet tells the Linux kernel to avoid printing errors to the screen during system startup
Note: Most modern Linux distributions use a GUID label (i.e. root= UUID=42c0fce6-bb79-4218-af1a-0b89316bb7d1) in place of root=/dev/sda1 to identify the partition that holds the root filesystem
You can add your own keywords to the kernel line in /boot/grub/grub.conf to control how your Linux kernel is loaded. For example, appending the text nosmp to the kernel line disables Symmetric Multi-Processing (SMP) support within the Linux kernel. Alternatively, appending the text mem=4096M to the kernel line forces your Linux kernel to see 4096MB of physical RAM in the event that your Linux kernel does not detect all of the RAM in your computer properly.
GRUB boot screen
Recall from the /boot/grub/grub.conf file shown earlier that you have 5 seconds after the BIOS POST to interact with the GRUB boot screen shown in Figure 8-2. If you press any key within these 5 seconds, you will be presented with a graphical GRUB boot menu screen similar to Figure 8-3 that you can use to manipulate the boot process.
If you have several different Linux kernels installed on your system (from updating your system software), you can select the kernel that you would like to boot, or you can highlight your kernel and press a to append keywords to the kernel line, or press e to edit the entire boot configuration for the kernel listed in /boot/grub/grub.conf at boot time. You can also press c to obtain a grub> prompt where you can enter a variety of commands to view system hardware configuration, find and display files, alter the configuration of GRUB, or boot an operating system kernel. Typing help at this grub> prompt will display a list of available commands and their usage.
Reinstalling GRUB
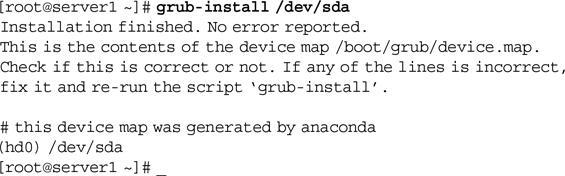
If the GRUB boot loader becomes damaged, you can reinstall it using the grub-install command that is available on the system or on a live Linux system used for system rescue. To install GRUB Stage1 on the MBR/GPT of the first SATA hard disk, you can type the following command:
8-2c GRUB2
GRUB2
GRand Unified Bootloader version 2 (GRUB2) is the boot loader commonly used on modern Linux systems and the boot loader that you will find on Fedora 20 and Ubuntu Server 14.04 systems.
Note: GRUB2 has additional support for systems that do not use the Intel x86_64 architecture, as well as specialized hardware systems. For example, the Sony Playstation 4 uses the GRUB2 boot loader.
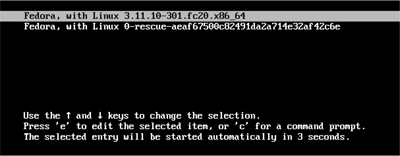
GRUB2 has a similar structure to GRUB; however, Stage2 loads a terminal-friendly boot loader screen similar to that shown below:
GRUB2 configuration
The main configuration file for GRUB2 is /boot/grub/grub.cfg (or /boot/grub2/grub.cfg); this file is automatically built via entries within the /etc/default/grub file, and the output of any shell scripts stored within the /etc/grub.d directory.
When you install a device driver that needs to be loaded by the boot loader (e.g., disk controller devices), the device driver package will often add a file to the /etc/grub.d directory that provides the necessary configuration.
For any other settings, you should add or modify the existing lines within the /etc/default/grub file. A sample /etc/default/grub file on a Fedora 20 system is shown here:
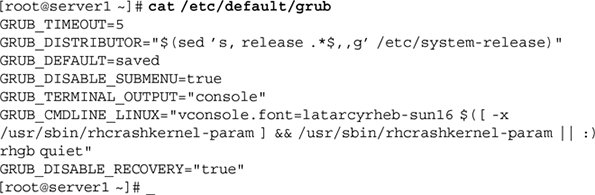
From the preceding output, you could change the GRUB_TIMEOUT line to modify the number of seconds that the GRUB2 boot loader screen appears before the default operating system is loaded, or add parameters that are passed to the Linux kernel by modifying the GRUB_CMDLINE_LINUX line. Also note that the /etc/default/grub file does not list any OS paragraphs. This is because GRUB2 uses the /etc/grub.d/30_os-prober script to automatically detect available OSs on the system and configure them for use with GRUB2. If you would like to modify the default OS listed at the GRUB2 boot loader screen, you can set the GRUB_DEFAULT line to the line number, starting from 0. For example, to set the second OS line shown in Figure 8-4 (Fedora, with Linux 0-rescue-aeaf67500c82491da2a714e32af42c6e) as the default OS to boot, simply set GRUB_DEFAULT=1 in the /etc/default/grub file.
After modifying the /etc/default/grub file, or adding scripts to the /etc/grub.d directory, you can run the grub2-mkconfig command to rebuild the /boot/grub/grub.cfg or /boot/grub2/grub.cfg file. For example, to rebuild the /boot/grub2/grub.cfg file, you can use the following:
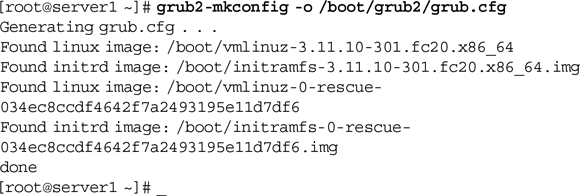
As with GRUB, if the GRUB2 boot loader becomes damaged, you can reinstall it. Simply use the grub2-install command that is available on the system or on a live Linux system used for system rescue. To reinstall GRUB2 Stage1 on the MBR/GPT of the first SATA hard disk, you can type the following command:

The grubby command can also be used to configure the LILO, ELILO, GRUB, and GRUB2 boot loaders. For sample usage examples and options, consult the grubby man page.
Página 3
8-3 Linux Initialization
system initialization process - The process that executes the daemons that provide for system services during boot time and bring the system to a useable state.
Up until very recently, Linux systems have used a system initialization process from the UNIX SysV standard . However, recent Linux distributions have adopted the Systemd system initialization process. Systemd is completely compatible with the UNIX SysV standard yet implements new features for managing all system devices, including Linux kernel modules, daemons, and network sockets. Ubuntu Server 14.04 uses the UNIX SysV system initialization process, whereas Fedora 20 implements the new Systemd system initialization process.
UNIX SysVA - UNIX standard that is used to provide the structure of the system initialization process on Linux systems.
Systemd - A relatively new software framework used on Linux systems that provides a system initialization process and system management functions.
8-3a Working with the UNIX SysV System Initialization Process
There are two SysV system initialization processes used in most modern Linux systems:
The traditional SysV system initialization process
The upstart system initialization process
upstart - A recent version of the UNIX SysV system initialization process used on modern Linux distributions.
In both systems, the init daemon runs a series of scripts to start other daemons on the system to provide system services and ultimately allow users to log in and use the system. Furthermore, the init daemon is responsible for starting and stopping daemons after system initialization, including stopping daemons before the system is halted or rebooted.
Runlevels
Because the init daemon often has to manage several daemons at once, the init daemon categorizes the system into runlevels. A runlevel defines the number and type of daemons that are loaded into memory and executed by the kernel on a particular system. At any one time, a Linux system might be in any of the seven standard runlevels defined in Table 8-3.
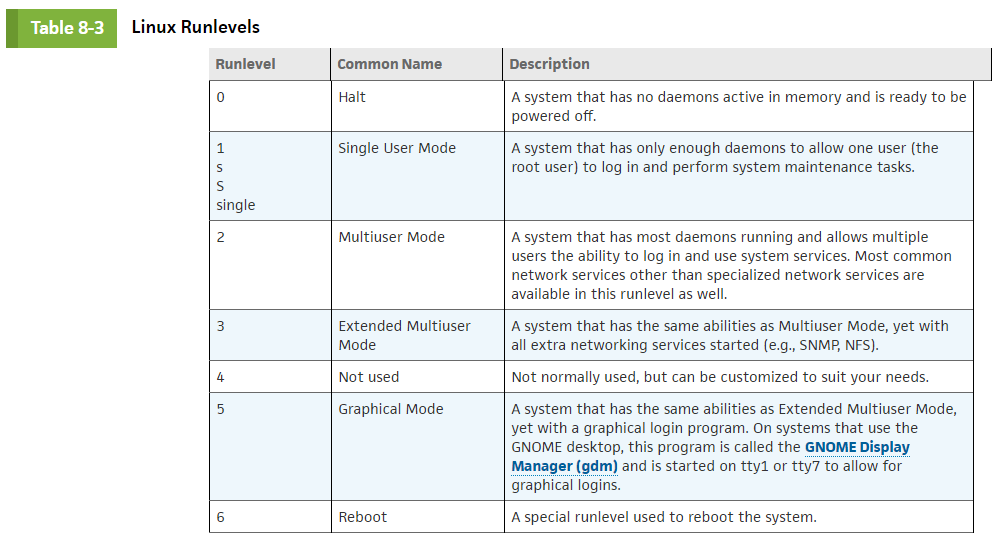
Note: Because the init daemon is responsible for starting and stopping daemons and, hence, changing runlevels, runlevels are often called initstates.
To see the current runlevel of the system and the previous runlevel (if runlevels have been changed since system startup), you can use the runlevel command, as shown in the following output:
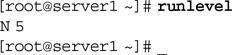
The preceding runlevel command indicates that the system is in runlevel 5 and that the most recent runlevel prior to entering this runlevel is nonexistent (N).
runlevel command - The command used to display the current and most recent (previous) runlevel.
To change the runlevel on a running system, you simply need to specify the init command followed by the new runlevel; to change from runlevel 5 to runlevel 1 to perform system maintenance tasks, you can use the following commands:
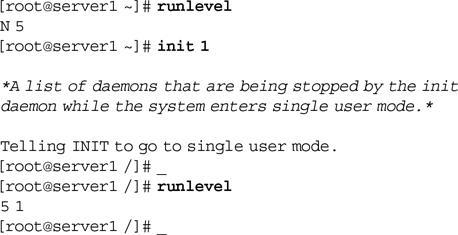
init command - A UNIX SysV command used to change the operating system from one runlevel to another.
The telinit command can be used in place of the init command when changing runlevels. Thus, the command telinit 1 can instead be used to switch to Single User Mode.You can also pass options from the boot loader to the Linux kernel to force the system to boot to a particular runlevel. If you append the keyword single to the kernel line within the GRUB/GRUB2 configuration screen, you will boot to Single User Mode. Similarly, you can boot to Single User Mode from the LILO boot: prompt by typing the name of the Linux image followed by 1, S, s, or single.
The /etc/inittab file
Unless you specify otherwise, the init daemon enters the default runlevel indicated in the /etc/inittab file. In the past, the /etc/inittab file contained the entire configuration for the init daemon. However, on modern systems, the /etc/inittab often contains a single uncommented line that configures the default runlevel, as shown here:

The line id:5:initdefault: in the /etc/inittab file tells the init daemon that runlevel 5 is the default runlevel to boot to when initializing the Linux system at system startup.
Note: Runlevel 5 is the default runlevel in most Linux distributions that have a GUI environment installed.
Ubuntu Server 14.04 does not contain an /etc/inittab file by default but will use it to set the default runlevel if present. Instead, the default runlevel on Ubuntu Server 14.04 is normally set in the /etc/init/rc-sysinit.conf file.
Runtime Configuration Scripts
During the boot process, the init daemon must execute several scripts that prepare the system, start daemons, and eventually bring the system to a usable state. These scripts are called runtime configuration (rc) scripts.
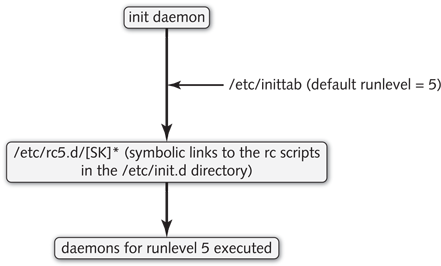
On Linux systems that use the traditional UNIX SysV system initialization process, the init daemon identifies the default runlevel in the /etc/inittab file and then proceeds to execute the files within the /etc/rc[runlevel].d directory that start with S or K. If the default runlevel is 5, then the init daemon would execute all files that start with S or K in the /etc/rc5.d directory in alphabetical order. The S or the K indicates whether to Start or Kill (stop) the daemon upon entering this runlevel, respectively. Some sample contents of the /etc/rc.d/rc5.d directory are shown in the following output:
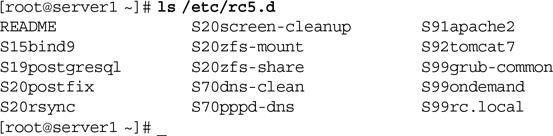
From the preceding output, you can see that the init daemon will start the postfix daemon (S20postfix) upon entering this runlevel. To ensure that the files in the preceding directory are executed in a specific order, a sequence number is added following the S or K at the beginning of the filename. Thus, the file S19postgresql is always executed before the file S20postfix.
runtime configuration (rc) scripts - Scripts that are used during the system initialization process to start daemons and provide system functionality.
Recall that runlevel 1 (Single User Mode) contains only enough daemons for a single user to log in and perform system tasks. If a user tells the init daemon to change to this runlevel using the init 1 command, the init daemon will execute every file that starts with S or K in the /etc/rc1.d directory. Because few daemons are started in Single User Mode, most files in this directory start with a K, as shown in the following output:

Note: Each file in an /etc/rc[runlevel].d directory is merely a symbolic link to an executable rc script in the /etc/init.d directory
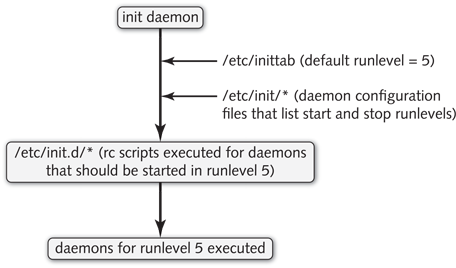
On Linux systems that use the upstart init system, the /etc/rc[runlevel].d directories are not used. Instead, the init daemon identifies the default runlevel in the /etc/inittab file and then directly executes the rc scripts within the /etc/init.d directory to start or stop the appropriate daemons based on the information specified in the configuration files within the /etc/init directory.
Each daemon has a separate configuration file within the /etc/init directory that uses standard wildcard notation to identify the runlevels in which it should be started or stopped. For example, the /etc/init/cron.conf file shown next indicates that the cron daemon should be started in runlevels 2, 3, 4, and 5 ([2345]) and not be stopped in runlevels 2, 3, 4, and 5 ([!2345]):
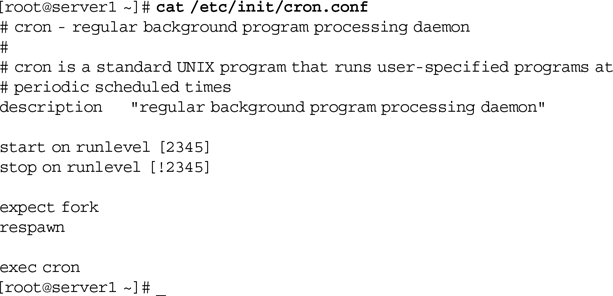
Figure 8-6 illustrates the upstart system initialization process for a system that boots to runlevel 5.
Starting and Stopping Daemons Manually Recall from the preceding section that the init daemon starts daemons at system initialization as well as starts and stops daemons afterwards when the runlevel is changed by executing the rc scripts within the /etc/init.d directory.
To manipulate daemons after system startup, you can execute them directly from the /etc/init.d directory with the appropriate argument (start, stop, or restart). For example, to restart the cron daemon, you could run the following command:
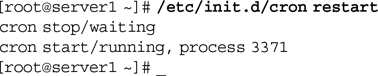
You can also use the service command to start, stop, or restart any daemons listed within the /etc/init.d directory.
service command - A command that can be used to manually start, stop, and restart UNIX SysV daemons.
For example, you can restart the cron daemon using the following command:
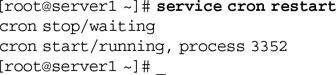
The upstart init system also provides the stop command to stop a daemon, the start command to start a daemon, and the restart command to restart a daemon.
stop command - A command that can be used to manually stop an upstart daemon.
start command - A command that can be used to manually start an upstart daemon.
restart command - A command that can be used to manually restart an upstart daemon.
Thus, you could also restart the cron daemon using the following command:

Configuring Daemons to Start in a Runlevel If your Linux distribution uses the upstart init system, then configuring a daemon to start or stop in a particular runlevel is as easy as modifying the associated daemon configuration file in the /etc/init directory, as shown earlier.
However, for systems that use traditional UNIX SysV system initialization, you must create or modify the symbolic links within the /etc/rc[runlevel].d directories. To make this process easier, there are commands that you can use to do this for you. The chkconfig command is available on many Linux systems, and can be used to both list and modify the runlevels that a daemon is started in. For example, the following command indicates that the postfix daemon is not started in any runlevel:

To configure the postfix daemon to start in runlevels 3 and 5 and to verify the results, you could run the following commands:

Unfortunately, the chkconfig command is not available in Ubuntu Server 14.04 by default. Instead, you can use the update-rc.d command on Ubuntu Server 14.04 to configure the files within the /etc/rc[runlevel].d directories.
update-rc.d - A command that can be used to configure UNIX SysV daemon startup by runlevel on Ubuntu Linux systems.
First, you should remove any existing symbolic links within the /etc/rc[runlevel].d directories for the postfix daemon using the following command:
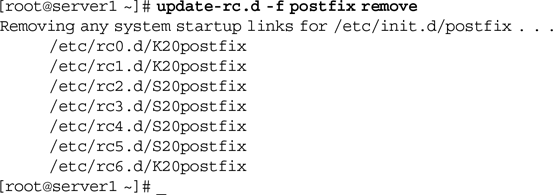
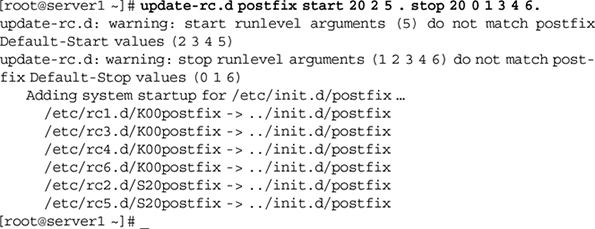
Next, you can use the update-rc.d command to configure the appropriate symbolic links within the /etc/rc[runlevel].d directories for the postfix daemon. Since most daemons are started in runlevels 2 through 5, you can specify the defaults keyword to create symbolic links that start the postfix daemon in runlevels 2 through 5, as shown in the following output:
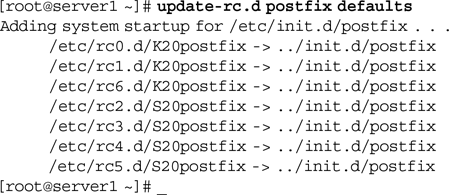
Alternatively, you can specify to start the postfix daemon only in runlevels 2 and 5 using the following command that creates the rc scripts using a sequence number of 20:
8.3b Working with the Systemd System Initialization Process
Like the UNIX SysV init daemon, the Systemd init daemon is used to start daemons during system initialization as well as start and stop daemons after system initialization. However, Systemd can also be used to start, stop, and configure many other operating system components. To Systemd, each operating system component is called a unit. Daemons are called service units because they provide a system service, and runlevels are called target units (or targets).
service units - A Systemd term that is used to describe a daemon.
target units (or targets) - A Systemd term that is used to describe the number and type of daemons running on a Linux system. It is functionally equivalent to the UNIX SysV term runlevel.
By default, each target maps to a UNIX SysV runlevel:
poweroff.target is the same as Runlevel 0.
rescue.target is the same as Runlevel 1 (Single User Mode).
multi-user.target is the same as Runlevel 2, 3 and 4.
graphical.target is the same as Runlevel 5.
reboot.target is the same as Runlevel 6.
Note: The graphical.target first loads all daemons from the multi-user.target.
The default target on a system that has a GUI environment installed is the graphical.target. To configure your system to instead boot to the multi-user.target, you can update the /etc/systemd/system/default.target symbolic link to point to the correct runlevel using the following command:

Note: Most of the rc scripts that are used by Systemd to start and stop daemons are stored in the /usr/lib/systemd/system directory and called [daemon].service.
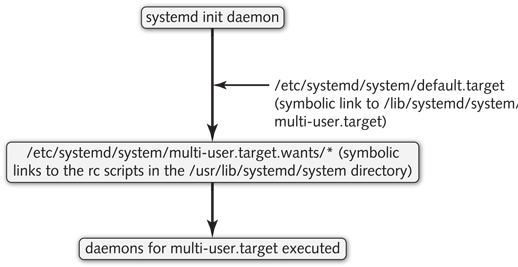
Note: Both the /lib/systemd/system and /etc/system/system directories contain subdirectories called *.target.wants for loading daemons and other components.
To start and stop daemons, as well as configure them to automatically start during system initialization, you can use the systemctl command. To start, stop, or restart a Systemd daemon, you can specify the appropriate action (start, stop, or restart) and name of the service unit as arguments.
Starting, Stopping & Restarting Daemons
systemctl - A command that can be used to manually start, stop and restart Systemd daemons, as well as configure Systemd daemon startup during the system initialization process.
For example, to restart the cron daemon, you could use the following command: systemctl restart crond.service
Displaying Currently Loaded Daemons
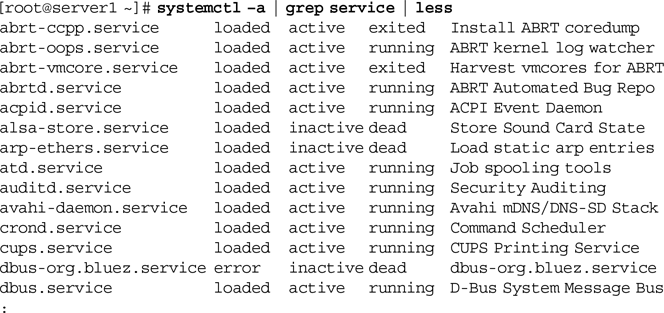
Without arguments, the systemctl command displays a list of all units that are currently executing in memory and their status. You can narrow this list to only services by piping the results to the grep service command.
Displaying All Daemons
Moreover, to see all possible services regardless of whether they are loaded into memory or not, you can add the –a (or --all) option to the systemctl command. The following command displays all Systemd services and their state (dead indicates that it is currently not running):
Displaying Detailed Information About a Daemon
You can see detailed information about a particular Systemd daemon by using the status argument to the systemctl command. For example, systemctl status crond.service would show detailed information about the cron daemon.
Configuring Daemons to Run at Startup
To configure a Systemd daemon to start in the default target (e.g., graphical.target), you can use the enable argument to the systemctl command. For example, to ensure that the cron daemon is started at system initialization, you can run the systemctl enable crond.service command.
Alternatively, the systemctl disable crond.service would prevent the cron daemon from starting when your system is booted.
Switching Targets (Daemons)
The systemctl command can also be used to change between targets. You can switch to multi-user.target (which is analogous to runlevel 3) by running either the systemctl isolate multi-user.target or systemctl isolate runlevel3.target command. Alternatively, you can switch to graphical.target (which is analogous to runlevel 5) by running the systemctl isolate graphical.target or systemctl isolate runlevel5.targetcommand.
Página 4
8-4 The X Windows System
Although most administrators favor the command-line interface, Linux users typically use GUIs for running user programs.
8-4a Linux GUI Components
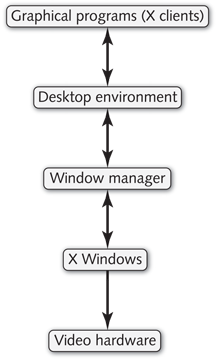
The Linux GUI was designed to function consistently, no matter what video adapter card and monitor are installed on the computer system. It is composed of many components, each of which works separately from the video hardware.
Note: Graphical programs can communicate directly with each other in any X Windows environment via the use of the dbus daemon, or to hardware devices using the hald daemon.
8-4b Starting & Stopping X Windows
8-4c Configuring X Windows
X Windows The core component of a Linux GUI is X Windows, which provides the ability to draw graphical images in windows that are displayed on a terminal screen. The programs that tell X Windows how to draw the graphics and display the results are known as X clients. X clients need not run on the same computer as X Windows; you can use X Windows on one computer to send graphical images to an X client on an entirely different computer by changing the DISPLAY environment variable discussed in Chapter 7. Because of this, X Windows is sometimes referred to as the server component of X Windows, or simply the X server.
X clients -
X server -
Informações
- Descrição
- Linux Operating System (CIS126DL) (Chapter 8: System Initialization & X Windows) Notas sobre Chapter 8 Notes, criado por Michael Mason em 04-04-2017.
- Criado por
- Michael Mason · abr 2017
- Atualizado
- 7 mar 2018
- Visualizações
- 0
- Avaliação