17656732
Description
Quiz by Sandi Hagood, updated more than 1 year ago
More
Question 1
Question
Where is the inspector and what are it's uses?
Answer
-
In the File menu go to Inspector. Its contextual parameters adapt based on what is selected and what has focus.
-
To the right of the Tracks area. It provides a search field to get to loops and iTunes music.
-
To the left of the Tracks area. Its contextual parameters adapt based on what is selected and what has focus.
-
At the top of the window. It provides different tools to allow you to work in the Tracks area.
Question 2
Question
Check all that apply concerning the Tracks area:
Answer
-
It is in the center of the main window.
-
It contains Track headers to the left.
-
It contains an EQ fader.
-
It contains a ruler at the top.
-
It has a workspace where you edit regions.
-
It contains a bank of instruments.
Question 3
Question
The control bar is the row of buttons and displays at the top of your display. It contains transport buttons, information LCD displays, and mode buttons.
Answer
- True
- False
Question 4
Question
The workspace is in the Tracks area below the ruler and contains track headers and the regions used in your project.
Answer
- True
- False
Question 5
Question
When multiple panes are open, how do you make sure the desired pane reacts to key commands?
Answer
-
Make sure your key commands are set by adding them in the Key Commands Preferences.
-
By clicking on the pane so there is a blue outline to bring focus.
-
Close all panes to make sure you are in the correct pane where you want to work.
-
Command-F
Question 6
Question
What are ways to adjust a numerical value in Logic X? (Check all that apply)
Answer
-
Slide the pointer vertically.
-
Command-drag the value.
-
Double-Click and type the value in the field.
Question 7
Question
How do you copy a region? (Check all that apply)
Answer
-
File>Duplicate Region.
-
Option-Drag the region.
-
Select region, then Command C.
-
Use the Copy tool in the Tools menu.
Question 8
Question
A region can be resized by placing the pointer over one of the two lower corners so it changes to a Resize tool, and then drag horizontally.
Answer
- True
- False
Question 9
Question
How do you loop a region? (Check all that apply)
Answer
-
L
-
Select the Loop checkbox in the Inspector.
-
Move the pointer to the upper right corner of the region and drag.
Question 10
Question
Effect plug-ins are added by clicking on the effects button in the Track Header
Answer
- True
- False
Question 11
Question
In the help tag, what are the units of the 4 numeric values used to determine the length and position of a region?
Answer
-
Bars, divisions, ticks, and beats
-
Minutes, Seconds, milliseconds, ticks.
-
Bars, beats, divisions, and ticks
-
Bars, beats, divisions, and frames.
Question 12
Question
How many ticks are in a 16th note?
Answer
-
100
-
240
-
220
-
280
Question 13
Question
What ways are there to mix down your project to a stereo audio file? (Check all that apply)
Answer
-
File > Bounce > Project or Section.
-
Option-Command-B
-
Command-B
-
File > Export > Project or Section.
Question 14
Question
The keyboard shortcut for the Mixer is M.
Answer
- True
- False
Question 15
Question
The keyboard shortcut for the Loops Browser is O.
Answer
- True
- False
Question 16
Question
What two fundamental settings affect the quality of a digital audio recording?
Answer
-
Sample Rate and EQ.
-
I/O Buffer Size and Recording Delay.
-
Sample Rate and Bit Depth.
-
Surround Format and Enabling 24-bit Recording.
Question 17
Question
In Logic, where can you find the sample rate setting?
Answer
-
The sample rate is found under Logic Pro X > Project Settings > Audio
-
The sample rate is found under File > Project Settings > Audio
-
The sample rate is found under Edit > Sample Rate Settings
Question 18
Question
What precaution must you take before record-enabling multiple tracks simultaneously?
Answer
-
Make sure cycle mode is on to make take folders.
-
Make sure the tracks are assigned different inputs.
-
Make sure the tracks are not muted.
-
All of the above.
Question 19
Question
In Autopunch mode, you can adjust the left and right edge of the autopunch area, in the middle of the ruler, to set the punch-in and punch-out points.
Answer
- True
- False
Question 20
Question
Which of the statements below are true regarding accessing your metronome and count-in settings?
Answer
-
Control-click the metronome button.
-
Click the count-in button.
-
Record > Count-in
-
Click the metronome button.
Question 21
Question
When you raise the I/O buffer size, the CPU works harder so you can't use more plug-ins, and the roundtrip latency is shorter.
Answer
- True
- False
Question 22
Question
In the Project Audio Browser, when selecting unused files, what determines whether a file is used or unused?
Answer
-
When no regions present in the workspace refer to that file.
-
When you have copied the file.
-
When the file is currently playing.
Question 23
Question
Nondestructive audio editing alters the audio data in the referenced audio file.
Answer
- True
- False
Question 24
Question
Where can you perform nondestructive audio editing? (Check all that apply)
Answer
-
Workspace
-
Audio Track Editor
-
Audio File Editor
-
Piano Roll
Question 25
Question
How do you comp takes?
Answer
-
Create a new track stack and record each take into a component of the stack. Use the scissors tool and fade tool to comp between edits.
-
Using the auto punch feature, set the auto punch region and re-record over an area.
-
Use the quick swipe comp tool to drag over desired sections. The take folder assembles a comp including all the highlighted sections.
-
Record each track, and then use the track folder feature to comp them all together. Use the marquee and fade tool to smooth out edits.
Question 26
Question
How do you prepare to edit the takes inside a take folder?
Answer
-
Close the take folder.
-
From the take folder pop-up menu, select edit.
-
Click the Quick Swipe Comping button at the top left of the take folder to disable Quick Swipe Comping mode.
Question 27
Question
How can you see the result of your comp as regions? (Check all that apply)
Answer
-
Close the disclosure triangle in the Take Folder
-
From the Take Folder pop-up menu, choose Flatten
-
In the Edit Menu, choose Flatten Take Folder
-
Bounce region in place
Question 28
Question
How do you add a fade-in or fade-out to a region or add a crossfade between two regions?
Answer
-
Drag the Fade tool over the boundaries of a region
-
Control-Shift-drag the Pointer tool
-
Adjust the Fade In parameter in the Region Inspector
-
Select region and use Option-Command-F to get the Fade In/Fade Out handles
Question 29
Question
How do you select a section of an audio region?
Answer
-
Pencil tool.
-
Text tool.
-
Highlighter tool.
-
Marquee tool.
Question 30
Question
Which tool allows you to move an individual note inside an audio region, without dividing the region? (Check all that apply)
Answer
-
Flex Tool
-
Pointer Tool
-
Marquee Tool
-
Scissors Tool
Question 31
Question
How do you choose a drummer? (Check all that apply)
Answer
-
Add a New Drummer track
-
Open the Library, and in the Drummer section, choose a category and a drummer.
-
Go to the Library and select a drum kit
-
Select a new genre from the controls area
Question 32
Question
In the Library, click the padlock icon in the Sounds section to lock the drum set while changing drummers.
Answer
- True
- False
Question 33
Question
You can edit the drummer regions in the Drummer Editor at the bottom of the main window,
Answer
- True
- False
Question 34
Question
You can mute or unmute drum parts by clicking on parts of the drum in the Drummer editor.
Answer
- True
- False
Question 35
Question
How do you make the drummer play softer or louder, simpler or more complex?
(Check all that apply)
Answer
-
Adjust the fills dial
-
Move the ball around on the XY grid to correspond to the performance style
-
Mute or unmute drum parts
-
Choose a drummer Preset
Question 36
Question
How do you access the Feel knob, to make the drummer play behind or ahead of the beat?
Answer
-
Select the Gear drop down menu and choose Feel knob options
-
Use the details button in the drummer editor
-
Control-click on the Swing knob to adjust the feel
-
Control-click on the Drummer editor to add the Feel knob to the controls
Question 37
Question
How do you open Smart Controls? (Check all that apply)
Answer
-
S
-
B
-
C
-
Use the Smart Controls icon in the Control bar
Question 38
Question
How do you open Drum Kit Designer? (Check all that apply)
Answer
-
Choose a drum kit in the Library
-
Click the drum icon at the top of the Library
-
Click the software instrument plug-in slot in the channel strip.
-
Double click on the drummer
Question 39
Question
When customizing a drum kit, you have to select the appropriate Producer Kit in the Library to access all the available drum kit features.
Answer
- True
- False
Question 40
Question
How do you dampen or tune an individual drum?
Answer
-
Click on the drum in the Drummer Editor
-
Click on the Details button in the Drummer Editor to access the dampen and tune knobs
-
In the Drum Kit Designer, click a drum and adjust the settings in the Edit panel
-
Adjust the settings in Smart Controls
Question 41
Question
You can convert Drummer regions into MIDI by control-clicking the region and choose Convert > Convert to MIDI Region.
Answer
- True
- False
Question 42
Question
How do you swap samples in Drum Machine Designer?
Answer
-
You cannot swap samples in the Drum Machine Designer.
-
Click a cell sample you want to swap and choose a new sample in the Library.
-
Drag a new file onto the cell from your File Browser.
Question 43
Question
You can use an audio effect plug-in for an individual cell in Drum Machine Designer by clicking a cell and inserting your plug-in on the right channel strip in the inspector.
Answer
- True
- False
Question 44
Question
How do you merge a new recording in an existing MIDI region?
Answer
-
Choose Record > Overlapping MIDI Recordings > Merge. Which section of Merge depends on whether Cycle mode is on or off.
-
Choose > MIDI Preferences and enable Merge mode.
-
Select the Overlapping MIDI button on the Track Header.
Question 45
Question
To time-correct a MIDI region, in the Region inspector, set the Quantize parameter to a desired note length.
Answer
- True
- False
Question 46
Question
How do you choose default region parameters for new MIDI recordings? (Check all that apply)
Answer
-
Open the Piano roll and adjust the settings
-
Set the quantize settings in the Library
-
Default parameters are automatically selected
-
Deselect all regions in the workspace to access the MIDI Defaults settings in the Region inspector.
Question 47
Question
A summing stack will allow MIDI regions on the main track trigger instruments on the subtracks.
Answer
- True
- False
Question 48
Question
In the Smart Controls pane, how do you map a screen control to a plug-in parameter? (Check all that apply)
Answer
-
In the Parameter Mapping Area, click Learn.
-
In the Window menu, select Control Mapping
-
Click a screen control to select it
-
Click a plug-in parameter to map it to the selected screen control
Question 49
Question
To map a screen control to a knob on your MIDI controller, you can go to the External Assignment area, and click Learn. Click a screen control to select it, and turn a knob on your MIDI controller until the screen control moves along.
Answer
-
True
-
False
Question 50
Question
To automatically arpeggiate chords, you can insert the Arpeggiator MIDI effect plug-in in the MIDI FX slot of the software instrument channel strip.
Answer
- True
- False
Question 51
Question
How can you put a track into Live mode? (select all that apply)
Answer
-
Click the Record-enable button
-
Send any MIDI event from your MIDI controller
-
Command - L
-
Start playback
Question 52
Question
How do you create notes in the Piano Roll Editor?
Answer
-
Click on the grid
-
Use the Pencil Tool
-
Drag on the grid with the Pointer Tool
-
Drag a note from the Part Box
Question 53
Question
You can resize a note in the Piano Roll Editor by choosing a note value in the Library.
Answer
- True
- False
Question 54
Question
How do you adjust the Velocity of notes in the Piano Roll Editor?
Answer
-
Drag notes vertically with the Pencil Tool
-
Drag notes vertically with the Pointer Tool
-
Drag notes vertically with the Velocity Tool
-
Click on a note and type in the value
Question 55
Question
In the Piano Roll Editor, how do you view only those lanes occupied by MIDI notes?
Answer
-
Zoom sliders
-
View > Lanes Occupied
-
Click the Collapse button
-
Command - Z
Question 56
Question
To quickly paint multiple notes of the same length, you can drag the Brush tool
Answer
- True
- False
Question 57
Question
How do you create a crescendo using note velocities?
Answer
-
In the Score Editor, use the Velocity Tool and draw a line across the notes
-
In the Automation Parameter pop-up menu, ensure that Note Velocity is chosen, and draw a line in the Automation lane.
-
In the MIDI Draw area, choose the Velocity Tool, and draw a line
-
In the MIDI draw inspector, ensure that Pitch is chosen, and draw a line in the Piano Roll
Question 58
Question
How do you create MIDI control data? (select all that apply)
Answer
-
Click to create the first point.
-
Double click with Pointer tool
-
Double- click away from the automation line, to create a new point.
-
Use the Pencil tool for more complex automation
Question 59
Question
In the Automation lane, you can make a straight line curve by holding down Control-Shift and dragging between two points.
Answer
- True
- False
Question 60
Question
You can copy a section of automation in the Automation lane by selecting the control points, and Option-drag the selection.
Answer
- True
- False
Question 61
Question
If you place the pointer over a note, after a pause, a help tag appears with the pitch and velocity of the note.
Answer
- True
- False
Question 62
Question
How can you check the position, length, and pitch of a note in the Piano Roll?
Answer
-
Double-click the note
-
Control-click the note
-
Click and hold the note
-
Delete the note
Question 63
Question
Which picture displays how you would adapt the project tempo to the tempo of an audio file that you import?
Answer
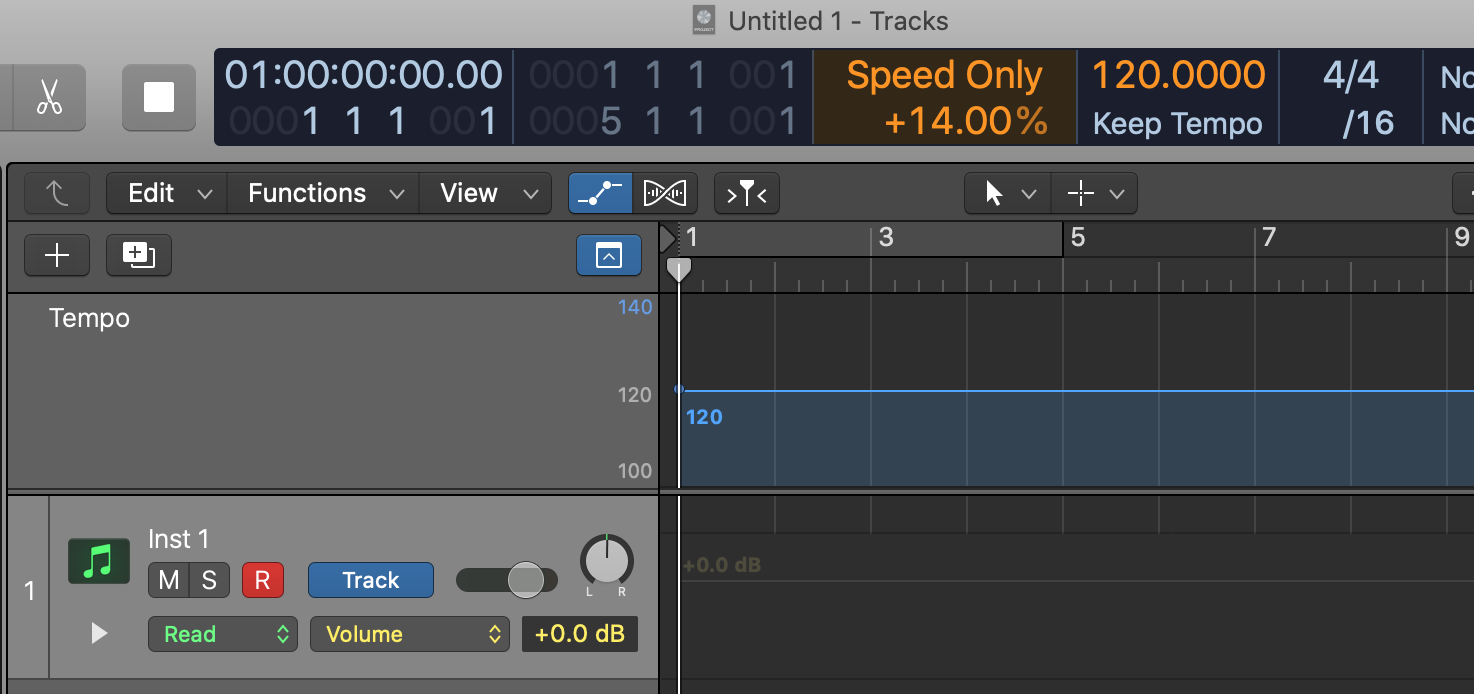
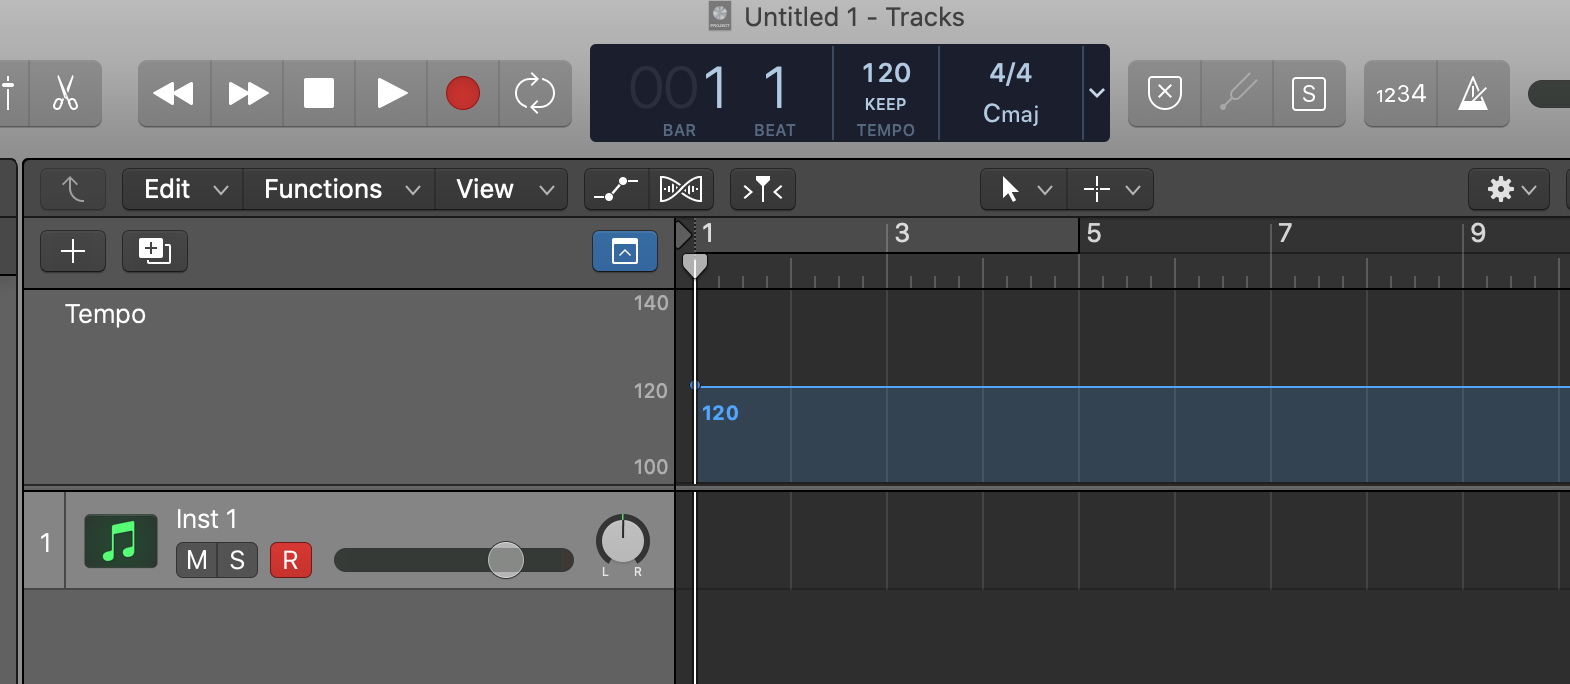
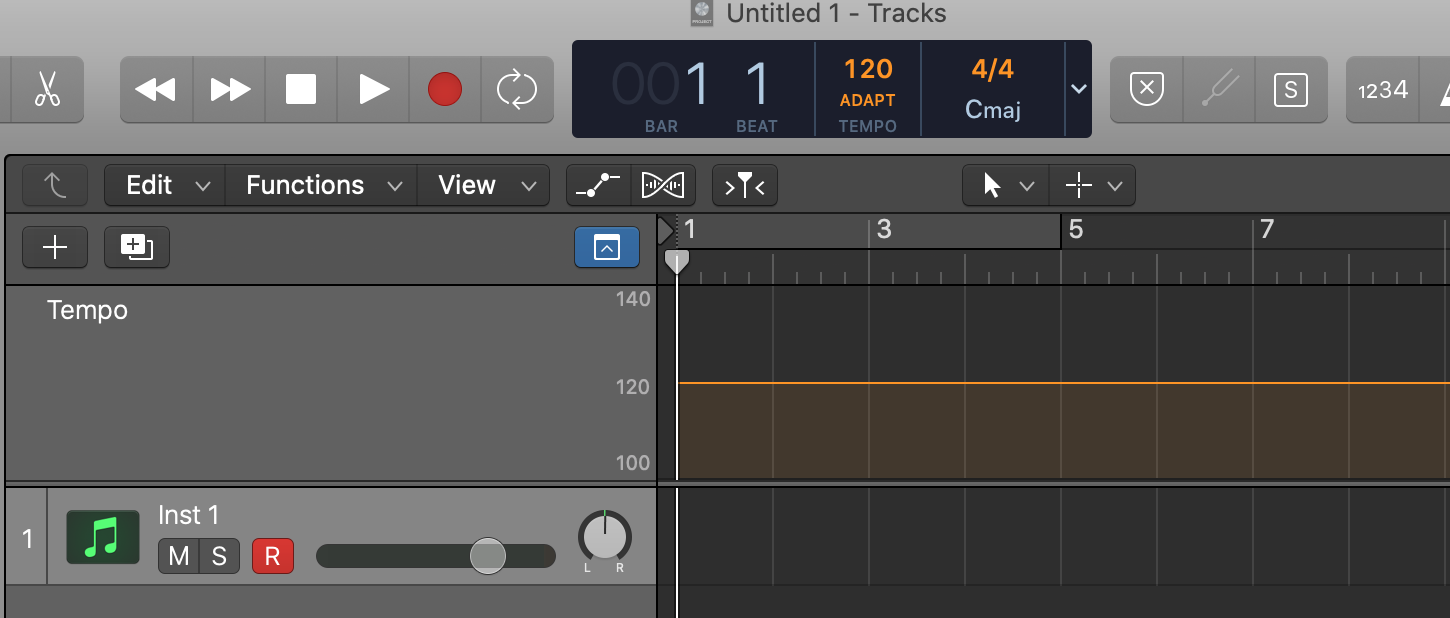
Question 64
Question
How do you create an Apple Loop that follows the project tempo?
Answer
-
Bounce a section of a region and import it into the Loops area
-
Drag any region to the Loops area
-
Drag a region to the Loop Browser that is a whole integer in length
-
Control-click on a region and choose Add to Loop Browser
Question 65
Question
How do you add tempo changes and curves?
Answer
-
In the Tracks Inspector, use quantization to set the tempo at any given marker point. Use the Fade-In/Out tool to set the curve.
-
In the Global Tracks, on the Tempo track, create and adjust tempo points.
-
Show the Automation lines, choose Tempo in the pop up menu, and draw curves and control points using one of the automation modes
Question 66
Question
You can apply a tape or turntable speed-up or slow-down effect by adding a fade-in or fade-out, Ctrl-clicking it, and from the shortcut menu choosing speed up or slow down.
Answer
- True
- False
Question 67
Question
How do you make one track follow the groove of another? (Check all that apply)
Answer
-
Configure the track headers to show groove tracks
-
Enable Flex Mode and choose Rhythmic
-
Select the Match Groove Track checkbox in the other track(s)
-
Click over the track number to set the groove track (gold star)
-
Quantize the region in the Region inspector
Question 68
Question
How do you turn on Flex editing? (Check all that apply)
Answer
-
F
-
Use the Flex button in the Tracks area menu bar and enable the Flex button on the desired track
-
Command-F
-
Choose a flex mode for the selected track in the Track Inspector
Question 69
Question
Assuming there are no pre-existing flex markers in the region, you can time stretch an audio region using the region's start and end points as boundaries by dragging the Flex Tool on the lower half of the waveform.
Answer
- True
- False
Question 70
Question
How do you time stretch an audio region using the previous and next transient marker as boundaries?
Answer
-
Drag the Flex tool on the upper half of the waveform
-
Drag the Flex tool on the lower half of the waveform
-
Drag the Pointer tool on the lower half of the waveform
-
Drag the Pointer tool on the upper half of the waveform
Question 71
Question
Using Flex Pitch, where can you edit the pitch of notes inside an audio region? (Check all that apply)
Answer
-
Workspace
-
Audio File Editor
-
Audio Track Editor
-
Piano Roll
Question 72
Question
When Flex Pitch is turned on for a track, how do you quickly tune and entire audio region?
Answer
-
Select the audio region, rubber band the notes and drag to correct pitch
-
Select the audio region, and in the Region inspector, "set all to perfect pitch"
-
Select the audio region, Ctrl-click and "set all to perfect pitch" from the shortcut menu
-
Select the audio region in the Audio Tracks Editor and move all pitches by dragging to perfect pitch
Question 73
Question
How can you edit the pitch curve?
Answer
-
Drag using the Flex tool in the Workspace
-
Using Flex Pitch editing in the Audio Tracks Editor, drag the 6 hotspots around a note beam
-
Control-Click-drag on a note and adjust it's curve
-
Using the Flex tool in the Audio Tracks Editor, Command-Option-drag around a note beam
Question 74
Question
How do you use Solo mode? (Check all that apply)
Answer
-
Select the regions you want to solo and use Control-S
-
Select the regions you want to solo and drag the Solo tool.
-
Select the regions you want to solo and use Command - S.
-
Select the regions you want to solo, and in the control bar, click the Solo button
Question 75
Question
To add a marker, place the playhead where you want to place the marker. Go to Navigate > Create Marker.
Answer
- True
- False
Question 76
Question
How do you pack regions into a folder?
Answer
-
Select the regions and use the Glue tool
-
Select the regions and go to Functions > Merge > Pack Folder
-
Select the regions and go to Functions-> Folder-> Pack Folder
-
Select the Regions and use Command-P
Question 77
Question
Use the disclosure triangle to open and close a folder.
Answer
- True
- False
Question 78
Question
To insert a new section into a project, adjust the cycle region to desired length and use Edit-> Cut/Insert Time-> Swap Left and Right Locators
Answer
- True
- False
Question 79
Question
How do you skip a section when playing a project?
Answer
-
Use a skip cycle by dragging left on the cycle area
-
Use a skip cycle by Ctrl-clicking the cycle area, and from the shortcut menu choose "Swap Left and Right Locator."
-
Add a marker and hide the regions below it by Control-clicking on the marker and selecting Hide
Question 80
Question
How can you remove background noise between performances on a track?
Answer
-
Use a High Pass filter on the Graphic Equalizer
-
Use a Compressor
-
Use Strip Silence and set the threshold
-
Use a Low Pass filter on the Graphic Equalizer
Question 81
Question
When Cycle mode is enabled, you can click a track header to select all the regions between the locators on that track, to quickly select many small regions on the same track.
Answer
- True
- False
Question 82
Question
How do you drag a region while ensuring that it retains its position relative to the bar lines?
Answer
-
In the Snap pop-up menu, make sure "Snap Regions to Relative Values" is selected and choose Smart.
-
In the Snap pop-up menu, make sure "Snap Regions to Relative Values" is selected and choose Bar.
-
In the Snap pop-up menu, make sure "Snap Regions to Relative Values" is selected and choose Tick.
-
In the Snap pop-up menu, make sure "Snap Regions to Relative Values" is selected and choose Measure.
Question 83
Question
To quickly solo or mute multiple tracks in the Tracks area, press Option, and drag up or down over the Solo or Mute button on a track header.
Answer
- True
- False
Question 84
Question
Identify the 4 main instrumental sound components you can adjust to give each instrument its place in the mix. (Check all that apply)
Answer
-
Volume Level
-
Pan Position
-
Frequency Spectrum
-
Compression
-
Distance
-
Delays
Question 85
Question
You use a bus send to route some of the signal from a channel strip to an aux channel strip, usually to be processed by plug-ins.
Answer
- True
- False
Question 86
Question
How can you make a group of tracks appear as one track in the Tracks area without changing its audio routing?
Answer
-
Use groups on the selected tracks' channel strips
-
Select the tracks and choose Track-> Create a Track Stack, and choose folder stack
-
Select the tracks and choose Track-> Create a Track Stack, and choose summing stack
Question 87
Question
How can you submix a group of tracks, for example, to process the submix with audio effect plug-ins?
Answer
-
Use groups on the selected tracks' channel strips
-
Select the tracks and choose Track-> Create a Track Stack, and choose folder stack
-
Select the tracks and choose Track-> Create a Track Stack, and choose summing stack
Question 88
Question
A compressor attenuates the level of a signal after that signal goes over a certain threshold, giving the signal a more consistent level.
Answer
- True
- False
Question 89
Question
What does a limiter do?
Answer
-
It attenuates the level of a signal after that signal goes over a certain threshold, giving the signal a more consistent level.
-
It works in a similar fashion to a compressor, but it makes sure that the signal is attenuated so it never goes over a specific output ceiling.
-
The limiter works with the compressor to make all sound levels equal.
Question 90
Question
In the inspector, how can you choose which channel strip is displayed in the right channel strip?
Answer
-
Control-click the track header and select 'Display right channel strip.'
-
Go to View > Channel Strip > Display right channel strip
-
On the left channel strip, click any Send slot or the Output slot to display the corresponding channel strip on the right.
Question 91
Question
How do you change the mono or stereo format of the input of a channel strip?
Answer
-
Click the Format button in the Input slot.
-
Control-click the Pan knob.
-
Go to Mix > Mono or stereo
-
Click the Output slot.
Question 92
Question
You can toggle the soloed state of currently soloed tracks by clicking the Solo Kill/Recall button at the top of the track headers.
Answer
- True
- False
Question 93
Question
How can you set up Logic to use Command-Z to undo plug-in parameter changes?
Answer
-
In a plug-in window, from the Settings pop-up menu, choose Include Plug-In Undo Steps in Project Undo History.
-
Command-Z cannot be used to undo plug-in parameter changes.
-
In the Inspector, click on the pop-up menu in the plug-in slot, and choose Include Plug-In Undo Steps in Project Undo History.
Question 94
Question
You can create a control point on the automation curve by clicking on the automation curve.
Answer
- True
- False
Question 95
Question
How can you create a control point away from the automation curve?
Answer
-
Option-click away from the line.
-
Control-Shift-drag away from the line.
-
Double-click away from the line.
-
Drag the point off the line.
Question 96
Question
How can you quickly adjust the value of a parameter for a given section of a track?
Answer
-
Use the Trim tool to select the desired section, and drag the selected automation curve up or down.
-
Use the Flex tool to select the desired section, and drag the selected automation curve up or down.
-
Use the Pointer tool to select the desired section, and drag the selected automation curve up or down.
-
Use the Marquee tool to select the desired section, and drag the selected automation curve up or down.
Question 97
Question
You can trim an automation curve by placing the mouse pointer on the numerical display in the track header and drag vertically.
Answer
- True
- False
Question 98
Question
How can you create automation control points that snap to the grid?
Answer
-
From the Snap pop-up menu, choose Snap Automation.
-
From the Automation pop-up menu, choose Snap Automation.
-
From the Snap pop-up menu, choose Smart.
Question 99
Question
In both Touch and Latch mode, when you release the mouse button, the parameter returns to the previous value on the automation curve.
Answer
- True
- False
Question 100
Question
How can you view multiple automation curves on the same track? (Select all that apply)
Answer
-
Click the Folder button in track header to show an additional subtrack.
-
Click the disclosure triangle in the track header to show an additional subtrack.
-
Click the - (minus sign) in the subtrack to create another subtrack.
-
Click the + (plus sign) in the subtrack to create another subtrack.
Question 101
Question
How do you assign a controller knob to Automation Quick Access?
Answer
-
Click Assign, and turn the knob of your choice up and down to assign it.
-
An alert asks you to assign a controller knob.
-
Enable Automation Quick Access with Command-A.
-
In the Automation preferences, turn on Automation Quick Access.
Question 102
Question
Automation Quick Access always controls the parameter displayed in the Automation Parameter pop-up menu on the selected track header.
Answer
- True
- False
Want to create your own Quizzes for free with GoConqr? Learn more.