
Flashcards
IDP semester 1
Cards in this deck (69)
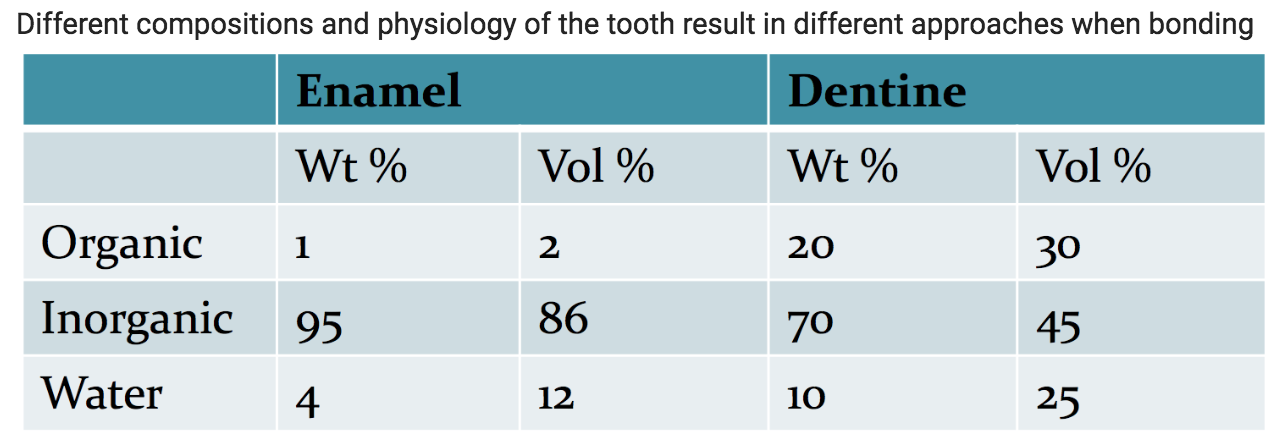
- 1Enamel and Dentine Compositions
- 2Components of an adhesive resin: ResinResin is responsible for ‘bonding’ the tooth structure to the restorative material with methacrylate (MA) and also responsible for the degree of polymerisation shrinkage
- 3Components of an adhesive resin: SolventThe solvent helps the hydrophobic resin to flow into the dentinal tubules/collagen networks
- 4Components of an adhesive resin: Initiator Light and dual cure pros and consThe initiator starts the reaction. Camphorquinone (CQ) is the most common initiator.
Light cure pros: Colour stable, No mix, Command set, Good physical properties
Light cure cons: Incremental placement, Shrinkage, Ambient light issues
Dual cure pros: Flexibility in use, Command set
Dual cure cons: Must mix to get a reaction, Work time is limited, Lower physical properties - 5Components of an adhesive resin: FillersFillers give strength and stability for crosslinking & adhesive reinforcement. It is made of nanofillers and gives the composite resin a radiopacity
- 6Components of an adhesive resin: Adhesion Promoter/PrimerA primer dissolves the resin, chemically bonds to calcium in dentine/enamel, making the surface of the substrate more amenable to accepting a bond
- 7Components of an adhesive resin: Stabiliserreduces polymerisation during storage
- 8Components of Dentine Bonding Agents: Dentine conditionersDentine conditioners are acids that modify the smear layer. They react with hydroxyapatite and result in the opening of the dentine tubules and creates a demineralised surface layer of dentine up to 4um.
- 9Components of Dentine Bonding Agents: PrimerPrimer is the adhesive in the dentine bonding process, consisting of a monomer (methacrylate) that bonds to Composite Resin and a coupling agent that bonds to dentine (either via the collagen bundles or apatite). It is important that the primer penetrates the demineralised collagen layer for a strong interface region.
- 10Components of Dentine Bonding Agents: SolventAcetone:
- Excellent Diluent (Provides a low viscosity and film thickness)
- Efficient Carrier (Deep penetration through smear layer into dentinal tubules, Permits use of stronger, hydrophobic resins - hydrophobic resins take up less water)
- Rapid Evaporator (Removes water and solvent quickly to enable complete polymerisation)
Tert-Butanol:
- Longer working time
- Higher degree of technique tolerance
- More forgiving with regards to wet/dry dentine
- Visible application in cavity - 11Components of Dentine Bonding Agents: Bond/Resin/AdhesivePenetrates and polymerizes into the dentine spaces and interfibrillar spaces to form a backbone. Co-Polymerizes with the primer molecules. Flows into the dentine tubules creating a seal and surface rich in Methacrylate to bond composite resin. The dentine surface is thoroughly sealed with a resin, which is bonded to the dentine via the coupling agent in the primer and the resulting inter-penetrating layer of dentine and resin is called the hybrid (consisting of primer, collagen, hydroxyapatite, adhesive) layer.
- 12Enamel Bonding Technique (entirely micromechanical) Step 1Enamel Prophylaxis: cleaning to rid pellicle and plaque with a slurry of pumice (There is no need to pumice if a cavity preparation on prepared enamel has been performed with a handpiece)
- 13Enamel Bonding Technique (entirely micromechanical) Step 2Application of the Etchant: acid etching to transform the smooth surface of the enamel into an irregular surface of enamel prisms and to increase surface free energy. Teeth need to be dry before applying the etchant (usually 37% Phosphoric Acid) for ~20 seconds. After etching, wash to remove acid and particles. Then, dry extremely well to enhance wettability of the resin onto the surface (wet enamel will not adapt to bond). Well etched and dried enamel looks dull, white and frosted. Gel form is preferred as it allows for better control of placement, is easily seen and complete removal is easily monitored.
- 14Enamel Bonding Technique (entirely micromechanical) Step 3Application of Resin/Adhesive: Resin penetrates the surface of the enamel and forms enamel tags up to 30um. Upon polymerization, the resin becomes locked via micromechanical retention in the enamel tags.
- 15Dentine Bonding Technique: 3 step process1. Etch, Wash and Dry dentine:
DRY BUT DONT DESICCATE: overdrying can cause collagen fibres to collapse further, and primer and bond can’t reach those areas as well.
2. Apply primer and Allow to Dry (don’t wash)
3. Application of Bond/Resin/Adhesive and Cure - 16What is a Smear Layer?An inhibitory layer of debris on the surface of tissues of EXPOSED dentine, including Microorganisms, Salivary proteins, Collagen and Hydroxyapatite
- 17Resin-Enamel Bonding SystemResin bonding to enamel is usually reliable and strong.
Factors that can affect its efficiency include: clinical techniques, moisture isolation, presence of unsupported or fractured enamel margins, ‘poor quality’ enamel and primary teeth (primary dentition is relatively prismless, fluorotic enamel may require longer etch times), adhesive properties (low viscosity adhesive will allow optimum penetration, adhesive should be as thin as possible with no pooling at margins) - 18Dentine-Enamel Bonding SystemAdhesion to dentine is less reliable than adhesion to enamel primarily due to differences in
composition and structure.
Dentine: ~2.5x water and 20x organic material than enamel. This heterogenous composition makes it more difficult substrate to bond to.
Water competes with bonding agents and can hydrolyse resin bonds
Often covered by a gelatinous smear layer (0.5-5um) inhibiting bonding - 19Components of composite resin: Organic Resin MatrixOrganic resin matrix: the chemically active component of the composite. Initially a fluid monomer that is converted to a rigid polymer. Shrinks on polymerisation by ~7.5%. Highly viscous, hence ‘viscosity controllers’ are added to ensure ease of use. An inhibitor is also added to prevent premature polymerisation.
- 20Components of composite resin: Inorganic fillerreduces polymerisation shrinkage, makes the resin less susceptible to heat changes, improves mechanical properties such as compressive strength. Includes a heavy metal for visibility on radiographs (radiopaque). Also provides an ability to control aesthetic features (Colour, Translucency, and Fluorescence)
- 21Components of composite resin: Coupling agentbonds the hydrophilic filler to the hydrophobic resin matrix to prevent fracture and wear of the restoration. Also acts as a stress absorber, allowing stresses in the resin to be transferred between filler particles.
- 22The Setting Reaction of Composite Resins1. Activation: curing begins the initiation process
2. Initiation: The free radical from the initiator breaks the carbon-carbon double bond (C=C) in monomers within the resin.
3. Propagation: The free radical from the new polymer will break a C=C in another monomer. This repeats until termination.
4. Termination: usually occurs when the matrix has solidified. - 23Properties of Composite Resin1. Thermal properties: Thermal expansion of composite resin is approx. 3 times greater than the tooth structure
2. Radiopacity: Enables clinician to detect recurrent caries and marginal defects
3. Polymerisation shrinkage: A problem with all resin-based restorative materials. Shrinkage will vary between 1-5% volume.
4. Setting: Light-activated materials continue to polymerise and shrink after removal of the curing light - conversion of monomer to polymer is never quite complete. - 24Clinical Considerations and Limitations of Composite ResinsShrinkage is ‘toward area of greatest bond potential’ and towards the light.
Methods to reduce polymerisation shrinkage:
• incremental placement
• placement of GIC base to reduce volume of composite
• the development of stronger bonding agents
• use of modified techniques of light curing
Contraindications include patients with excessive wear and bruxism. - 25Components of GICA glass powder
A liquid (poly acrylic acid in water) - 26Setting Reaction of GIC1) When the glass powder and liquid are mixed, the acid starts to dissolve the glass through an Acid-Base Reaction.
2) Glass releases ions including Ca2+ and Al3+
3) Polyacrylic acid chains in the liquid are crosslinked by the Ca2+ from the glass
4) Forms a layer of silica gel on the surface of unreacted powder ???
5) Over time, the Ca2+ions are replaced with Al3+ ions and the material hardens - 27GIC Properties1. Adhesion to enamel and dentine: Chemical (ionic) bond, Able to bond directly to dentine and enamel. Also forms micromechanical bonds with the collagen in dentine
2. Boiocompatibility: Acts as a Flouride reservoir (2 long term releases), resistant to plaque accumulation, Induces minimal and transient pulpal response. But has poor resistance to acid attack (since it is inorganic), short working time and long setting time
3. High compressive strength because of the high powder/liquid ratio
4. Low tensile strength compared to Composite Resin
5. Brittle, low fracture resistance
6. Poor wear
7. Water sensitive
8. Poorer aesthetics compared to composite resin
9. Higher replacement rate for secondary caries than Composite Resin - 28rmGIC compared to conventional GICMore polymerization shrinkage of rmGIC than conventional GIC
Higher bond strength, likely due to enhanced micromechanical interlocking
Longer working time and shorter setting time than GIC
Strength and resistance to desiccation and acid attack is improved compared to GIC
Better colour selection than conventional GIC - 29Clinical Applications of rmGICFissure sealants
Liners/Bases
Non-stress bearing areas (Cervical/Root restorations)
Temporary or caries control restorations - 30Clinical Applications of GICOcclusal pits and fissures (esp in erupting teeth)
Liners/Bases
Non-stress bearing areas (Cervical/Root restorations)
Temporary or caries control restorations - 31Clinical Applications of Resin CompositesFillings
Proximal posterior cavities
Luting agents
Indirect Restorations
Endodontic Post and Cores - 32Course of V2Passes from the Middle Cranial Fossa into the Pterygopalatine Fossa via Foramen Rotundum. As it crosses the PPF, it gives off branches:
Pterygopalatine ganglion
Infraorbital nerve
Zygomatic branches - 33Areas of supply of the Nasopalatine branch, Greater Palatine n. and Lesser Palatine n. of V2Nasopalatine branch: mucosa of the primary palate via the incisive foramen
Greater Palatine nerve: palatal bone and surrounding soft tissue via the greater palatine foramen
Lesser Palatine nerve: mucosa of the soft palate & tonsillar region via lesser palatine foramen - 34Areas of supply of the Posterior, Middle and Anterior Superior Alveolar nerves of V2PSA: upper 7s, upper 8s, palatal and distobuccal root of upper 6s, heir periodontium, buccal gingiva and maxillary sinuses
MSA: premolars, mesiobuccal root of upper 6s and the periodontium, buccal mucosa and bone in the premolar region
ASA: incisors and canines and their associated periodontium, buccal bone and mucous membranes - 35Uses of InfiltrationAll teeth and buccal mucosa of the maxilla (blood supply, more superficial (buccal) roots, cancellous bone)
Anterior Mandible (thin bone around the 33 to the 43)
Posterior mandible up to age 7-10 (less dense bone for easy diffusion) - 36Infiltration Steps1. Retract the lip strongly with a mirror
2. Use a short needle
3. Aline the needle with the long axis of the tooth
4. Insert needle into the buccal mucogingival junction
5. Advance slowly until the tip is deep to the level of the tooth apex
6. Insert no more than 1-1.5cm
7. No need to touch bone
8. Inject slowly - 37Considerations with LA in the MaxillaWide palatal roots of the 1st molar may require palatal injections due to inability of anaesthetic to diffuse
Canine eminence (bone ridge) overlying canine, do not hit with needle - 38Nasopalatine Nerve Block Steps1. Apply pressure to the opposite side of the injection site
2. Insert needle at a 45 degree angle to the palate into palatal mucosa lateral to the incisive papilla along the midline
3. Deposit a small amount to reduce patient discomfort (you should see the tissue blanch)
4. Advance needle until it contacts the hard palate
5. Withdraw needle slightly, aspirate and inject very slowly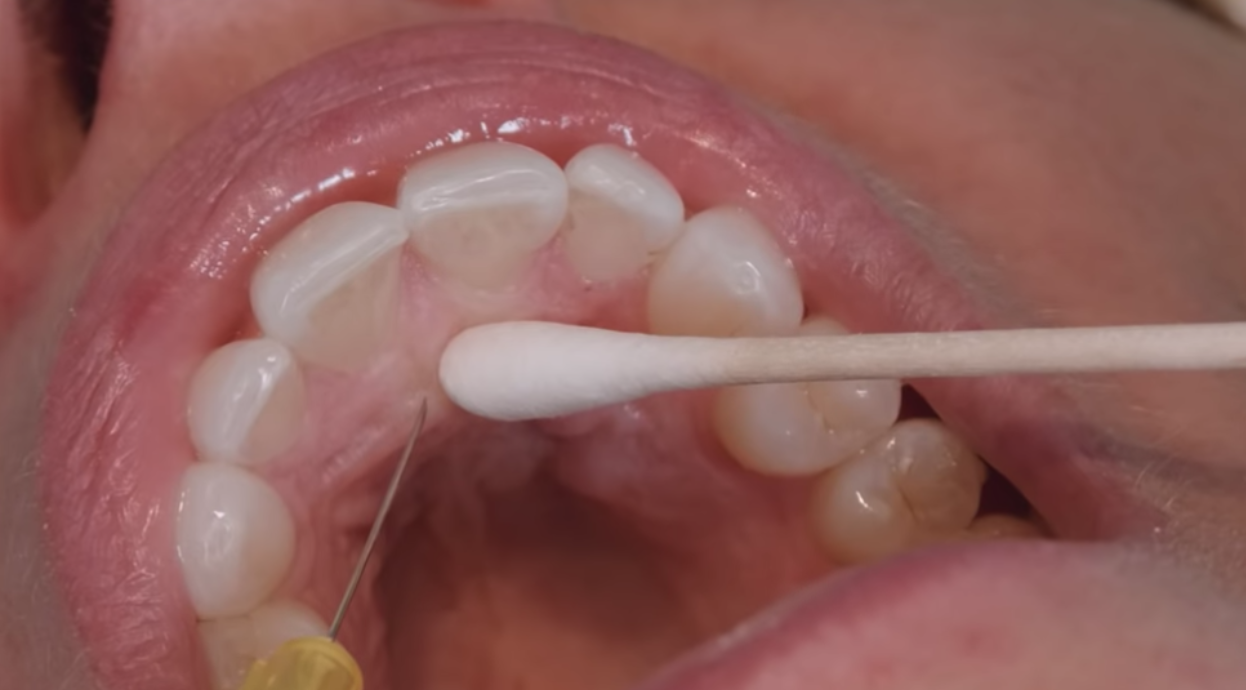
- 39Greater Palatine Nerve Block1. Locate greater palatine foramen with the cotton bud – opposite palatal root of upper 2nd molars (or at the junction of the hard/soft palates) and apply surface pressure to the depression
2. Insert needle at a 90 degree angle slightly anterior to the foramen, into palatal mucosa at the junction of the horizontal process of palatine bone and the Mx alveolar process (alveolar bone)
3. Advance needle until it contacts the hard palate
4. Withdraw needle slightly, aspirate and inject very slowly
Injecting the right side: sit at 8-9 o’clock
Left side: 11 o’clock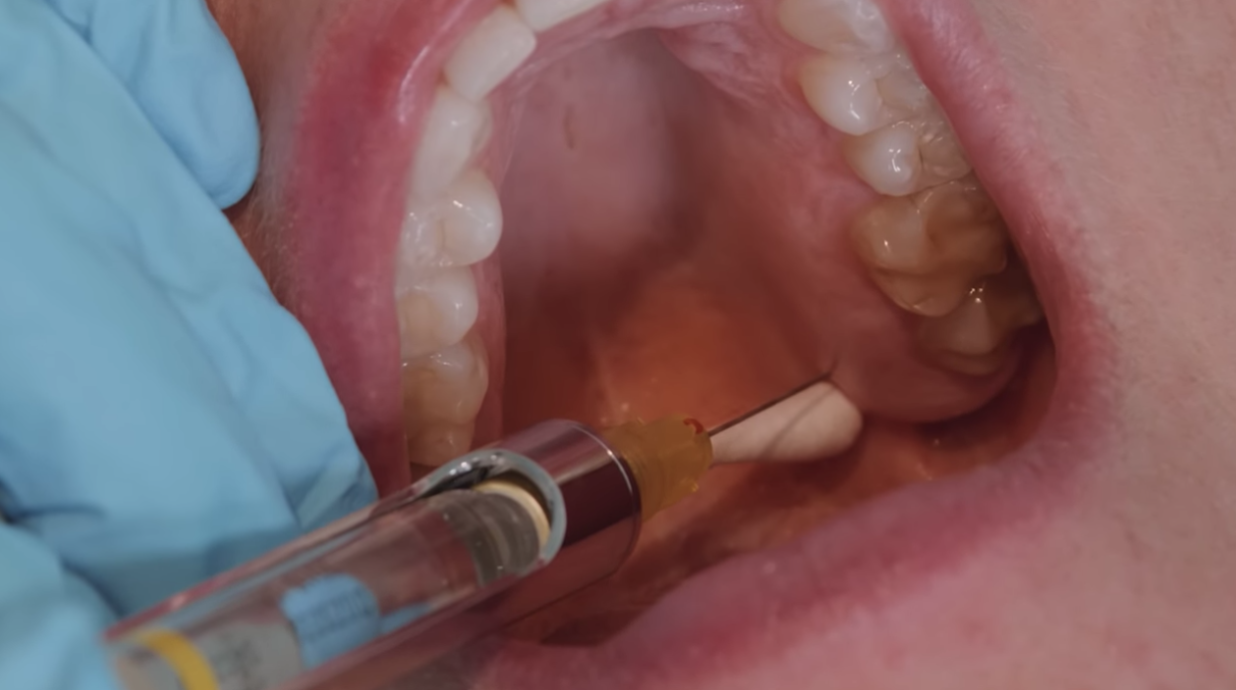
- 40Palatal Anaesthesia Usesextractions due to damage to soft tissues and palatal bone
occasionally required for endodontic and restorative procedures if pain is experienced (eg rubber dam)
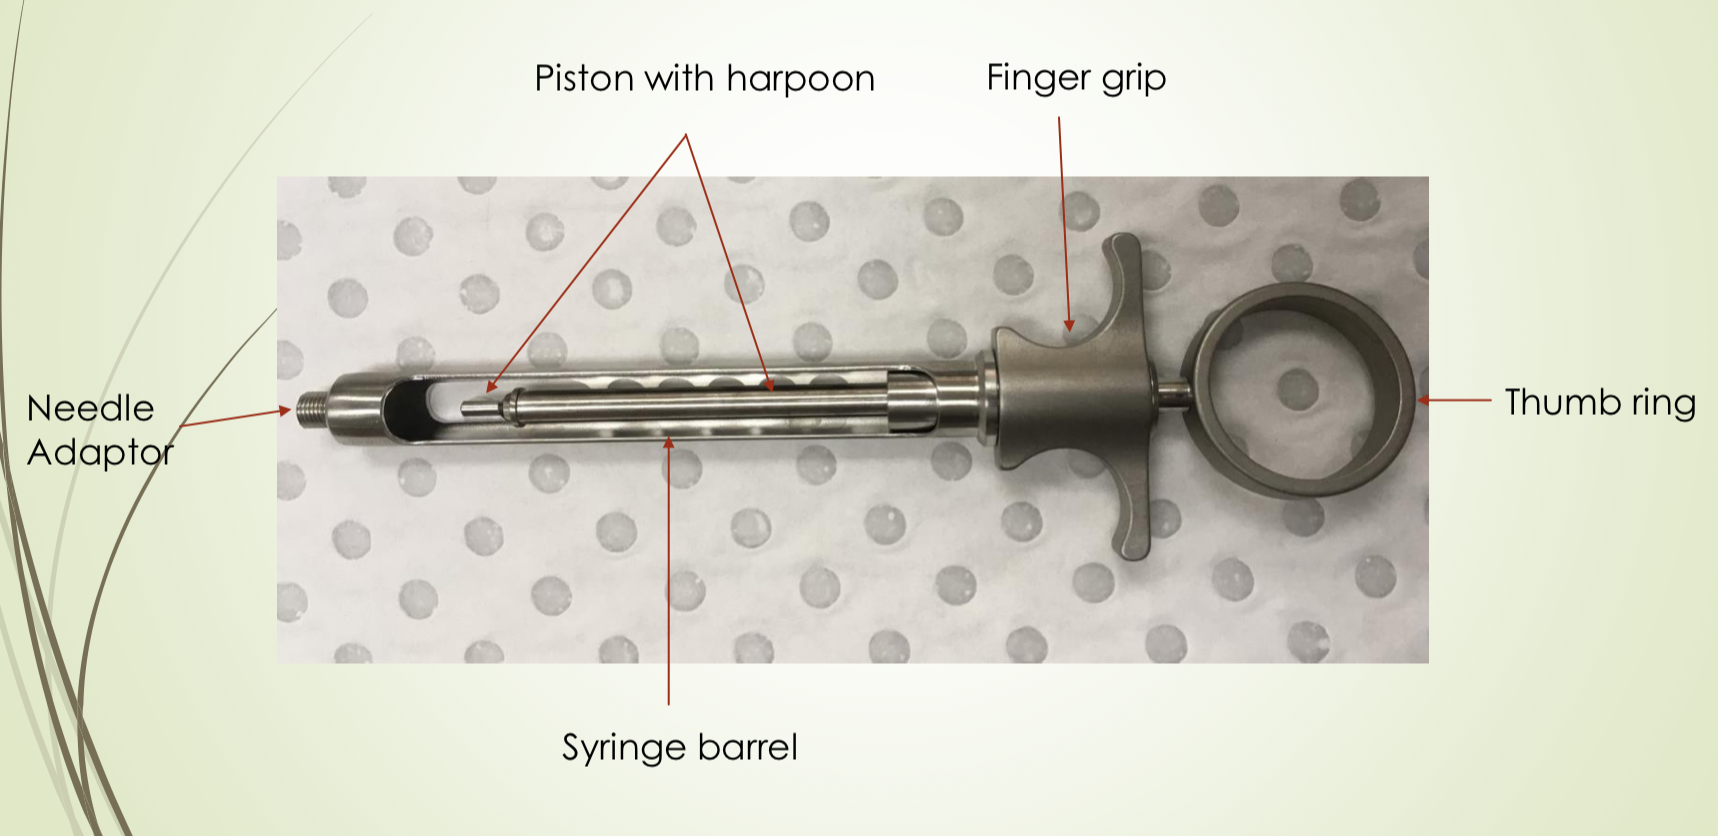
inadequate anaesthesia of the palatal root of upper 1st molars - 41Aspirating Syringe Components
- 42Cartridge Components and ContentsAnaesthetic Agent
+/- Vasoconstrictor
Preservative (antioxidant) for the vasoconstrictor
Sodium Chloride
Distilled water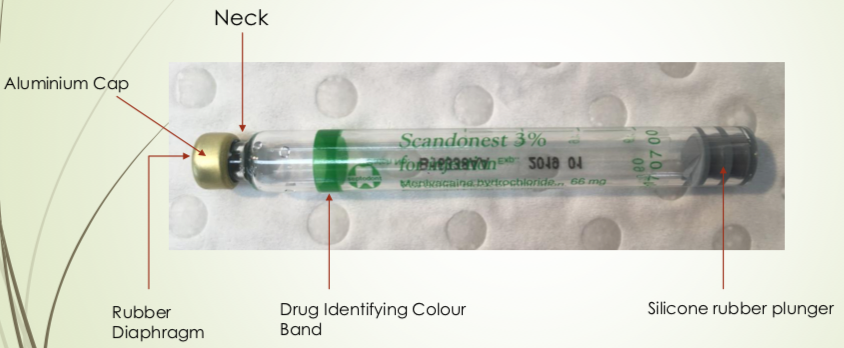
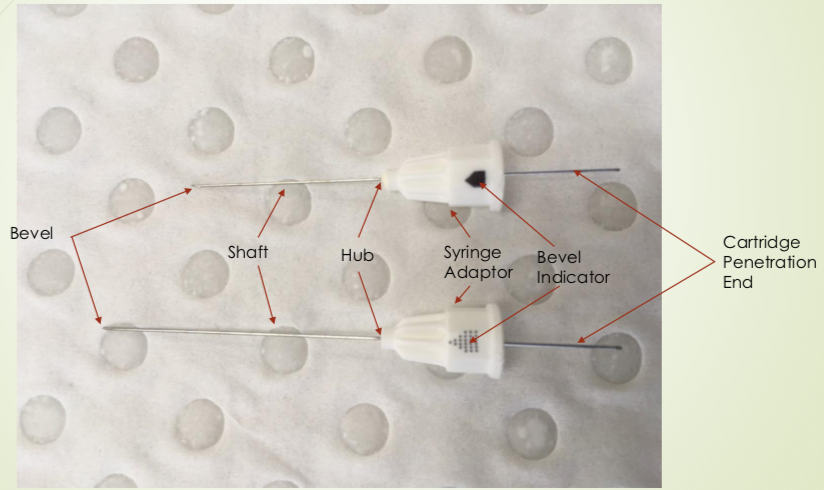
- 43Needle Components
- 44Mandibular Labial InfiltrationNUMBS:
Anterior mandibular teeth (incisive nerve), labial mucosa and lip (mental nerve branches) - 45Lingual InfiltrationNUMBS:
lingual gingivae and floor of the mouth - 46Inferior Alveolar Nerve BlockNUMBS:
Mandibular teeth and associated lingual tissue and facial tissue anterior to 1st molar -
Mandibular teeth up to the midline, body of the mandible, the inferior portion of the ramus,
mucous membranes anterior to the mandibular first molars (mental nerve),
floor of the oral cavity, anterior ⅔ of tongue and lingual soft tissues and periosteum (lingual nerve) - 47IAN Block Steps1. Enter the mouth from the second premolar on contralateral side
2. Palpate the coronoid notch and locate the pterygotemporal depression
3. Insert just on lateral aspect of pterygomandibular raphe
4. Advance needle about 2cm until it contacts bone
5. Withdraw needle slightly
6. Aspirate
7. Inject slowly - 48Lingual Nerve BlockNUMBS:
lingual mucosa of all teeth, anterior 2/3 of tongue, floor of mouth - 49Buccal Nerve BlockNUMBS:
buccal mucosa and gingiva in the area of the molars and 2nd premolar - 50Facial palsy as a consequence of incorrect inferior alveolar nerve blockInjecting into the parotid salivary gland which rapidly diffuses into the facial nerve.
Reassure the patient it is transient
Give an eye patch to protect the eye
Consider delaying treatment to another time - 51Local Complications when using LANeedle breakage (not properly inserted to the hub)
Pain during administration
Insufficient anaesthesia
Excessive spread of anaesthesia
Trauma to nerve: persistent sensitivity disorders
Trauma to artery: blanching
Trauma to vein: haematoma formation and trismus
Tissue damage
Infection - 52Physiology of PainPain stimuli generated mainly by the sensory nerve endings of the Aδ and C fibres.
The stimulus received by the nociceptors is converted in to a nerve impulse and transported from the PNS to the CNS, where it is interpreted.
Nociceptors are present in pulp and soft tissues of the mouth. - 53Pharmacology of LA AgentsLA interferes reversibly with the action potential and with impulse conduction by blocking Na+ channels leading to local insensibility to pain stimuli
- 54Structure/Components of LA AgentsA lipophilic group (usually an aromatic structure containing a benzene ring) – determines lipid solubility
Hydrophilic group (contains a secondary or tertiary amine) – determines water solubility - 55Pharmacodynamics of LA AgentsRN + H+ <-> RNH+ (cationic/active form)
You want a balance of RN to diffuse across the lipid bilayer and RNH+ to attach to the sodium pumps.
The body is always at a pH of 7.4, unless there in an infection, where the body will be more acidic as it undergoes more anaerobic respiration. - 56Vasoconstrictors in LAsActions:
reduce blood flow at the site of the injection
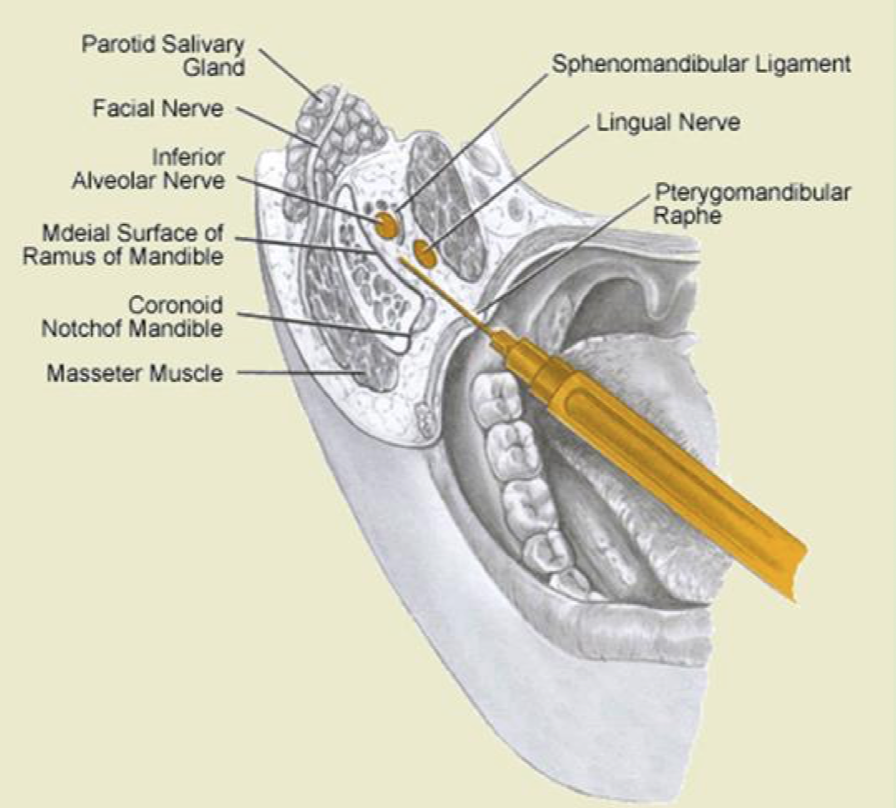
delay absorption of LA which reduces risk of systemic toxicity - 57IAN Block anatomyneedle pierces between buccinator and superior constrictor. Medial pterygoid muscle is lateral to lingual nerve.
- 58Advantages of GIC/rmGIC linersBonds more reliably to dentine
Fluoride release
Less cavity shrinkage
Less post operative pulpal sensitivity
Reduced miro-leakage
Barrier against chemical irritation
Provided thermal insulation
Can resist the condensation forces on a tooth when placing a restoration - 59Sandwich Tecnique AdvantagesGIC Base:
• Good retention to Dentine
• Fluoride release
• Dentine ‘substitute’
• Less moisture sensitive
• Less polymerisation shrinkage
Hides poor aesthetics of GIC/rmGIC
Still has the protective benefit of CR occlusally - 60Sandwich Technique Disadvantages• rmGIC has monomer and may be contraindicated in cavities close to the pulp
• Open sandwich still has exposed GIC → Prone to acid attack
• Need enough room for CR build up
• Junction between CR and GIC is the weak area in an open sandwich
• Avoid placing on enamel margins (can be difficult) - 61Posterior Proximal (Class II) RestorationsPlace matrix
Wash and dry cavity (don’t desiccate)
Condition with 10% polyacrylic acid for 10s
Wash thoroughly
Dry
Place base (GIC/rmGIC)
Etch with 37% orthophosphoric acid for 10s
Wash and dry thoroughly
Bond
Adhesive resin applied with microbrush
Light cure (20s)
Build up restoration with increments of composite resin/
Light cure each increment (20s)
Remove matrix band
Finish restoration
Check occlusion
Check contact point - 62Aaetiology of cervical lesionsCarious: New or Existing restorations (Recurrent Caries)
Non-carious:
Erosion - Chemical (food, drink, medication, gastric)
Abrasion - mechanical, frictional
Abfraction - occlusion - 63Factors dependent on methods of Cervical (Class V) RestorationsCavity Depth
Margins
Enamel and/or dentine
Active or arrested lesion
Caries risk assessment
Aetiology (Eg. acid environment → avoid GIC) - 64When to restore Cervical lesions with linersFor larger and deeper lesions.
Open sandwich technique. - 65Types of Preventive Resin RestorationsType A – Suspicious pits and fissures where caries is limited to enamel
Type B – Incipient lesion in dentine that is small and confined
Type C – Requires Exploration and preparation of the dentine - 66Class III Restoration StepsPlace Rubber Dam
Clean surface of the tooth with pumice and a bristle brush
Dry and inspect teeth: carious areas feel soft and sticky/tacky, with changes to enamel colour. Stains feel hard
Open the carious or suspicious areas with a small round bur
Remove only carious lesions
Open adjacent grooves only when necessary to ensure they are caries free using the tip of a diamond or small round bur
Etch with 37% Phosphoric acid for 20s
Rinse and dry (but don’t desiccate if into dentine)
Prime/Bond (light cure for 20s)
Place CR in deepest area of restoration
Light cure 20s
Place sealant material over restored area and adjacent intact etched pits and fissures
Light cure 20s - 67Anterior proximal (Class III) restorations: Access formA lingual access/approach is preferable due to aesthetics
Gain access to caries through palatal marginal ridge
Contact points may be maintained if caries free
Drill within the middle third of the crown in an inciso-apical direction
Leave a thin slither of enamel in place to protect adjacent tooth. A metal matrix band can also be used.
Place celluloid strip (used to contour the composite resin) interproximally and hold into place with wedge. - 68Incisal edge/corner (Class IV) restorations: bevellingWhere placed appropriately can
Enhance seal (but not significantly)
Enhance retention
Improve aesthetics (more gradual blending with the colour of tooth structure)
Bevelled margins are more susceptible to fracture under occlusal loading due to less bulk at the margin. At cervical margin bevels should only be placed on enamel margins, not ginigval margins
Only for anteriors - 69—
Information
- Description
- Composite resin, GIC, Maxillary and Mandibular Local Anaesthesia
- Created by
- Joanne _
- Views
- 3
- Rating