873812
Description
Mind Map by Josephine Hooper, updated more than 1 year ago
|
|
Created by Josephine Hooper
almost 10 years ago
|
|
DNA Fingerprinting
- What is it?
- Is a process which
extracts DNA from the
cells of a person of
interest and turns it into a
pattern of bands (lines)
- DNA BANDS
---------->
- This pattern can be
compared with the DNA
fingerprints of the cells
left at a crime scene -
this leads to identifying
or eliminating suspects.
- It can also be used in
law courts to prosecute
a criminal case.
- The prosecuting lawyer
will try to show that the
person being tried, was at
the crime scene and left
his or her cells on the
weapon or victim.
- The defending lawyer will try to
discredit the DNA fingerprint by
questioning how the cells were
collected and how the DNA
fingerprint was produced in the
laboratory.
- The prosecuting lawyer
will try to show that the
person being tried, was at
the crime scene and left
his or her cells on the
weapon or victim.
- DNA fingerprints can also be used
to establish the paternity of children;
to identify people who have been
killed in natural disasters and to
work out how closely related plants
and animals are to each other (the
more bands which are the same, the
more closely related the plants or
animals are).
- It can also be used in
law courts to prosecute
a criminal case.
- DNA BANDS
---------->
- Is a process which
extracts DNA from the
cells of a person of
interest and turns it into a
pattern of bands (lines)
- Steps involved in the
production of a DNA
fingerprint
- 1. Cells (tissues) are collected
e.g. from crime scene.
- Typical cells include: salvia (contains
cheek cells), blood (contains white blood
cells with nuclei), semen (contains sperm
with half the amount of DNA but also
contains skin cells of a person) and lastly
hair (contains skin cells).
- 2. DNA is extracted using a
laboratory technique which
mashes the cells to release DNA
and then separates out the DNA
from other chemicals in the cells.
- 3. Restriction enzymes are added to the DNA.
- the restriction enzymes run
along the length of the strands of
DNA, cutting the DNA when a
particular code is found. When
they have finished the DNA
strands are in fragments of
different lengths.
- 4. The DNA fragments are dropped into the
channels of an apparatus containing agarose gel
(jelly).
- 5. A Gel electrophoresis is used to separate the
DNA fragments according to length.
- The smaller the DNA
fragment, the further it will
move through the gel.
- The smaller the DNA
fragment, the further it will
move through the gel.
- 5. A Gel electrophoresis is used to separate the
DNA fragments according to length.
- the restriction enzymes run
along the length of the strands of
DNA, cutting the DNA when a
particular code is found. When
they have finished the DNA
strands are in fragments of
different lengths.
- 3. Restriction enzymes are added to the DNA.
- Typical cells include: salvia (contains
cheek cells), blood (contains white blood
cells with nuclei), semen (contains sperm
with half the amount of DNA but also
contains skin cells of a person) and lastly
hair (contains skin cells).
- 1. Cells (tissues) are collected
e.g. from crime scene.
- Steps for producing Gel
Electrophoresis
- 1. Put a small amount of
agarose into a flask.
- 2. Add some liquid buffer
to the flask.
- 3. Place the flask containing the buffer and
agarose mixture inside the microwave, heat
the mixture until the agarose melts into the
buffer.
- 4. Pour the melted agarose mixture into
the mould - make sure the mould has
tape on each end as this holds in the
melted agarose.
- 5. Place the comb into the gel on one
end, and let the gel cool and solidify -
when the gel's solid remove comb.
- 6. Pour buffer into the electrophoresis
box - place the gel still in its mould, in
the electrophoresis box.
- 7. With a clean pipet tip, use the microwave
to suck up some loading buffer, then add it to
the DNA sample.
- 8. Suck up some of the DNA
sample into the pipet tip, eject
the DNA sample into the first
well of the gel, using a clean
pipet tip use the micropipettor to
suck up some DNA size
standard, transfer the DNA size
standard into the next empty
well.
- 9. Plug the black cord from
the electrophoresis box
into the matching outlet on
the power supply.
- 10. Stain the DNA in
your gel using DNA
staining solution.
- 11. Drag the gel out of the mould
and put it into the DNA staining
solution.
- 12. Remove the gel from the
staining solution and place it on
the UV light box, then record the
final results.
- 12. Remove the gel from the
staining solution and place it on
the UV light box, then record the
final results.
- 11. Drag the gel out of the mould
and put it into the DNA staining
solution.
- 10. Stain the DNA in
your gel using DNA
staining solution.
- 9. Plug the black cord from
the electrophoresis box
into the matching outlet on
the power supply.
- 8. Suck up some of the DNA
sample into the pipet tip, eject
the DNA sample into the first
well of the gel, using a clean
pipet tip use the micropipettor to
suck up some DNA size
standard, transfer the DNA size
standard into the next empty
well.
- 7. With a clean pipet tip, use the microwave
to suck up some loading buffer, then add it to
the DNA sample.
- 6. Pour buffer into the electrophoresis
box - place the gel still in its mould, in
the electrophoresis box.
- 5. Place the comb into the gel on one
end, and let the gel cool and solidify -
when the gel's solid remove comb.
- 4. Pour the melted agarose mixture into
the mould - make sure the mould has
tape on each end as this holds in the
melted agarose.
- 3. Place the flask containing the buffer and
agarose mixture inside the microwave, heat
the mixture until the agarose melts into the
buffer.
- 2. Add some liquid buffer
to the flask.
- 1. Put a small amount of
agarose into a flask.
- The collection of cells
at a crime scene
- Tissue (cells) is collected at the crime scene
by police forensic team. Here are some of the
rules for the procedure they follow:
- 1. Personal Protective Equipment (PPE) must be
worn at all times as a single hair or drop of sweat
from an unprotected person could leave an
unknown DNA sample at the scene (The scene
could be contaminated).
- 2. When collecting DNA samples, the forensic
investigator should change gloves and forceps
after each item is collected in order to avoid
cross-contamination between items of evidence.
- 3. Biological evidence should be labeled and
stored under laboratory conditions.
- ie. in a cool, dry area, free of moisture (to
prevent the growth of mould which can affect
the DNA testing as it contains its own DNA).
- 4. Liquids should be placed in glass
collection tubes and refrigerated.
- 5. DNA samples must be collected from (a) the
victim (b) any suspects (c) any other persons
whose DNA may be found on the item of
evidence.
- 5. DNA samples must be collected from (a) the
victim (b) any suspects (c) any other persons
whose DNA may be found on the item of
evidence.
- ie. in a cool, dry area, free of moisture (to
prevent the growth of mould which can affect
the DNA testing as it contains its own DNA).
- 3. Biological evidence should be labeled and
stored under laboratory conditions.
- 2. When collecting DNA samples, the forensic
investigator should change gloves and forceps
after each item is collected in order to avoid
cross-contamination between items of evidence.
- 1. Personal Protective Equipment (PPE) must be
worn at all times as a single hair or drop of sweat
from an unprotected person could leave an
unknown DNA sample at the scene (The scene
could be contaminated).
- Tissue (cells) is collected at the crime scene
by police forensic team. Here are some of the
rules for the procedure they follow:
- Obtaining a DNA
sample from a person
- A person may provide samples of
their DNA using a buccal swab.
- The inside of a person's cheek is swabbed
with a cotton bud for 30 seconds.
- This is then placed in a sterile container and
sent to the forensic laboratory.
- This is then placed in a sterile container and
sent to the forensic laboratory.
- The inside of a person's cheek is swabbed
with a cotton bud for 30 seconds.
- A person may provide samples of
their DNA using a buccal swab.
- Analysing a DNA
fingerprint
- 99.9% of the DNA fingerprint will be
exactly the same for all humans.
- Therefore, forensic investigators look
at certain sections of the fingerprint
which are known to be different for
different humans. Most use 10-13
different sites on the fingerprint.
- Identical twins will usually have the same DNA
fingerprints at these sites.
- DNA pattern at these sites are compared with the DNA
fingerprints of the cells found at the crime scene.
- The probability of any person's DNA matching
the one at the crime site used to be considered
as 1 in 5 million.
- However, new techniques used today (STR)
which can sometimes identify the race of the
person from the fingerprint can reduce this
probability e.g. to 1 in 10 000.
- However, new techniques used today (STR)
which can sometimes identify the race of the
person from the fingerprint can reduce this
probability e.g. to 1 in 10 000.
- The probability of any person's DNA matching
the one at the crime site used to be considered
as 1 in 5 million.
- DNA pattern at these sites are compared with the DNA
fingerprints of the cells found at the crime scene.
- Identical twins will usually have the same DNA
fingerprints at these sites.
- Therefore, forensic investigators look
at certain sections of the fingerprint
which are known to be different for
different humans. Most use 10-13
different sites on the fingerprint.
- 99.9% of the DNA fingerprint will be
exactly the same for all humans.
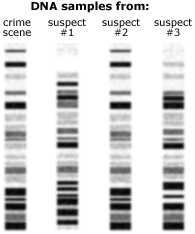
- Compairing DNA
fingerprints
- DNA samples gathered at a
crime scene can be compared
with the DNA of a suspect to show
whether or not he or she was
present.
- Researchers are able to
read the fingerprint and match it to
others.
- They do this by placing the xray on a light
background, and comparing the RFLP lengths in the
DNA from the crime scene, to the DNA of the
suspect.
- Diagram of DNA fingerprint
comparing -------->
- They do this by placing the xray on a light
background, and comparing the RFLP lengths in the
DNA from the crime scene, to the DNA of the
suspect.
- Researchers are able to
read the fingerprint and match it to
others.
- DNA samples gathered at a
crime scene can be compared
with the DNA of a suspect to show
whether or not he or she was
present.
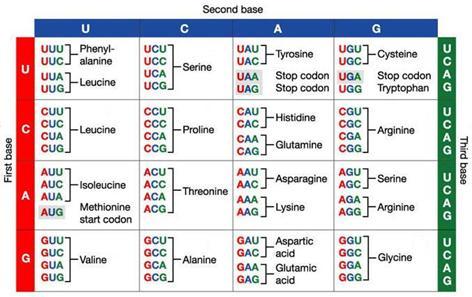
- Genetic Code
Table
- The genetic code is the set of rules by
which information encoded within genetic
material is translated into proteins by
living cells.
- The genetic code is highly similar among all
organisms and can be expressed in a simple table
with 64 entries.
- <--------- Genetic Code Table
- <--------- Genetic Code Table
- The genetic code is highly similar among all
organisms and can be expressed in a simple table
with 64 entries.
- The genetic code is the set of rules by
which information encoded within genetic
material is translated into proteins by
living cells.
- DNA Tour -
Genome Spots
- The two genes that produce red and green
light-sensitive proteins are located on the X
chromosome. Mutations in these genes can
cause colour blindness. Colour blindness is
a common inherited sex-linked disorder that
affects a person’s ability to see or recognise
certain colours. Eight to ten percent of all
males and one half of a percent of all
females are colour-blind.
- INHERITANCE: colour blindness is a
sex-linked recessive disorder. The genes for
colour vision are carried on the X chromosome.
Females have two X chromosomes and will not
be coloured blind if they have only one mutated
copy of the gene. Males, with only one X
chromosome, will be colour blind if they inherit
the mutated gene.
- INCIDENCE: roughly 10% of men have some form of
colour blindness. Women with their two X chromosomes
are much less likely to have the disorder - less than half
of one percent of women are affected.
- TREATMENT: currently
there is no treatment for
colour blindness.
- SYMPTOMS: people who are colour blind
are not able to see the full range of
colours. Colour vision deficiencies may
range from a mild loss to extreme. Red -
green colour blindness is the most
common, followed by blue - yellow. Those
most severely affected cannot see any
colour, but this condition - achromatopsia -
is rare and often associated with other
vision problems.
- TESTING AND SCREENING: simple
eye charts with colours embedded in
patterned shapes can detect colour
blindness. These tests are a routine
part of most vision testing.
- CAUSE: colour blindness is caused by
mutations in a gene or genes on the X
chromosome. The most common of colour
blindness is an inability to distinguish red
from green. The genes for pigments that are
sensitive to red and green light lie directly
next to one another, so mix ups in their
DNA sequences may rapidly occur during
egg or sperm formation.
- TESTING AND SCREENING: simple
eye charts with colours embedded in
patterned shapes can detect colour
blindness. These tests are a routine
part of most vision testing.
- SYMPTOMS: people who are colour blind
are not able to see the full range of
colours. Colour vision deficiencies may
range from a mild loss to extreme. Red -
green colour blindness is the most
common, followed by blue - yellow. Those
most severely affected cannot see any
colour, but this condition - achromatopsia -
is rare and often associated with other
vision problems.
- TREATMENT: currently
there is no treatment for
colour blindness.
- INCIDENCE: roughly 10% of men have some form of
colour blindness. Women with their two X chromosomes
are much less likely to have the disorder - less than half
of one percent of women are affected.
- INHERITANCE: colour blindness is a
sex-linked recessive disorder. The genes for
colour vision are carried on the X chromosome.
Females have two X chromosomes and will not
be coloured blind if they have only one mutated
copy of the gene. Males, with only one X
chromosome, will be colour blind if they inherit
the mutated gene.
- The two genes that produce red and green
light-sensitive proteins are located on the X
chromosome. Mutations in these genes can
cause colour blindness. Colour blindness is
a common inherited sex-linked disorder that
affects a person’s ability to see or recognise
certain colours. Eight to ten percent of all
males and one half of a percent of all
females are colour-blind.
Media attachments
Want to create your own Mind Maps for free with GoConqr? Learn more.