One of the key skills in page layout is the ability to measure type. Type measurement is about points and picas. A point is the basic unit of typographic measurement. How large is a point? Well, 72 points equals 1 inch (2.5 centimeters), so a single point measures 1⁄72 inch (0.0353 centimeters). To demonstrate how small one point is, here’s a line that’s one point thick:
______________________________
A pica is twelve points or 1⁄6 inch (0.415 centimeters). Picas are also called ems. The line shown below is 1 pica in length:
______
There are 6 picas to 1 inch (2.5 centimeters).
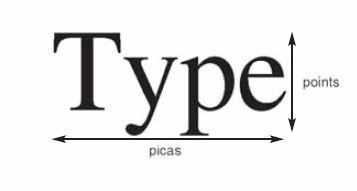
To obtain the vertical size of type, designers generally measure in points. To obtain the horizontal length of a line or block of type, they measure in picas (Figure 17).
There are also times when designers must convert inches to picas or their metric equivalents. For example, the dimensions of paper are usually given in inches (or in metric figures). If you use picas to determine the margins of your page, you may find it useful to convert those picas to inches (or centimeters). These measurements and conversions can seem confusing at first, but actually they’re quite easy to understand.
Suppose that you’re designing the layout for this series of study units. You chose to place one column of text on each page, but you don’t want that column to stretch from one side of the page to the other. So, instead of a 6-inch (15-centimeter) column, you chose a 4 1⁄2-inch (11.25-centimeter) column. How many points and picas does this column width equal?
Hint: Since there are 6 picas to an inch, multiply 4 1⁄2 (4.5) by 6 to get the equivalent column width in picas.
Slide 2
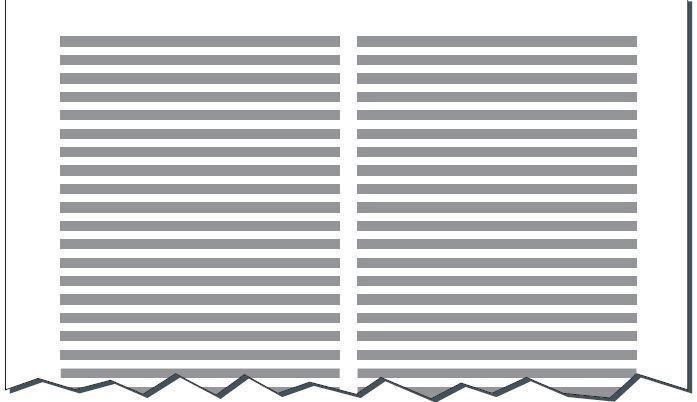
If you’re working with two columns that are 15 picas wide, it’s useful to know that each column’s width is 2.5 inches (6.35 centimeters) wide (Figure 18). That same column is 180 points wide (72 points per inch × 2.5 inches, or 15 picas × 12 points to the pica). Try measuring it in Figure 18 yourself.
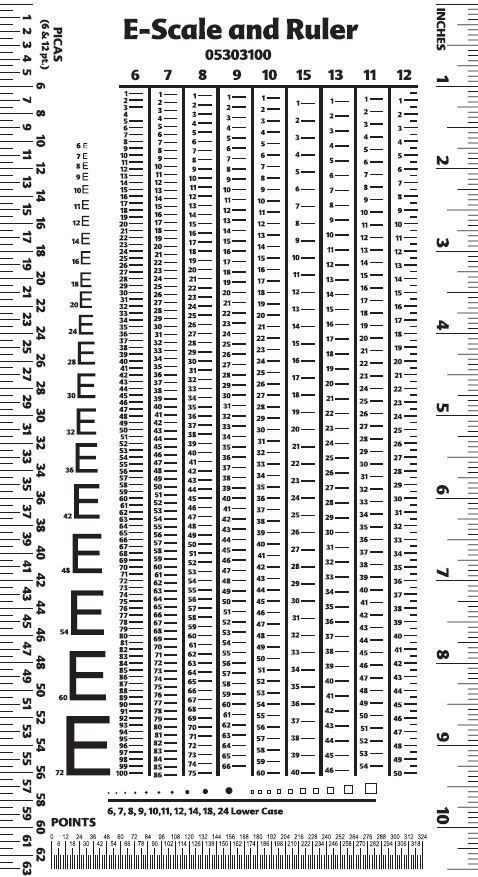
Making conversions from inches or centimeters to picas (and vice versa) is much easier when you use an E-scale (Figure 19). E-scales, also known as typeset rulers, were a common tool for designers before the advent of sophisticated page layout software. They are a specialty item that will have to order from an art supply store. You may only be able to find a pica ruler, which is helpful if you can’t get an E-scale.
If you can find either tool, they are handy to have when the occasional need comes up to match type, leading or line length measurements on a printed document. Let’s take a closer look at this handy measuring tool.
Hold the E-scale so that the inches ruler is on your right. At the scale’s right edge you’ll see a 10 1⁄2-inch ruler. Along the scale’s bottom edge is a point ruler, and this begins at zero (on the left) and increases all the way to 324 points (on the right).
Just above the point ruler is a set of bullets and boxes, which range in size from 6 to 24 points. The line of bullets and boxes is lowercase. These bullets and boxes are useful aids when setting up lists and checklists. This part of the scale helps you visualize and select the appropriately sized bullet or box.
On the left side of the scale is a pica ruler that measures 63 picas in length. The measuring marks appear at the 6- and 12-point positions along the ruler. (The 6-point marks are half picas, while the 12-point marks are full picas, designated by the numbered lines on the pica scale.)
Slide 4
In the top center portion of the scale, you’ll find a small vertical point ruler that you can use to determine the space, or leading, between lines of type. Leading is measured in points. This scale begins at the 0-point mark, which is the bold horizontal line and increases by increments of two points to 70 points. To use this portion of your ruler, line up the 0-point mark at a line’s baseline (illustrated in the previous section) and measure the vertical distance to the baseline of the line of type immediately below it (Figure 20). The point marker will indicate the leading in points. Try measuring the leading of the type on this page. You’ll find the leading is 10.5 points.
From the left side of the scale, moving toward the middle, you’ll find a series of rules that begin with a 6-point leading distance between lines, and increases to 7, 8, 9, and 10 points. On the right, you’ll find similar measurements for 15, 13, 11, and 12 points. You can use these rules to find out approximately how many lines of text you can fit on a page.
The uppercase Es running down the left side of the scale give this tool its name. These Es represent the point sizes 6 through 72 in Helvetica font, and are useful for comparing and measuring the size of text of the same font on a printed page. The best way to do this is to find an uppercase roman E (or other block-shaped, nonbolded capital, such as H or T) in the text and match it as closely as you can to an E on the scale. Use this tool to measure the point size of the type you’re reading right now. They won’t match exactly because this text is printed in Palatino and the Es on the E-scale are in Helvetica, but it will give you practice using the E-scale.
You’ll find endless opportunities to use the E-scale as you pursue your career in graphic design. Practice measuring different types of documents—books, newspapers, fliers, and so on. This tool will serve you so well that you’ll always want to keep it within arm’s reach.
More about the E-scale
Slide 5
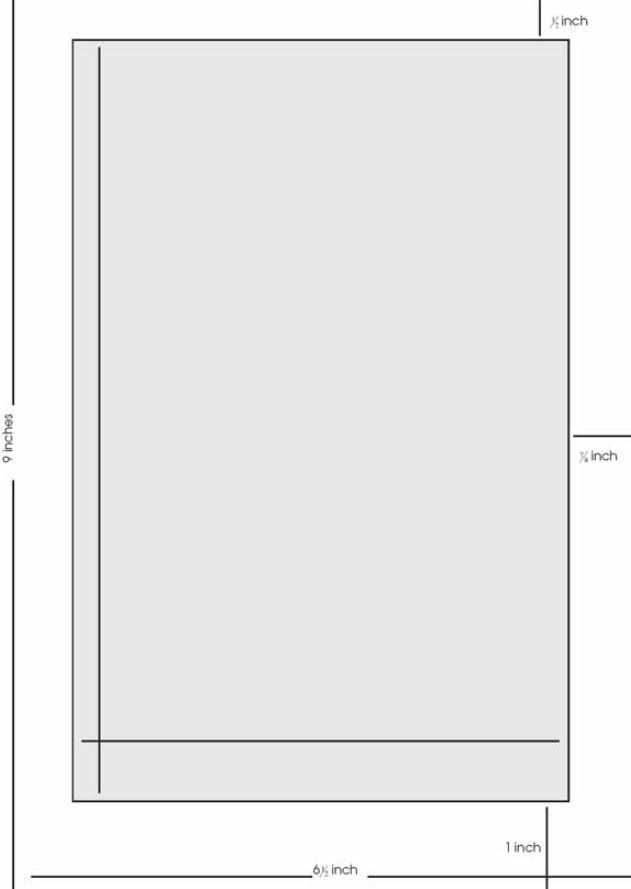
Let’s apply this standard to a page that has a trim size of 6 × 9 inches. This imaginary page features a single column approximately 4.9 inches wide and 7.5 inches deep (including the running head and page number). The bottom margin is 1 inch, so the top margin should be 1⁄2 inch. To get the outer margin’s width, add the bottom and top margins (1 inch + 1⁄2 inch = 1 1⁄2 inch). Divide this sum by two to get the average of the top and bottom margin, and thus the width of the outer margin—3⁄4 inch. The inner margin should be half of the outer margin, so divide 3⁄4 by 2 to get just under 3⁄8 inch. Figure 30 illustrates this classical standard in a typical book spread.
