
Notes
Chapter 4 Notes
Content of the notes (5)
Page 1
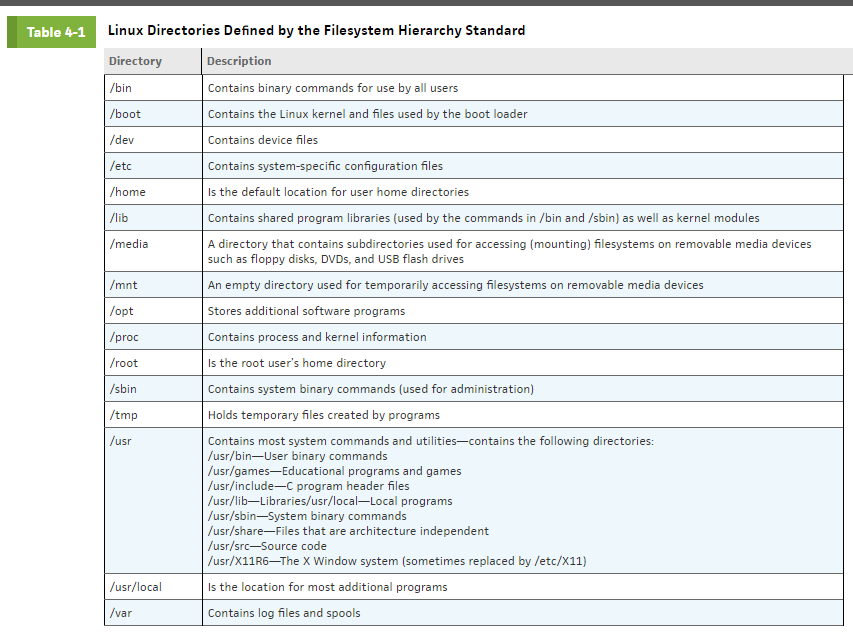
4-1: The Filesystem Hierarchy Standard
Filesystem Hierarchy Standard (FHS): A standard outlining the location of set files and directories on all Linux & UNIX systems.
To read the complete Filesystem Hierarchy Standard definition, go to http://refspecs.linuxfoundation.org/fhs.shtml.
Page 2
4-2: Managing Files & Directories
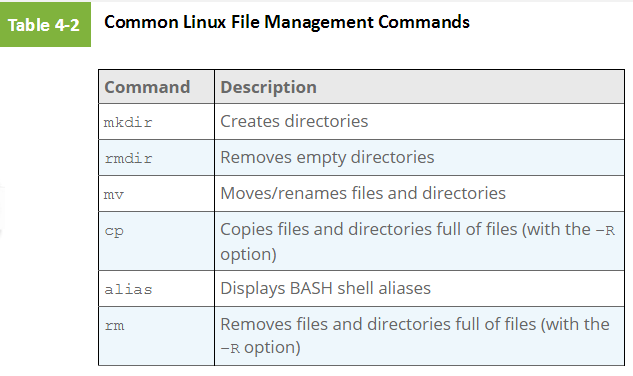
mkdir (make directory) command
mkdir (make directory) command - The command used to create directories.
Example: mkdir proj_files

mv (move) command
mv (move) command - The command used to move/rename files and directories.
requires two (2) arguments: the source file/directory and the target file/directory
Example: mv /etc/sample1 /root
If you want to move several files, you include one source argument for each file you want to move and then include the target directory as the last argument. For example, to move the /etc/sample1 and /etc/sample2 files to the /root directory, you could use the command:
mv /etc/sample1 /etc/sample2 /root
Source & destination files/folders can be relative or absolute
Source argument can contain wildcard characters if multiple files/folders are to be moved
Example: mv project* proj_files
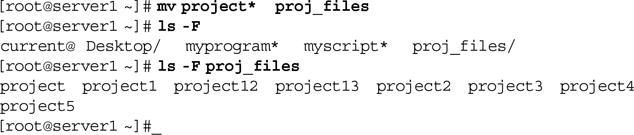
Additional notes:
If the target is the name of a directory, the mv command moves those files to that directory
If the target is a filename of an existing file in a certain directory and there is one source file, the mv command overwrites the target with the source
If the target is a filename of a nonexistent file in a certain directory, the mv command creates a new file with that filename in the target directory and moves the source file to that file
Renaming files using the mv command
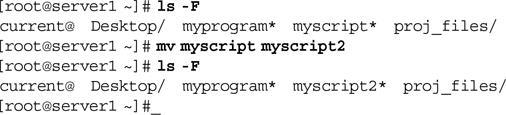
Another important use of the mv command is to rename files, which is simply moving a file to the same directory but with a different filename. The mv command works similarly to a cut-and-paste operation in which the file is copied to a new directory and deleted from the source directory.
Example: mv myscript myscript2
cp (copy) command
cp (copy) command - The command used to create copies of files and directories.
requires two (2) arguments: the source file/directory and the target file/directory
Similar to the mv command, you can copy several files. For example, to make a copy of the file /etc/hosts in the current directory (/root), you can specify the absolute pathname to the /etc/hosts file (/etc/hosts) and the relative pathname indicating the current directory ( . )

You can make copies of files within the same directory.
Example: cp hosts hosts2
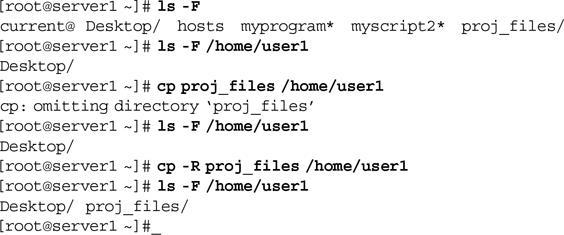
To copy a directory full of files in Linux, you must tell the cp command that the copy will be recursive (involve files and subdirectories too) by using the –R option.
Example: cp -R proj_files /home/user1
A note on aliases
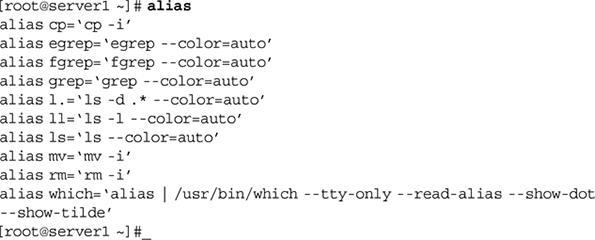
Aliases are special variables in memory that point to commands.
If the target is a file that exists, both the mv and cp commands warn the user that the target file will be overwritten and will ask whether to continue. This is not a feature of the command as normally invoked, but it is a feature of the default configuration in Fedora Linux because the BASH shell in Fedora Linux contains aliases to the cp and mv commands.
When you type mv, you are actually running the mv command with the –i option without realizing it. If the target file already exists, both the mv command and the mv command with the –i option interactively prompt the user to choose whether to overwrite the existing file.
Similarly, when you type the cp command, the cp –i command is actually run to prevent the accidental overwriting of files. To see the aliases present in your current shell, simply type alias, as shown in the following output:
Aliases and interactive mode
Overriding interactive mode (-i)
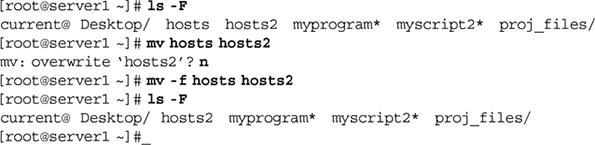
If you want to override this interactive option, which is known as interactive mode, use the –f (force) option to override the choice, as shown in the following example. In this example, the root user tries to rename the hosts file using the name “hosts2,” a name already assigned to an existing file. The example shows the user attempting this task both without and with the –f option to the mv command:
rm (remove) command
rm (remove) command - The command used to remove files (not directories).
requires one (1) argument: the file(s) to be deleted
Example: rm some_file
After a file has been removed from the filesystem, it cannot be recovered
Argument can contain wildcard characters if multiple files are to be removed/deleted
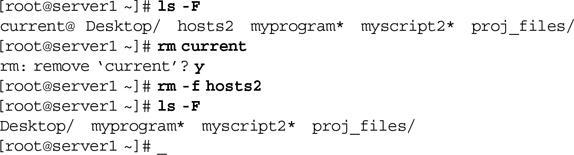
As a result, the rm command is aliased in Fedora Linux to the rm command with the –i option, which interactively prompts the user to choose whether to continue with the deletion.
Like the cp and mv commands, the rm command accepts the –f option to override this choice and immediately delete the file. An example demonstrating the use of the rm and rm –f commands to remove the current and hosts2 files is shown here:
rmdir (remove directory) command
rmdir (remove directory) command - The command used to remove empty directories.
requires one (1) argument: the empty folder to be deleted
Example: rmdir some_folder
A folder can only be removed by the rmdir command if it is empty
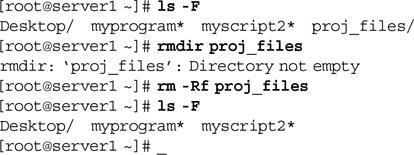
A folder and its files can only be removed using the -R (recursive) option in conjunction with with the rm command
For example, if the root user wants to remove the proj_files subdirectory and all of the files within it without being prompted to confirm each file deletion, the command she must use is rm –Rf proj_files:
Additional notes:
Both the –r and the –R options have the same meaning (recursive)
The –R option to the rm command is dangerous if you are not certain which files exist in the directory to be deleted recursively
Page 3
4-3: Finding Files
locate command - The command used to locate files from a file database. As long as this database is current, this is the fastest way to search for files.
The database used for the locate command is /var/lib/mlocate/mlocate.db | It is updated each day automatically and can be updated manually by running the updatedb command at a command prompt. You can configure the directories that are searched by the updatedb command by editing the /etc/updatedb.conf file.
Example: locate inittab
find command - The command used to find files on the filesystem using various criteria. It is a slower yet more versatile method for locating files.
Syntax: find <start directory> -criteria <what to find>
Example: find /etc -name inittab
You can also use wildcard metacharacters with the find command; however, these wildcards must be protected from shell interpretation, as they must only be interpreted by the find command. To do this, ensure that any wildcard metacharacters are enclosed within quote characters.
Example: find /etc -name "host*"
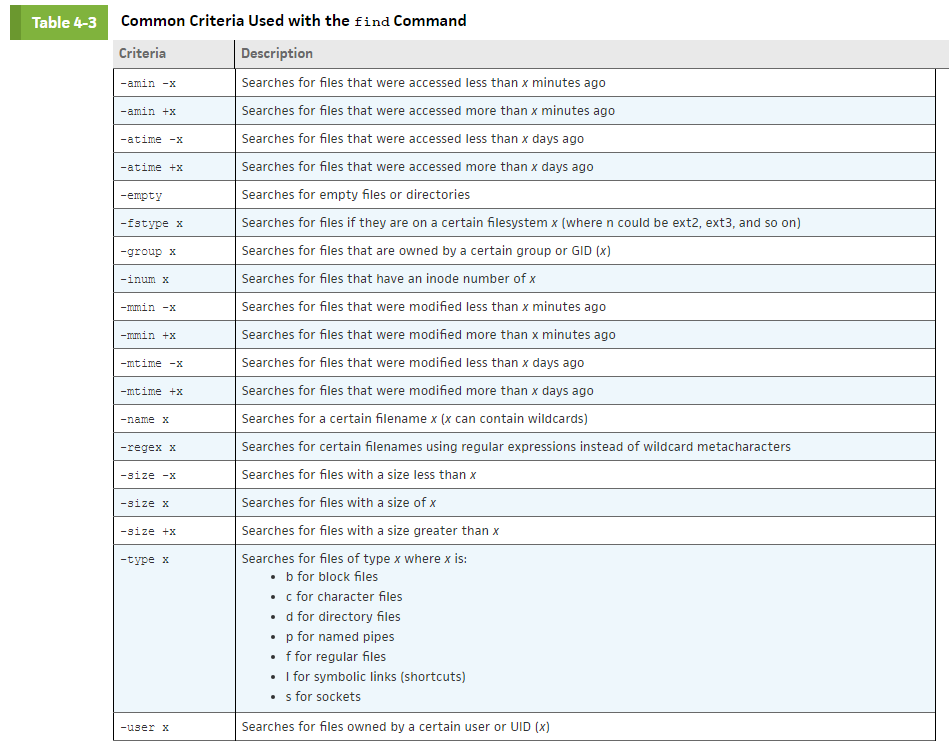
Although the find command can be used to search for files based on many criteria, it might take several minutes to complete the search if the number of directories and files being searched is large. To reduce the time needed to search, narrow down the directories searched by specifying a subdirectory when possible.
which command - The command used to locate files that exist within directories listed in the PATH variable.
PATH variable - A variable that stores a list of directories that will be searched in order when commands are executed without an absolute or relative pathname.
Recall that you can see the contents of a certain variable in memory by using the $ metacharacter with the echo command:

Note: In addition to locate, find, and which, many different commands can be used to search for files on the filesystem. For example, whereis is a simpler version of find.
Page 4
4-4: Linking Files
Files can be linked to one another in two ways:
symbolic link
hard link
symbolic link - A pointer to another file on the same or another filesystem; commonly referred to as a shortcut.
hard link - A file joined to other files on the same filesystem that shares the same inode.
How files are stored on a Linux filesystem
On a structural level, a filesystem has three main sections: superblock, inode table and data blocks:
superblock
inode table
data blocks
superblock - The portion of a filesystem that stores critical information, such as the inode table and block size.
inode table - The collection of inodes for all files and directories on a filesystem.
inodes - The portion of a file that stores information on the file’s attributes, access permissions, location, ownership, and file type. Each file contains a unique inode number for identification
When a file is deleted, only its inode (which serves as a pointer to the actual data) is deleted. The data that makes up the contents of the file as well as the filename are stored in data blocks, which are referenced by the inode. In filesystem-neutral terminology, blocks are known as allocation units because they are the unit by which disk space is allocated for storage.
data blocks - A filesystem allocation unit in which the data that makes up the contents of the file as well as the filename are stored.
Note: All files except for special device files also have data blocks associated with the inode.
Also note: that directories are simply files that are used to organize other files; they too have an inode and data blocks, but their data blocks contain a list of filenames that are located within the directory.
Hard links
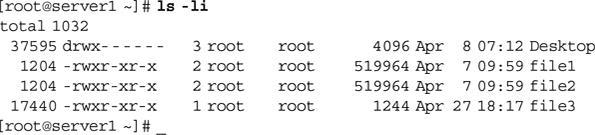
Hard-linked files share the same inode. As a result, they share the same inode number and data blocks, but the data blocks allow for multiple filenames. To create a hard link, you must use the ln (link) command and specify two arguments: the existing file to hard-link and the target file that will be created as a hard link to the existing file.
ln (link) command - The command used to create hard and symbolic links.
Syntax: ln file1 file2
Note: Although hard links share the same inode and data section, deleting a hard-linked file does not delete all the other hard-linked files; it simply removes one filename reference. Removing a hard link can be achieved by removing one of the files, which then lowers the link count.
The ls -i option
To view the inode number of hard-linked files to verify that they are identical, you can use the –i option to the ls command in addition to any other options. The inode number is placed on the left of the directory listing on each line, as shown in the following output:
Note: Directory files are not normally hard-linked, as the result would consist of two directories that contain the same contents. However, the root user has the ability to hard-link directories in some cases, using the –F or –d option to the lncommand. Only directories that have files regularly added and need to maintain identical file contents are typically hard-linked.
Symbolic Links
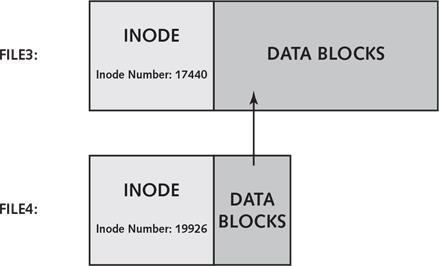
Symbolic links (shown in Figure 4-2) are different from hard links because they do not share the same inode and data blocks with their target file; one is merely a pointer to the other, thus both files have different sizes. The data blocks in a symbolically linked file contain only the pathname to the target file. When a user edits a symbolically linked file, he is actually editing the target file. Thus, if the target file is deleted, the symbolic link serves no function, as it points to a nonexistent file.
Note: Symbolic links are sometimes referred to as “soft links” or “symlinks.”
To create a symbolic link, you use the –s option to the ln command.
Example: ln -s file3 file4
The ls –F command also indicates symbolic links by appending an @ symbol, as shown in the following output:

Another difference between hard links and symbolic links is that symbolic links need not reside on the same filesystem as their target.
Note: Unlike hard links, symbolic links are commonly made to directories to simplify navigating the filesystem tree. Also, symbolic links made to directories are typically used to maintain compatibility with other UNIX and Linux systems. For example, on Fedora 20, the /usr/tmp directory is symbolically linked to the /var/tmp directory for this reason.
Page 5
4-5: File & Directory Permissions
All access to resources depends on whether the user name and group memberships have the required permission.
permission - A list that identifies who can access a file or folder and their level of access.
4-5A: File & Directory Ownership
When a user creates a file or directory, that user’s name and primary group become the owner and group owner of the file, respectively.
primary group - The group that is specified for a user in the /etc/passwd file and that is specified as group owner for all files created by a user.
Only two users on a Linux system can modify permissions on a file or directory or change its ownership: the owner of the file or directory and the root user.
To view your current user name, you can use the whoami command. To view your group memberships and primary group, you can use the groupscommand. An example of these two commands when logged in as the root user is shown in the following output:
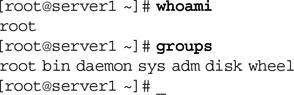
Note: If the root user creates a file, the owner is “root” and the group owner is also “root.”
touch command - The command used to create new files. It was originally used to update the time stamp on a file.
To change the ownership of a file or directory, you can use the chown (change owner) command, which takes two arguments at minimum: the new owner and the files or directories to change.
Example: chgrp sys file1
chgrp (change group) command - The command used to change the owner and group owner of a file or directory.
As with the chown command, the chgrp command also accepts the –R option to change group ownership recursively throughout the directory tree.
Normally, you change both the ownership and group ownership on a file when that file needs to be maintained by someone else. As a result, you can change both the owner and the group owner at the same time using the chown command.
To change the owner to user1 and the group owner to root for file1 and the directory Desktop recursively, you can enter the following commands:
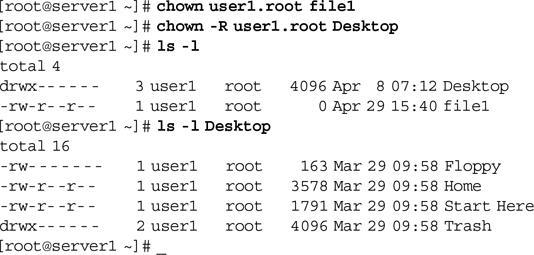
Note: You can also use the : character instead of the . character in the chown command to change both the owner and group ownership (e.g., chown –R user1:root Desktop).
To protect your system’s security, you should ensure that most files residing in a user’s home directory are owned by that user; some files in a user’s home directory (especially the hidden files and directories) require this to function properly.
4-5B: Managing File & Directory Permissions
Every file and directory file on a Linux filesystem contains information regarding permissions in its inode. The section of the inode that stores permissions is called the mode of the file and is divided into three sections based on the user(s) who receive(s) the permissions to that file or directory:
User (owner) permissions
Group (group owner) permissions
Other (everyone else on the Linux system) permissions
mode - The part of the inode that stores information on access permissions.
Furthermore, you can assign to each of these users the following regular permissions:
Read
Write
Execute
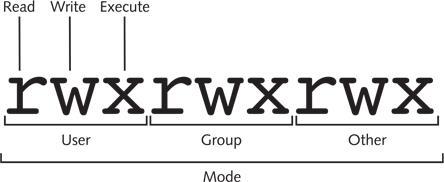
Interpreting the Mode
Note from the preceding output that, if the permission is unavailable, a dash (the hyphen character on your keyboard, - ) replaces its position in the mode.
user - The owner of the file or directory.
owner - The user whose name appears in a long listing of a file or directory and who has the ability to change permissions on that file or directory.
group - The collection of users who have ownership of that file or directory.
other - All the users on the Linux system.
Permissions are not additive; the system assigns the first set of permissions that are matched in the mode order: user, group, other. For example, let us assume that the bob user is a member of the proj group. In this case, the file called file1 in the preceding output gives the user or owner of the file (the bob user) read permission, gives members of the group (the proj group) write permission, and gives other (everyone else on the system) execute permission only. Because permissions are not additive, the bob user will only receive read to file1 from the system.
Note: It is bad form to assign all permissions to a file that contains sensitive data
Because the permission structure that you choose for a file or directory might result in too few or too many permissions, you can follow some general guidelines to avoid these situations:
The owner of a file or directory is typically the person who maintains it;
Members of the group are typically users in the same company department and must have limited access to the file or directory. As a result, most files and directories that you find on a Linux filesystem have more permissions assigned to the user of the file/directory than to the group of the file/directory
The other category has either the same permissions or less than the group of the file/directory, depending on how private that file or directory is.
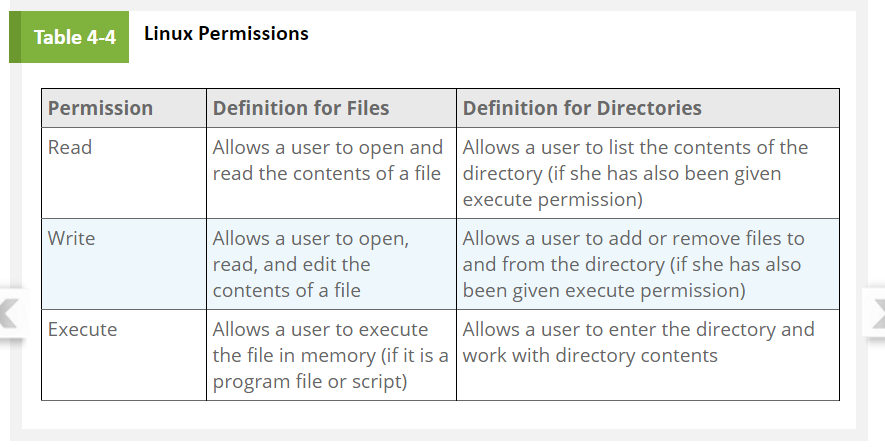
Interpreting Permissions
If a user has the read permission to a text file, that user can use, among others, the cat, more, head, tail, less, strings, and od commands to view its contents. That same user can also open that file with a text editor such as vi; however, the user does not have the ability to save any changes to the document unless that user has the write permission to the file as well.
Shell scripts can be executed in much the same way that binary compiled programs are; the user who executes the shell script must then have execute permission to that file to execute it as a program.
come back to...
Changing Permissions
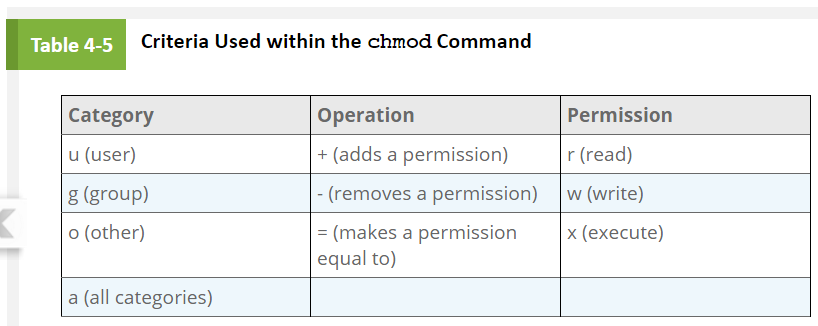
To change the permissions for a certain file or directory, you can use the chmod (change mode) command. The chmod command takes two arguments at minimum; the first argument specifies the criteria used to change the permissions (Table 4-5), and the remaining arguments indicate the filenames to change.
Example: chmod u+w,g+r-w,o+r-x file1
chmod (change mode) command - The command used to change the mode (permissions) of a file or directory.
Note: You should ensure that there are no spaces between any criteria used in the chmod command because all criteria make up the first argument only.
You can also use the = criteria from Table 4-5 to specify the exact permissions to change.
Example: chmod u=rw,g=r,o=r file1
If the permissions to be changed are identical for the user, group, and other categories, you can use the “a” character to refer to all categories, as shown in Table 4-5 and in the following example, when adding the execute permission to user, group, and other for file1.
Example: chmod a+x file1
However, if there is no character specifying the category of user to affect, all users are assumed, as shown in the following example when adding the execute permission to user, group, and other for file2.
Example: chmod +x file2
You might instead choose to use numeric criteria with the chmod command to change permissions. All permissions are stored in the inode of a file or directory as binary powers of two:
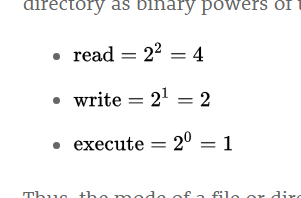
Thus, the mode of a file or directory can be represented using the numbers 421421421 instead of rwxrwxrwx. Because permissions are grouped into the categories user, group, and other, you can then simplify this further by using only three numbers, one for each category that represents the sum of the permissions, as depicted in Figure 4-4.
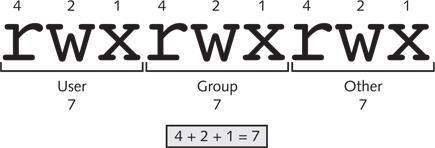
Similarly, to represent the mode rw-r--r--, you can use the numbers 644 because user has read and write , group has read (4), and other has read (4). The mode rwxr-x--- can also be represented by 750 because user has read, write, and execute , group has read and execute , and other has nothing (0). Table 4-6 provides a list of the different permissions and their corresponding numbers.
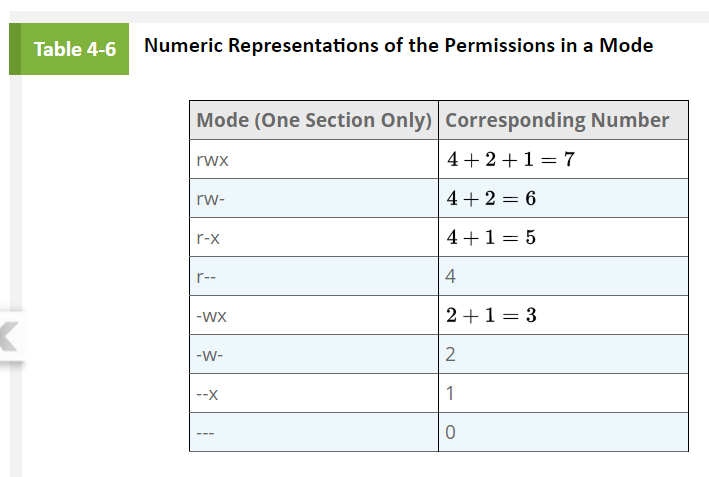
To change the mode of the file1 file used earlier to r-xr-----, you can use the command chmod 540 file1, as shown in the following example:
Example: chmod 540 file1
4-5c: Default Permissions
New files are given rw-rw-rw- by the system when they are created (because execute should not be given unless necessary), and new directories are given rwxrwxrwx by the system when they are created. These default permissions are too permissive for most files, as they allow other full access to directories and nearly full access to files. Hence, a special variable on the system called the umask (user mask) takes away permissions on new files and directories immediately after they are created.
umask - A special variable used to alter the permissions on all new files and directories by taking away select default file and directory permissions.
The most common umask that you will find is 022, which specifies that nothing (0) is taken away from the user, write permission (2) is taken away from members of the group, and write permission (2) is taken away from other on new files and directories when they are first created and given permissions by the system.
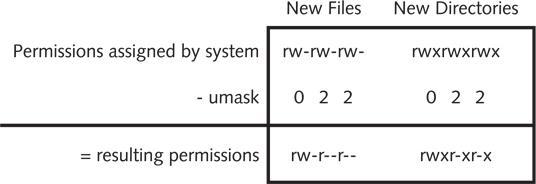
To change the umask to 007 and view its effect, you can type the following commands on the command line: umask 007
4-5d: Special Permissions
Read, write, and execute are the regular file permissions that you would use to assign security to files; however, you can optionally use three more special permissions on files and directories:
SUID (Set User ID)
SGID (Set Group ID)
Sticky bit
Defining Special Permissions
Setting Special Permisions
Information
- Description
- Linux Operating System (CIS126DL) (Chapter 4: Linux Filesystem Management) Note on Chapter 4 Notes, created by Michael Mason on 28/03/2017.
- Created by
- Michael Mason
- Views
- 2
- Rating