
Notes
Chapter 10 Notes
Content of the notes (4)
Page 1
Chapter 10: Common Administrative Tasks
10.1 Printer Administration
10.1a The Common UNIX Printing System
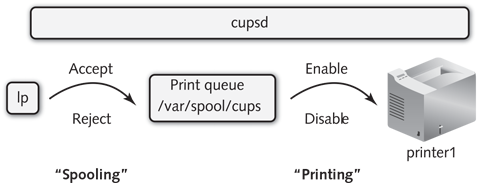
Today, the most common printing system used on Linux computers is the Common Unix Printing System (CUPS). Fundamental to using CUPS on a Linux system is an understanding of the process by which information is sent to a printer.
Common Unix Printing System (CUPS) - The printing system commonly used on Linux computers.
A set of information that is sent to a printer at the same time is called a print job. Print jobs can consist of a file, several files, or the output of a command.
print file - The information sent to a printer for printing.
To send a print job to a printer, you must first use the lp command and specify what to print.
lp command - The command used to create print jobs in the print queue in the CUPS printing system.
Next, the CUPS daemon (cupsd) assigns the print job a unique print job ID and places a copy of the print job into a temporary directory on the filesystem called the print queue, provided the printer is accepting requests.
CUPS daemon (cupsd) - The daemon responsible for printing in the CUPS printing system.
print job ID - A unique numeric identifier used to mark and distinguish each print job.
print queue - A directory on the filesystem that holds print jobs that are waiting to be printed.
If the printer is rejecting requests, the CUPS daemon prints an error message stating that the printer is not accepting print jobs.
Note: Accepting print jobs into a print queue is commonly called spooling or queuing.
spooling/queuing - The process of accepting a print job into a print queue.
Note: The print queue for a printer is typically /var/spool/cups. Regardless of how many printers you have on your Linux system, all print jobs are sent to the same directory.
After a print job is in the print queue, it is ready to be printed. If the printer is enabled and ready to accept the print job, the CUPS daemon then sends the print job from the print queue to the printer and removes the copy of the print job in the print queue. Conversely, if the printer is disabled, the print job remains in the print queue.
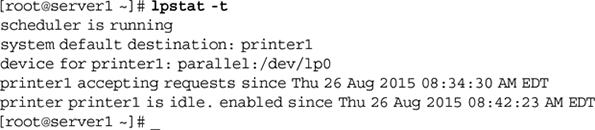
To see a list of all printers on the system and their status, you can use the –t (total) option to the lpstat command, as shown in the following output:
lpstat command - The command used to view the contents of print queues and printer information in the CUPS printing system.
The preceding output indicates that there is only one printer on the system, called printer1, that it prints to a printer connected to the first parallel port on the computer (parallel:/dev/lp0) and that there are no print jobs in its print queue. In addition, the CUPS daemon (scheduler) is running and accepting jobs into the print queue for this printer. Also, the CUPS daemon sends print jobs from the print queue to the printer because the printer is enabled.
You can manipulate the status of a printer using either the cupsaccept, cupsreject, cupsenable, or cupsdisable command followed by the printer name.
cupsaccept - The command used to allow a printer to accept jobs into the print queue.
cupsreject - The command used to force a printer to reject jobs from entering the print queue.
cupsenable - The command used to allow print jobs to leave the print queue.
cupsdisable - The command used to prevent print jobs from leaving the print queue.
Thus, to enable spooling and disable printing for the printer printer1, you can use the following commands:
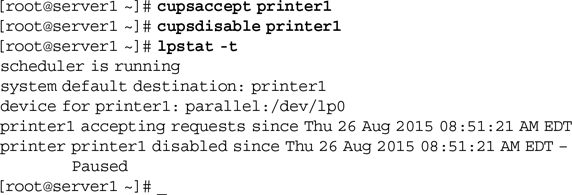
Any print jobs now sent to the printer printer1 are sent to the print queue but remain in the print queue until the printer is started again.
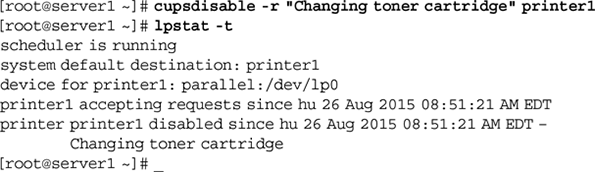
You can also use the –r option to the cupsdisable and cupsrejectcommands to specify a reason for the action, as shown in the following output:
10.1b Managing Print Jobs
Recall that you create a print job by using the lp command. To print a copy of the /etc/inittab file to the printer printer1 shown in earlier examples, you can use the following command, which returns a print job ID that you can use to manipulate the print job afterward: lp -d printer1 /etc/inittab

The lp command uses the –d option to specify the destination printer name. If this option is omitted, the lp command assumes the default printer on the system. Because printer1 is the only printer on the system and, hence, is the default printer, the command lp /etc/ inittab is equivalent to the one used in the preceding output.
Note: You can set the default printer for all users on your system by using the lpoptions –d printername command, where printername is the name of the default printer. This information is stored in the /etc/cups/lpoptions file.
Note: Alternatively, each user on a Linux system can specify his own default printer by adding the line default printername to the .lpoptions file in her home directory, where printername is the name of the default printer.
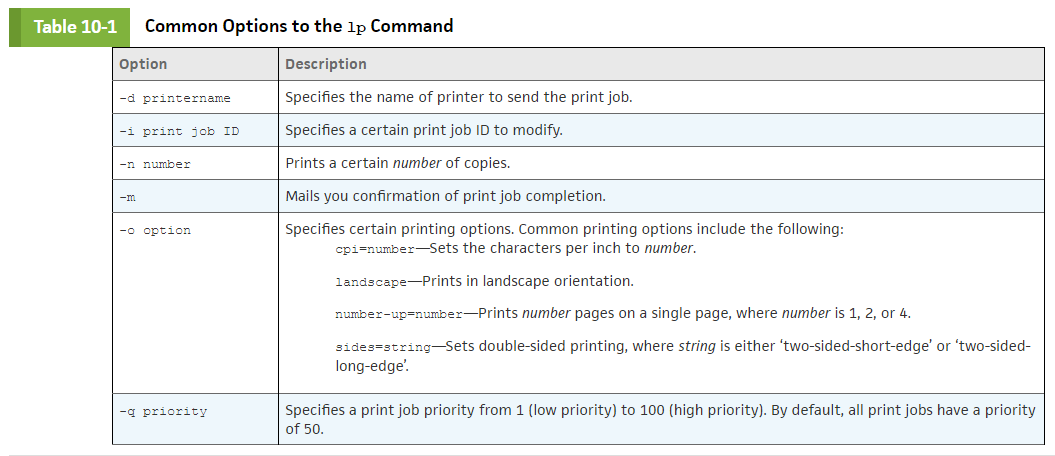
You can also specify several files to be printed using a single lp command by specifying the files as arguments. In this case, only one print job is created to print all of the files. To print the files /etc/hosts and /etc/issue to the printer printer1, you can execute the following command:
lp -d printer1 /etc/hosts etc/issue

The lp command accepts information from Standard Input; thus, you can place the lp command at the end of a pipe to print information. To print a list of logged-in users, you can use the following pipe: who | lp -d printer1

To see a list of print jobs in the queue for printer1, you can use the lpstat command. Without arguments, this command displays all jobs in the print queue that you have printed: lpstat

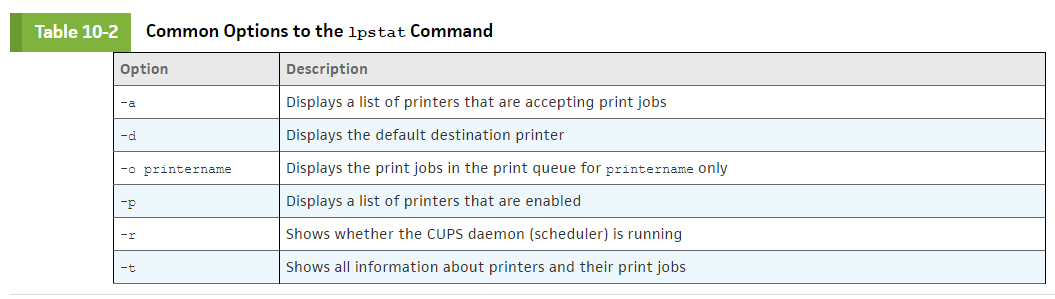
To remove a print job that is in the print queue, you can use the cancel command followed by the print job IDs of the jobs to remove.
cancel command - The command used to remove print jobs from the print queue in the CUPS print system.
To remove the print job IDs printer1-1 and printer1-2 created earlier, you can use the following command: cancel printer1-1 printer1-2

You can instead remove all jobs started by a certain user; simply specify the –u option to the cancel command followed by the user name.
To remove all jobs in a print queue, you can use the –a option to the cancel command, as shown in the following example, which removes all jobs destined for printer1: cancel -a printer1

Not all users might be allowed access to a certain printer. As a result, you can restrict access to certain printers by using the lpadmin command.
lpadmin command - The command used to perform printer administration in the CUPS printing system.
For example, to deny all users other than root and user1 from printing to the printer1 printer created earlier, you can use the following command: lpadmin -u allow:root, user1 -u deny:all -d printer1

10.1c The LPD Printing System
Although CUPS is the preferred printing system for Linux computers today, many older Linux computers use the traditional Line Printer Daemon (LPD) printing system.
Line Printer Daemon - A printing system typically used on legacy Linux computers.
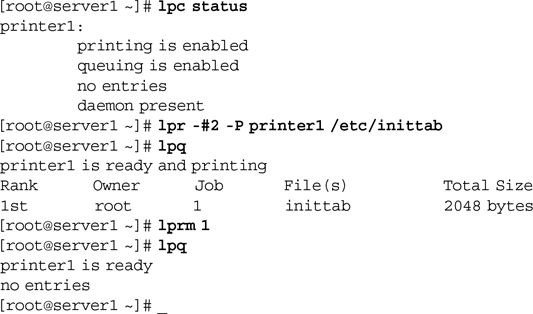
In this printing system, the lpr command is used to print documents to the print queue much like the lp command; the lpc command can be used to view the status of printers; the lpq command can be used to view print jobs in the print queue, much like the lpstat command; and the lprm command can be used to remove print jobs, much like the cancel command.
lpr command - The command used to create print jobs in the print queue in the LPD printing system.
lpc command - The command used to view the status of and control printers in the LPD printing system.
lpq command - The command used to view the contents of print queues in the LPD printing system.
lprm command - The command used to remove print jobs from the print queue in the LPD printing system.
10.1d Configuring Printers
The file that contains settings for the CUPS daemon is /etc/cups/cupsd.conf, and the file that contains the configuration information for each printer installed on the system is /etc/cups/printers.conf.
/etc/cups/cupsd.conf - A file that holds daemon configuration for the cups daemon.
/etc/cups/printers.conf - A file that holds printer configuration for the cups daemon.
By default, the CUPS daemon detects locally connected and network-shared printers and automatically adds an entry for them in the /etc/cups/printers.conf file using a name based on the printer model number (e.g., HP Laserjet 6M). For any printers that the CUPS daemon does not detect and configure, you must provide the necessary information.
Since the format of the /etc/cups/printers.conf file is rigid, it is safer to use a program to create or modify entries within them. You can provide a series of options to the lpadmin command discussed earlier to configure a printer on the system, or you can use one of several graphical utilities within a desktop environment that can do the same.
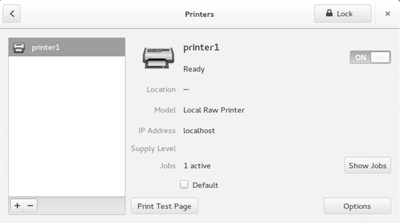
On Fedora 20 systems, the Printers tool within the GNOME desktop (shown in Figure 10-2) can be used to create new printers, print a test page, view print jobs, control spooling, and specify basic printing options.
Printers tool - A graphical utility used to configure printers on a Fedora 20 system.
You can access the Printers tool within the GNOME desktop environment on Fedora 20 by navigating to the Activities menu, Show Applications, Settings, Printers.
Adding Printers Manually
To manually add a printer within the Printers tool, you can click the + symbol in the lower-left corner. The Printers tool then prompts you to select your device from a list of detected printers, or specify the name or IP address of a printer on the network.
The most comprehensive way to create and manage CUPS printers is by using the CUPS Web administration tool, which gives Linux administrators the ability to create and manage all printer settings.
CUPS Web administration tool - A Web-based management tool for the CUPS printing system.
You can access the CUPS Web administration tool using a Web browser on TCP port 631 by navigating to http://servername:631, as shown below:
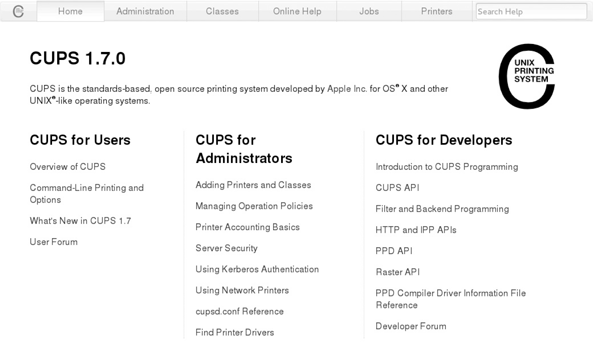
To create a new printer using this tool, select the Administration tab, click Add Printer, and log in using the root username and password. You will then be prompted to choose the type of printer, as shown below. You can choose to print to a printer that is connected to a local serial, parallel, or USB port, to a printer connected to the network using Hewlett- Packard JetDirect technology, or to a printer that is shared on a remote computer across a network with the Internet Printing Protocol (IPP), the Line Printer Daemon (LPD), or the Windows (SAMBA) printing service.
Internet Printing Protocol (IPP) - A printing protocol that can be used to send print jobs across a TCP/IP network, such as the Internet, using HTTP or HTTPS.
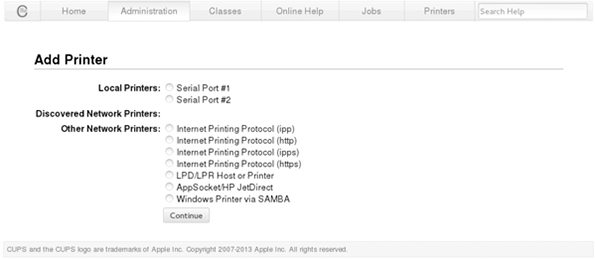
After selecting a printer type, you will be presented with several screens that prompt you to specify information that relates to the printer type (e.g., the network address for an network printer), as well as a printer name, description, manufacturer and model, default printer options, and whether to share the printer using IPP to other systems on the network.
After creating a printer, you can use the other options available on the Administration tab of the CUPS Web administration tool to configure and manage the CUPS printing service, as shown in below.
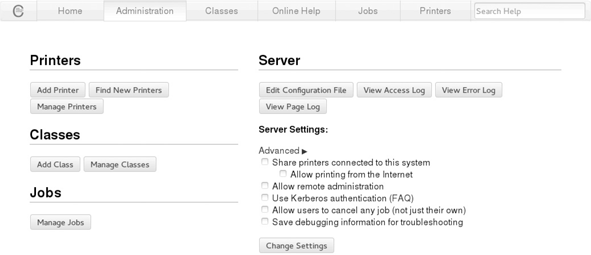
The Find New Printers button shown in above performs a detailed local and network search for new printer devices, and the Manage Printers button (which switches to the Printers tab) allows you to configure individual printer settings.
Creating & Managing Printer Collections, or Classes
CUPS also allows you to configure collections of printers that can be used as a single unit. These collections are called printer classes.
printer classes - A group of CUPS printers that are treated as a single unit for the purposes of printing and management.
When you print to a printer class, the print job is sent to the first available printer in the printer class. Printer classes are often used in larger organizations, where multiple printers are stored in a print room for users to print to. To create a printer class, select the Add Class button shown in above and supply a name and description for the new class as well as choose the printers that should be included in the class. Following this, you can click the Manage Classes button (which switches to the Classes tab) to configure settings for your new printer class.
Managing Print Jobs
Clicking Manage Jobs in the figure above (which switches to the Jobs tab) allows you to view, modify, and delete print jobs that have submitted to the queue. Regular users can also access the CUPS Web administration tool and select the Jobs tab to manage their own jobs after logging in with their username and password.
Sharing Printers on a Network
The Server section shown in Figure 10-5 allows you to edit the CUPS configuration file and access log files as well as perform advanced functions. Selecting the Allow remote administration option allows the CUPS Web administration tool to be accessed from other computers on the network. By selecting the Share printers connected to this system and Allow printing from the Internet options, IPP printer sharing will be enabled for all printers that allow IPP printer sharing in their settings. To configure a shared printer on a remote system using IPP, you can specify the URL http://servername:631/printers/printername when adding the printer.
Note: To allow for IPP printer sharing, any firewalls must allow TCP port 80, 443, and 631. Firewall configuration is discussed in Chapter 14.
Page 2
10.2 Log File Administration
To identify and troubleshoot problems on a Linux system, you must view the events that occur over time. Because administrators cannot observe all events that take place on a Linux system, most daemons record information and error messages to files stored on the filesystem. These files are referred to as log files and are typically stored in the /var/log directory.
/var/log directory - A directory that contains most log files on a Linux system.
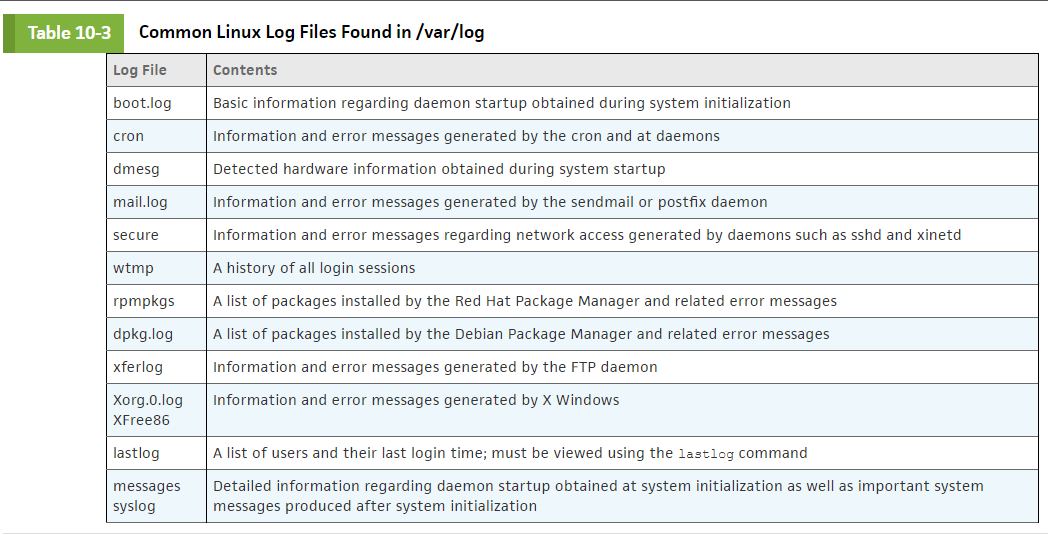
Many programs store their log files in subdirectories of the /var/log directory. For example, the /var/log/samba directory contains the log files created by the samba file-sharing daemons. Table 10-3 lists some common log files that you may find in the /var/log directory, depending on your Linux distribution.
Daemons that provide a service to other computers on the network typically manage their own log files within the /var/log directory. The logging for other daemons and operating system components is performed by a logging daemon. The two most common logging daemons used on Linux systems today are the System Log Daemon (rsyslogd) and the Systemd Journal Daemon (journald).
System Log Daemon (rsyslogd) - The daemon that logs system events to various log files via information stored in /etc/rsyslog.conf and files within the /etc/rsyslog.d directory.
System Journal Daemon (journald) - A Systemd component that logs system events to a journal database.
10.2a Working with the System Log Daemon
The System Log Daemon (rsyslogd) is the traditional and most common logging daemon used on Linux systems. When this daemon is loaded upon system startup, it creates a socket (/dev/log) for other system processes to write to. It then reads any information written to this socket and saves the information in the appropriate log file according to entries in the /etc/rsyslog.conf file and any files within the /etc/rsyslog.d directory.
/etc/rsyslog.conf - The main configuration file for the System Log Daemon.
A sample /etc/rsyslog.conf file is shown in the following output:
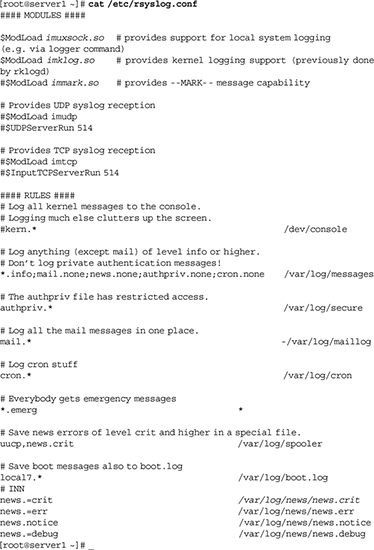
Note: On legacy Linux systems, the System Log Daemon is represented by syslogd and configured using the /etc/syslog.conf file.
Log File Format
Lines in the /etc/rsyslog.conf file or in files within the /etc/rsyslog.d directory that start with a # character are comments. All other entries have the following format:
facility.priority /var/log/logfile
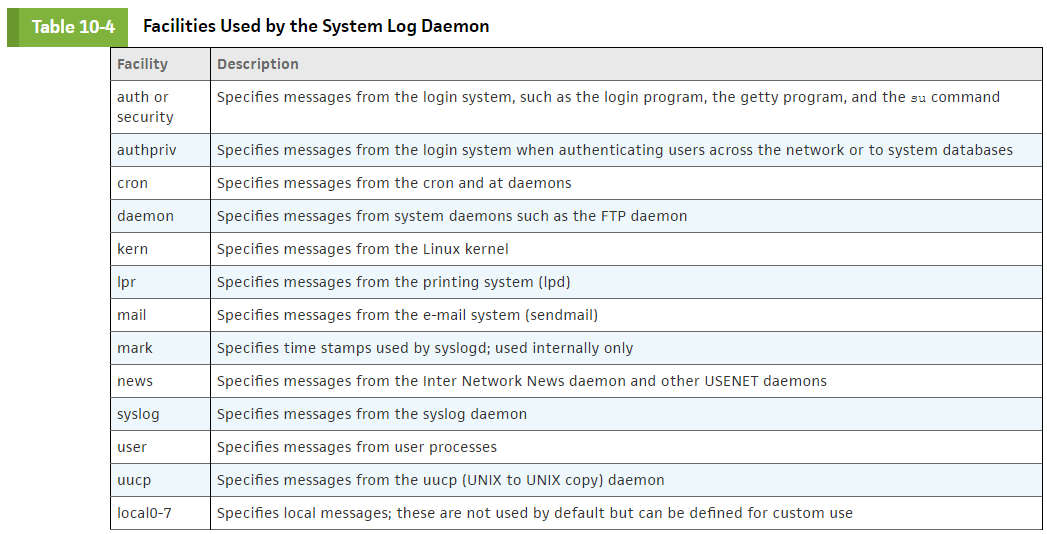
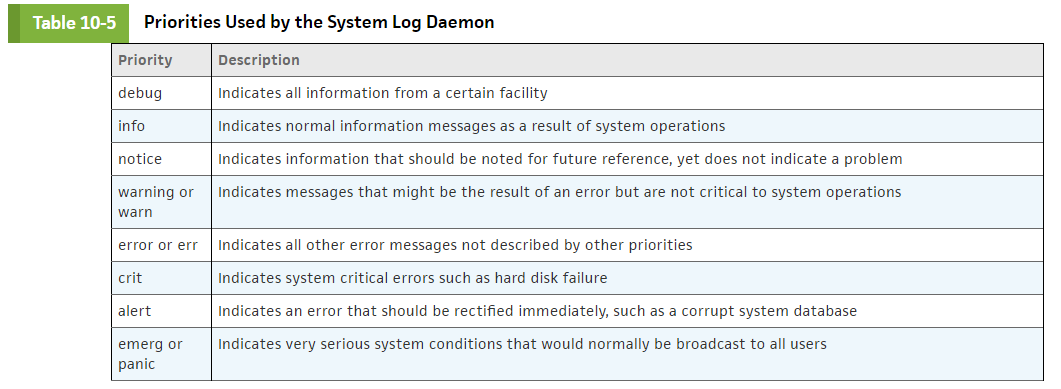
The facility is the area of the system to listen to, whereas the priority refers to the importance of the information. For example, a facility of kern and priority of warning indicates that the System Log Daemon should listen for kernel messages of priority warning and more serious.
facility - The area of the system from which information is gathered when logging system events.
priority - The importance of system information when logging system events.
When found, the System Log Daemon places these messages in the /var/log/logfile file. The aforementioned entry would read:
kern.warning /var/log/logfile
To only log warning messages from the kernel to /var/log/logfile, you can use the following entry instead:
kern.=warning /var/log/logfile
Alternatively, you can log all error messages from the kernel to /var/log/logfile by using the * wildcard, as shown in the following entry:
kern.* /var/log/logfile
In addition, you can specify multiple facilities and priorities; to log all error messages except warnings from the kernel to /var/log/logfile, you can use the following entry:
kern.*;kern.!=warn
To log all error messages from the kernel and news daemons, you can use the following entry:
kern,news.* /var/log/logfile
To log all warnings from all facilities except for the kernel, you can use the “none” keyword, as shown in following entry:
*.=warn;kern.none -/var/log/logfile
Remote Logging
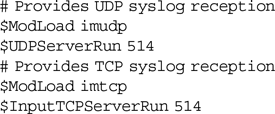
The /etc/rsyslog.conf file may also send logging information to another computer using the format facility.priority@hostname:portnumber; however the remote computer must have the modules that listen on either the TCP or UDP protocol uncommented in the /etc/rsyslog.conf file. For example, by uncommenting the same lines shown next in the /etc/rsyslog.conf file, you allow your system to accept incoming requests from another System Log Daemon on TCP and UDP port 514 (the default System Log Daemon port):
10.2b Working with the Systemd Journal Daemon
The Systemd Journal Daemon (journald) replaces the System Log Daemon on Linux distributions that use Systemd, such as Fedora 20. As with the System Log Daemon, journald creates a socket (/dev/log) for other system processes to write to and reads any information that is written to this socket. However, the events logged are not controlled by specific rules. Instead, journald logs all information to a database under the /var/log/journal directory structure, and events are tagged with labels that identify the same facility and priority information that we examined earlier with the rsyslogd daemon.
Note: You can configure daemon settings for journald, including the ability to forward events to the System Log Daemon, by editing its configuration file, /etc/systemd/journald.conf.
/etc/systemd/journald.conf - The configuration file for the Systemd Journal Daemon.
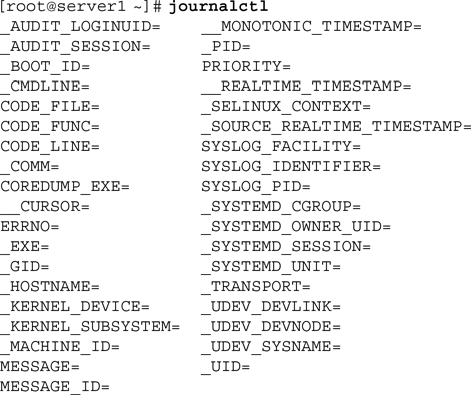
To view events within the journald database, you can use the same journalctl command that we introduced in Chapter 6 to view boot-related messages. If you type journalctl at a command prompt and press the Tab key, you will see a list of areas and criteria that can be queried, as shown here: journalctl
Say, for example, that you wish to search for information in the logs from a particular command on the system. You can type journalctl _COMM= and press the Tab key to see the available commands that perform logging via journald on the system, as shown here: journalctl _COMM=
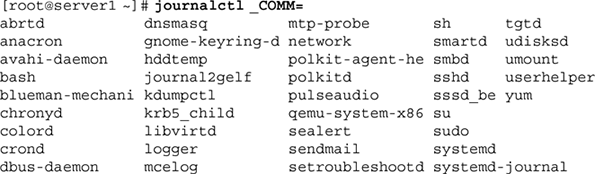
To see the logs from the cron daemon (crond), you can run the command journalctl _COMM=crond | less since there will likely be many lines of output.
However, when troubleshooting an issue regarding the cron daemon, it is more useful to narrow down the time period. The following command displays crond log entries from 1:00 p.m. (13:00) until 2:00 p.m. (14:00) from the current day: journalctl _COMM=crond --since "13:00" --until "14:00"
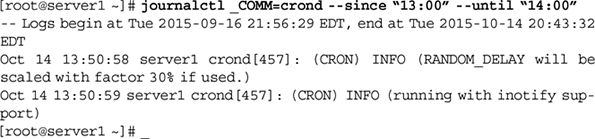
The time format used within the journalctl command follows the standard YYYY-MM-DD HH-MM-SS. Thus, to obtain crond events since 5:30 pm (17:30) on August 22, 2015, you could instead run the journalctl _COMM=crond --since “2015-08-22 17:30:00” command.
You can also query events related to a specific process or daemon if you specify the path name to the executable file or PID. For example, since the Systemd init daemon has a path of /usr/lib/systemd/systemd and a PID of 1, you could run the journalctl /usr/lib/systemd/systemd command or the journalctl _PID=1 command to view events related to the Systemd init daemon.
10.2c Managing Log Files and the journald Database
Although log files and the journald database contain important system information, they might take up unnecessary space on the filesystem over time. On systems that use Systemd, you can limit the size of the journald database by uncommenting and configuring the System- MaxUse line in /etc/systemd/journald.conf.
For example, SystemMaxUse=75M would limit the database to 75MB, and the oldest events would be deleted as new events are logged.
To prevent key older events from being overwritten, you can create a shell script that executes the appropriate journalctl commands and either prints the results or saves them to a text file. You can then configure the cron daemon to execute this shell script periodically, as discussed in Chapter 9.
For log files within the /var/log directory, you can periodically clear their contents to reclaim space on the filesystem.
Important: Do not remove log files, because the permissions and ownership will be removed as well. Before clearing important log files, it is good form to save them to a different location or print their contents for future reference.
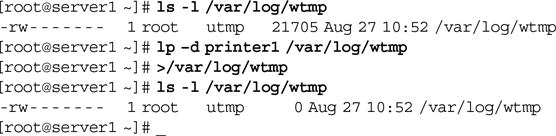
Clearing a log file
To clear a log file, recall that you can use a > redirection symbol. The following commands display the size of the /var/log/wtmp log file before and after it has been printed and cleared:
Alternatively, you can schedule the logrotate command to back up and clear log files from entries stored in the /etc/logrotate.conf file and files stored in the /etc/logrotate.d directory. The logrotate command typically renames (or rotates) log files on a cyclic basis; the log file will be renamed to contain a numeric or date extension, and a new log file will be created to accept system information.
logrotate - The command used to rotate log files; typically uses the configuration information stored in /etc/logrotate.conf.
/etc/logrotate.conf - The file used by the logrotate utility to specify rotation parameters for log files.
You can specify the type of extension as well as the number of log files that logrotate keeps. If logrotate is configured to keep only two copies of old log files, then after two log rotations, the oldest log file will automatically be removed.An example of the /etc/logrotate.conf file is shown in the following output:
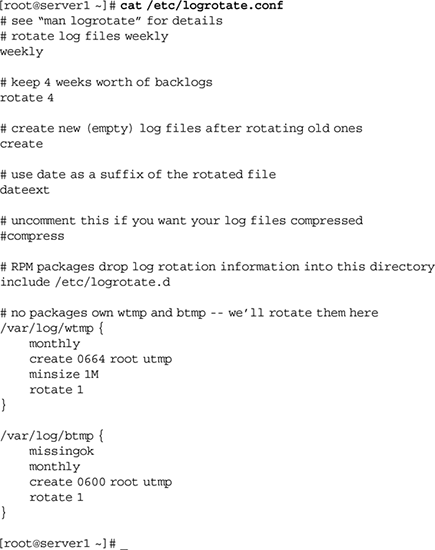
In the preceding output, any # characters indicate a comment and are ignored. The other lines indicate that log files contained in this file and all other files in the /etc/logrotate.d directory (include /etc/logrotate.d) are rotated on a weekly basis unless otherwise specified (weekly) using a date extension (dateext), and up to 4 weeks of log files will be kept (rotate 4).
The bottom of the /etc/logrotate.conf file has two entries that override these values. For the file /var/log/wtmp, this rotation occurs monthly instead of weekly, only if the size of the log file is greater than 1MB. Only one old log file is kept, and the new log file created has the permissions 0664 (rw-rw-r--), the owner root, and the group utmp. For the file /var/log/btmp, this rotation occurs monthly instead of weekly, and no errors are reported if the log file is missing. Only one old log file is kept, and the new log file created has the permissions 0600 (rw-------), the owner root, and the group utmp.Most rotation information within /etc/logrotate.conf is overridden from files stored in the /etc/logrotate.d directory. Take the file /etc/logrotate.d/psacct as an example:
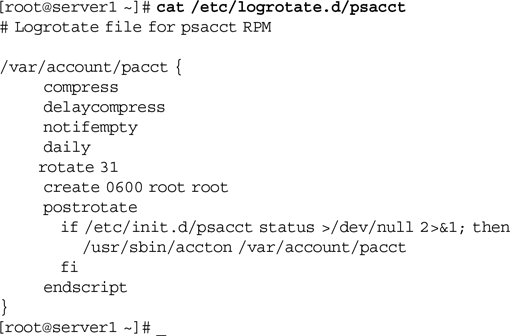
This file indicates that the /var/account/pacct file should be rotated daily if it is not empty, and that new log files will be owned by the root user/group and have the permissions 0600 (rw-------). Up to 31 old log files will be kept and compressed, but only on the next rotation (delaycompress). In addition, the /usr/sbin/accton /var/account/pacct command is run after each rotation if the /etc/init.d/psacct status command returns true.
On most Linux systems, the logrotate utility is automatically scheduled to run daily via the file /etc/cron.daily/logrotate; however, you might choose to run it manually by typing the command logrotate /etc/logrotate.confat a command prompt.
Over time, the logrotate command generates several copies of each log file, as shown in the following listing of the /var/log directory:
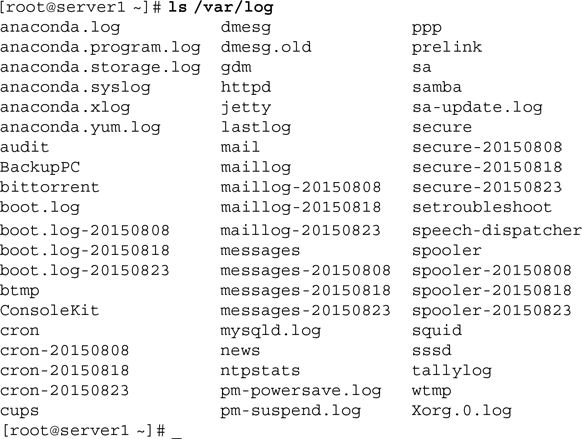
Given the preceding output, the most recent events for the cron daemon are recorded in the cron.log file, followed by the cron-20150823 file, followed by the cron-20150818 file and the cron-20150808 file.
Page 3
10.3 Administering Users and Groups
You must log in to a Linux system with a valid user name and password before a BASH shell is granted. This process is called authentication because the user name and password are authenticated against a system database that contains all user account information. Authenticated users are then granted access to files, directories, and other resources on the system based on their user account.
user account - The information regarding a user that is stored in a system database (/etc/passwd and /etc/shadow), which can be used to log in to the system and gain access to system resources.
The system database that contains user account information typically consists of two files: /etc/passwd and /etc/shadow. Every user typically has a line that describes the user account in /etc/passwd and a line that contains the encrypted password and expiration information in /etc/shadow.
/etc/passwd - The file that contains user account information.
/etc/shadow - The file that contains the encrypted password as well as password and account expiry parameters for each user account.
Older Linux systems stored the encrypted password in the /etc/passwd file and did not use an /etc/ shadow file at all. This is considered poor security today because processes often require access to the user information in /etc/passwd. Storing the encrypted password in a separate file that cannot be accessed by processes prevents a process from obtaining all user account information.
Enabling/Disabling Shadow
By default, Fedora 13 configures passwords using an /etc/shadow file. However, you can use the pwunconv command to revert to using an /etc/passwd file only. Also, you can use the pwconv command to configure the system again using an /etc/shadow file for password storage.
pwunconv command - The command used to disable the use of the /etc/shadow file.
pwconv command - The command used to enable the use of the /etc/shadow file.
Each line of the /etc/passwd file has the following colon-delimited format: name:password:UID:GID:GECOS:homedirectory:shell
The name in the preceding output refers to the name of the user. If an /etc/shadow is not used, the password field contains the encrypted password for the user; otherwise, it just contains an x character as a placeholder for the password stored in /etc/shadow.
The User Identifier (UID) specifies the unique User ID that is assigned to each user. Typically, UIDs that are less than 500 refer to user accounts that are used by daemons when logging in to the system. The root user always has a UID of zero.
User Identifier (UID) - A unique number assigned to each user account.
The Group Identifier (GID) is the primary Group ID for the user. Each user can be a member of several groups, but only one of those groups can be the primary group. The primary group of a user is the group that is made the group owner of any file or directory that the user creates. Similarly, when a user creates a file or directory, that user becomes the owner of that file or directory.
Group Identifier (GID) - A unique number given to each group.
GECOS represents a text description of the user and is typically left blank; this information was originally used in the General Electric Comprehensive Operating System (GECOS). The last two fields represent the absolute pathname to the user’s home directory and the shell, respectively.
An example of an /etc/passwd file is shown next:
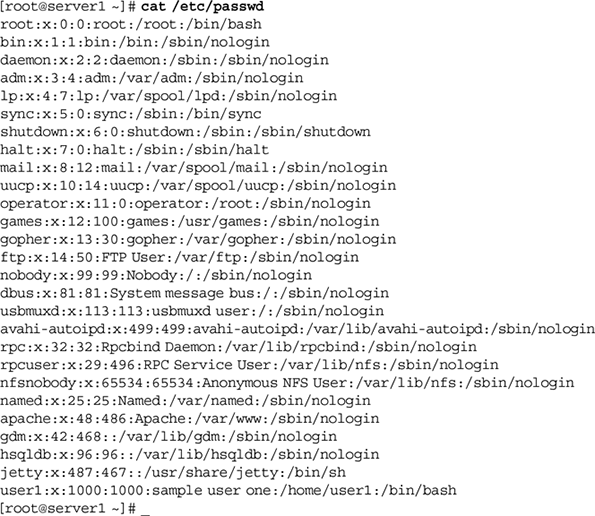
The root user is usually listed at the top of the /etc/passwd file, as just shown, followed by user accounts used by daemons when logging in to the system, followed by regular user accounts. The final line of the preceding output indicates that the user user1 has a UID of 1000, a primary GID of 1000, a GECOS of “sample user one,” the home directory /home/user1, and uses the BASH shell.
The /etc/shadow (Shadow) file
Like /etc/passwd, the /etc/shadow file is colon-delimited yet has the following format: name:password:lastchange:min:max:warn:disable1:disable2
Although the first two fields in the /etc/shadow file are the same as those in /etc/passwd, the contents of the password field are different; the password field in the /etc/shadow file contains the encrypted password, whereas the password field in /etc/passwd contains an x character because it is not used.The lastchange field represents the date of the most recent password change; it is measured in the number of days since January 1, 1970. For example, the number 10957 represents January 1, 2000, because January 1, 2000, is 10957 days after January 1, 1970.
Passwords
To prevent unauthorized access to a Linux system, it is good form to change passwords for user accounts regularly. To ensure that passwords are changed, you can can set them to expire at certain intervals. The next three fields of the /etc/shadow file indicate information about password expiration: min represents the number of days a user must wait before he changes his password after receiving a new one, max represents the number of days a user can use the same password without changing it, and warn represents the number of days before a password would expire that a user is warned to change his password.
When a password has expired, the user is still allowed to log in to the system for a certain period of time, after which point the user is disabled from logging in. The number of days after a password expires that a user account is disabled is represented by the disable1 field in /etc/shadow. In addition, you can choose to disable a user from logging in at a certain date, such as the end of an employment contract. The disable2 field in /etc/shadow represents the number of days since January 1, 1970 that a user account will be disabled.
An example /etc/shadow file is shown next:
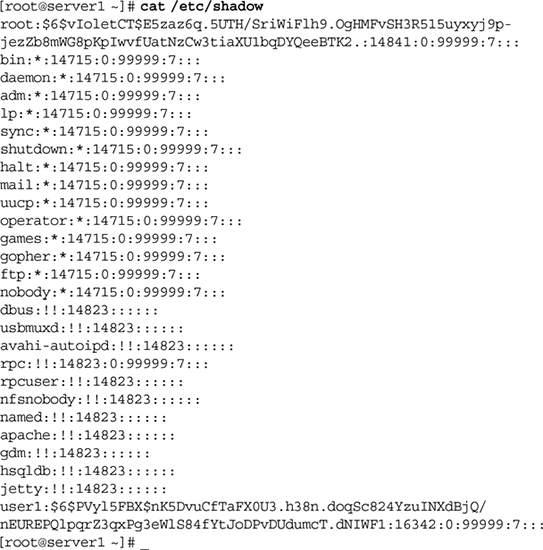
Note from the preceding output that most user accounts used by daemons do not receive an encrypted password.Although every user must have a primary group listed in the /etc/passwd file, each user can be a member of multiple groups. All groups and their members are listed in the /etc/group file. The /etc/group file has the following colon-delimited fields: name:password:GID:members
The first field is the name of the group, followed by a group password.
/etc/group - The file that contains group definitions and memberships.
Note: The password field usually contains an x, because group passwords are rarely used. If group passwords are used on your system, you need to specify a password to change your primary group membership using the newgrpcommand discussed later in this chapter. These passwords are set using the gpasswd command and can be stored in the /etc/gshadow file for added security. Refer to the gpasswd manual or info page for more information.
The GID represents the unique Group ID for the group, and the members field indicates the list of group members. An example /etc/group file is shown next:
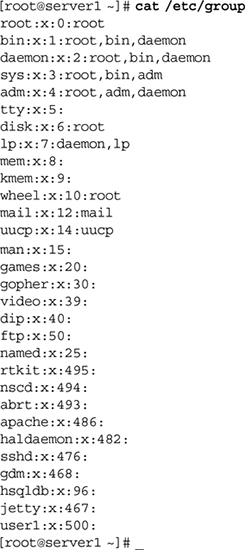
From the preceding output, the “bin” group has a GID of 1 and three users as members: root, bin, and daemon.
10.3a Creating User Accounts
You can create user accounts on the Linux system by using the useradd command, specifying the user name as an argument, as shown next: useradd bobg
In this case, all other information, such as the UID, shell, and home directory location, is taken from two files that contain user account creation default values.
The first file, /etc/login.defs, contains parameters that set the default location for e-mail, password expiration information, minimum password length, and the range of UIDs and GIDs available for use. In addition, it determines whether home directories will be automatically made during user creation, as well as the password hash algorithm used to store passwords within /etc/shadow.
/etc/login.defs - A file that contains default values for user creation.A sample /etc/login.defs file is depicted in the following example:
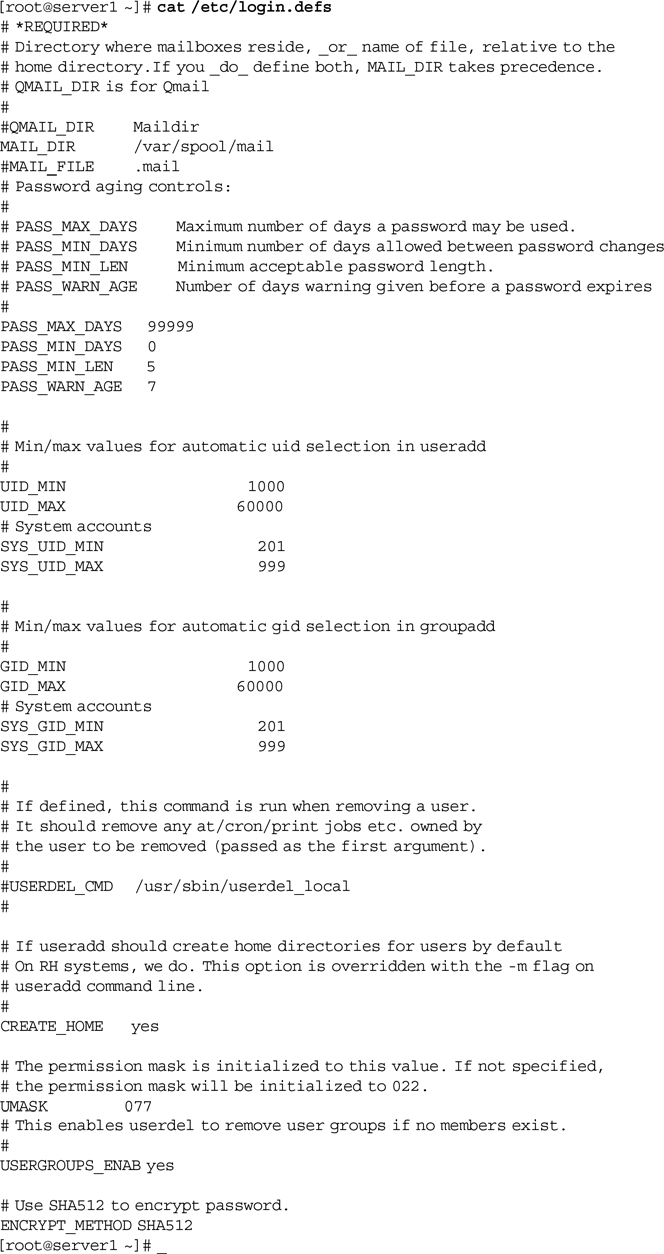
The second file, /etc/default/useradd, contains information regarding the default primary group, the location of home directories, the default number of days to disable accounts with expired passwords, the date to disable user accounts, the shell used, and the skeleton directory used. The skeleton directory, which is /etc/skel on most Linux systems, contains files that are copied to all new users’ home directories when the home directory is created. Most of these files are environment files, such as .bash_profile and .bashrc.
A sample /etc/default/useradd file is shown in the following output:
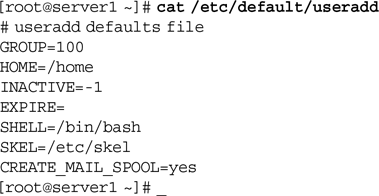
To override any of the default parameters for a user in the /etc/login.defs and /etc/default/useradd files, you can specify options to the useradd command when creating user accounts. For example, to create a user named maryj with a UID of 762, you can use the –u option to the useradd command, as shown in the following example: useradd -u 762 maryj
Table 10-6 lists some common options available to the useradd command and their descriptions:
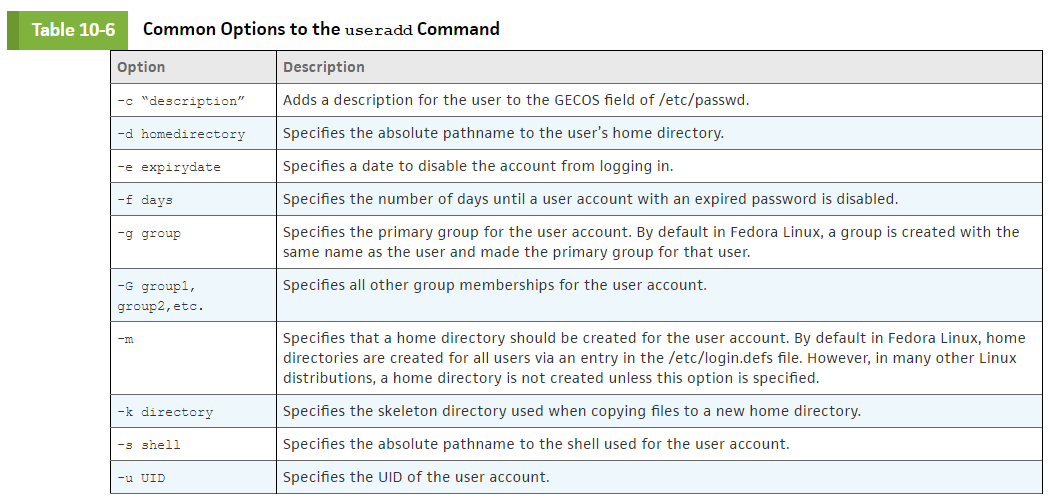
After a user account has been added, the password field in the /etc/shadow file contains either two ! characters or a single * character, indicating that no password has been set for the user account. To set the password, simply type the passwd command, type the name of the new user account at a command prompt, and then supply the appropriate password when prompted.
passwd command - The command used to modify the password associated with a user account.
An example of setting the password for the bobg user is shown in the following: passwd bobg
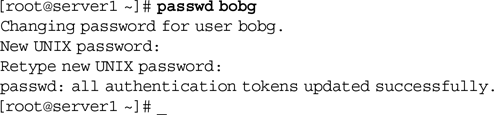
Note: Without arguments, the passwd command changes the password for the current user.
Note: All user accounts must have a password set before they are used to log in to the system.
Note: The root user can set the password on any user account using the passwdcommand; however, regular users can change their password only using this command.
10.3b Modifying User Accounts
To modify the information regarding a user account after creation, you can edit the /etc/passwd or /etc/shadow file. This is not recommended, however, because typographical errors in these files might prevent the system from functioning. Instead, it’s better to use the usermod command, which you can use to modify most information regarding user accounts.
usermod command - The command used to modify the properties of a user account on the system.
For example, to change the login name of the user bobg to barbg, you can use the –l option to the usermod command: usermod -l barbg bobg
Table 10-7 displays a complete list of options used with the usermodcommand to modify user accounts.
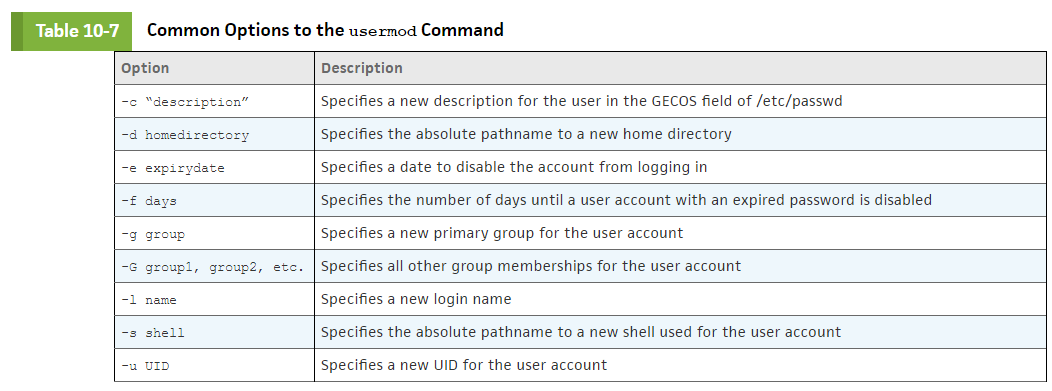
GECOS field
Note: If installed, the finger command can be used to view information about users. This information is stored in the GECOS field of /etc/passwd. As a result, instead of using the –c option to the usermod command, users can change their own GECOS, or finger information, using the chfn command.
chfn command - The command used to change the GECOS for a user.
Account Expiry
The only user account information that the usermod command cannot modify is the password expiration information stored in /etc/shadow (min, max, warn), discussed earlier. To change this information, you can use the chage command with the appropriate option.
chage command - The command used to modify password expiry information for user accounts.
For example, to specify that the user bobg must wait 2 days before changing his password after receiving a new password, as well as to specify that his password expires every 50 days with 7 days of warning prior to expiration, you can use the following options to the chage command:
chage -m 2 -M 50 -W 7 bobg
Locking an Account
Sometimes it’s necessary to lock an account—that is, to temporarily prevent a user from logging in. To lock an account, you can use the command usermod –L username at the command prompt. This places a ! character at the beginning of the encrypted password field in the /etc/shadow file. To unlock the account, simply type usermod –U username at the command prompt, which removes the ! character from the password field in the /etc/shadow file.Alternatively, you can use the passwd –l username command to lock a user account, and the passwd –u username command to unlock a user account. These commands place and remove two ! characters at the beginning of the encrypted password field in the /etc/shadow file, respectively.
Changing the User Shell
Yet another method commonly used to lock a user account is to change the shell specified in /etc/passwd for a user account from /bin/bash to an invalid shell such as /bin/false or /sbin/nologin. Without a valid shell, a user cannot use the system. To lock a user account this way, you can edit the /etc/passwd file and make the appropriate change, use the –s option to the usermodcommand, or use the chsh command.
chsh command - The command used to change a valid shell to an invalid shell.
The following example uses the chsh command to change the shell to /bin/false for the user bobg: chsh -s /bin/false bobg

10.3c Deleting User Accounts
To delete a user account, you can use the userdel command and specify the user name as an argument. This removes entries from the /etc/passwd and /etc/shadow files corresponding to the user account. Furthermore, you can specify the –r option to the userdel command to remove the home directory for the user and all of its contents.
userdel command - The command used to remove a user account from the system.
When a user account is deleted, any files that were previously owned by the user become owned by a number that represents the UID of the deleted user. Any future user account that is given the same UID then becomes the owner of those files.
Suppose, for example, that the user bobg leaves the company. To delete bobg’s user account and display the ownership of his old files, you can use the following commands:
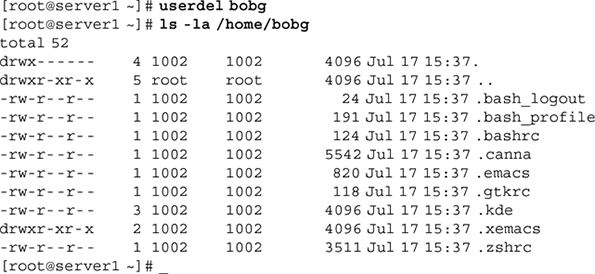
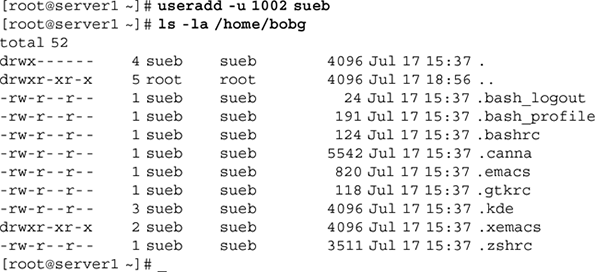
From the preceding output, you can see that the UID of the bobg user was 1002. Now suppose the company hires Sue—that is, the user sueb—to replace bobg. You can then assign the UID of 1002 to Sue’s user account. Although she will have her own home directory (/home/sueb), she will also own all of bobg’s old files within /home/bobg and otherwise. She can then copy the files that she needs to her own home directory and remove any files that she doesn’t need as part of her job function.
To create the user sueb with a UID of 1002 and list the ownership of the files in bobg’s home directory, you can use the following commands:
10.3d Managing Groups
By far, the easiest way to add groups to a system is to edit the /etc/group file using a text editor. Another method is to use the groupadd command.
groupadd - The command used to add a group to the system.
To add a group called group1 to the system and assign it a GID of 492, you can use the following command: groupadd -g 492 group1
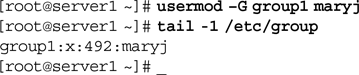
Then, you can use the -G option to the usermod command to add members to the group. To add the user maryj to this group and view the addition, you can use the following usermod command: usermod -G group1 maryj
There also exists a groupmod command, which can be used to modify the group name and GID, and a groupdel command, which can be used to remove groups from the system.
groupmod command - The command used to modify the name or GID of a group on the system.
groupdel command - The command used to delete a group from the system.
Listing Groups
To see a list of groups of which you are a member, simply run the groups command; to see the GIDs for each group, simply run the id command. The primary group is always listed first by each command.
groups command - The command that lists group membership for a user.
id command - The command that lists UIDs for a user and the GIDs for the groups that the same user belongs to.
The following output shows sample output of these commands when executed by the root user:

In the preceding output the primary group for the root user is the root group. This group is attached as the group owner for all files that are created by the root user, as shown in the following output:

Temporarily Changing the Primary Group
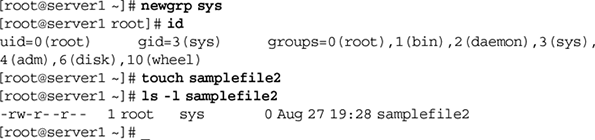
To change the primary group temporarily to another group that is listed in the output of the groups and id commands, you can use the newgrp command. Any new files created afterward will then have the new group owner.
newgrp command - The command used to temporarily change the primary group of a user.
The following output demonstrates how changing the primary group for the root user affects file ownership:
Note: If you use group passwords as described earlier in this section, you can use the newgrp command to change your primary group to a group of which you are not a member, provided you supply the appropriate group password when prompted.
The root user can use the newgrp command to change her primary group to any other group.
Using the GUI to Manage Groups
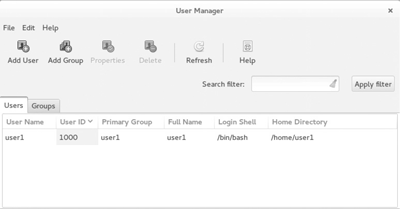
Although command-line utilities are commonly used to administer users and groups, you can instead use a graphical utility to create, modify, and delete user and group accounts on the system. These utilities run the appropriate command-line utility in the background. To create and manage users and groups in Fedora 20 from within a desktop environment, you can open a terminal application in the desktop environment, switch to the root user, and run the system-config-users command to open the User Manager utility shown in Figure 10-6.
Page 4
Chapter Summary
10-4a Chapter Summary
Print jobs are spooled to a print queue before being printed to a printer.
You can configure spooling or printing for a printer by using the cupsaccept, cupsreject, cupsenable, and cupsdisable commands.
Print jobs are created using the lp command, can be viewed in the print queue using the lpstat command, and are removed from the print queue using the cancel command.
You can configure printers using the lpadmin command, the CUPS Web administration tool, or by modifying the /etc/cups/printers.conf file.
Most log files on a Linux system are stored in the /var/log directory.
System events are typically logged to files by the System Log Daemon (rsyslogd) or to a database by the Systemd Journal Daemon (journald).
You can use the journalctl command to view the contents of the journald database.
Log files should be cleared or rotated over time to save disk space; the logrotate utility can be used to rotate log files.
User and group account information is typically stored in the /etc/passwd, /etc/shadow, and /etc/group files.
You can use the useradd command to create users and the groupadd command to create groups.
All users must have a valid password before logging in to a Linux system.
Users can be modified with the usermod, chage, chfn, chsh, and passwd commands, and groups can be modified using the groupmod command.
The userdel and groupdel commands can be used to remove users and groups from the system, respectively.
Information
- Description
- Linux Operating System (CIS126DL) Note on Chapter 10 Notes, created by Michael Mason on 03/05/2017.
- Created by
- Michael Mason
- Views
- 0
- Rating