
Quiz
AP World History Final Review (Period 1-3)
Perguntas do quiz (76)
1Use the images provided to choose your answer.
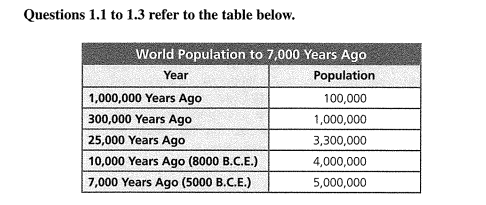
- AA
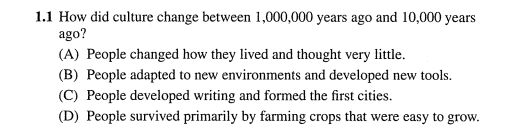
- BB
- CC
- DD
- AA
2Use the images provided to choose your answer.
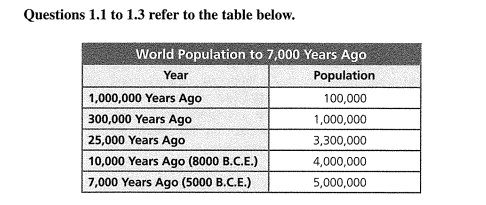
- AA
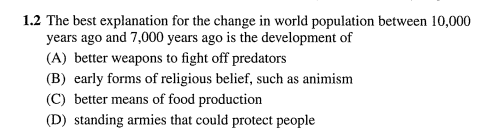
- BB
- CC
- DD
- AA
3Use the images provided to choose your answer.
- AA
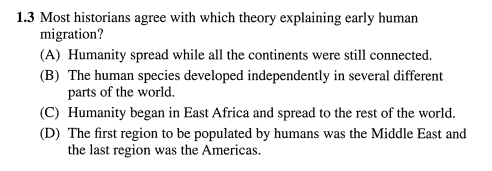
- BB
- CC
- DD
- AA
4Use the images provided to choose your answer.
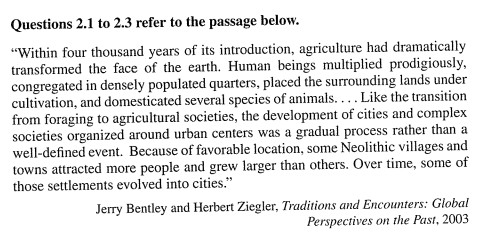
- AA
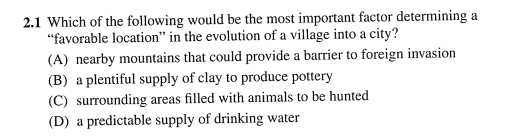
- BB
- CC
- DD
- AA
5Use the images provided to choose your answer.
- AA
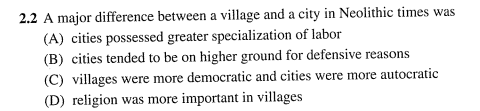
- BB
- CC
- DD
- AA
6Use the images provided to choose your answer.
- AA
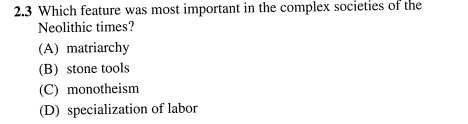
- BB
- CC
- DD
- AA
7Use the images provided to choose your answer.
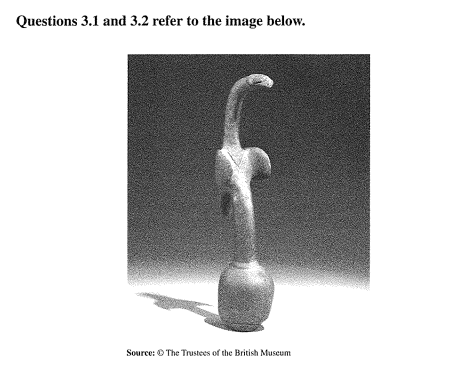
- AA
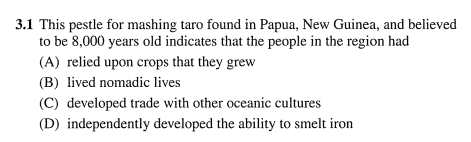
- BB
- CC
- DD
- AA
8Use the images provided to choose your answer.
- AA
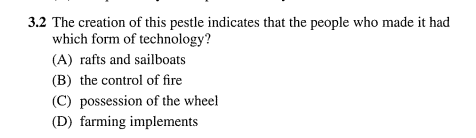
- BB
- CC
- DD
- AA
9Use the images provided to choose your answer.
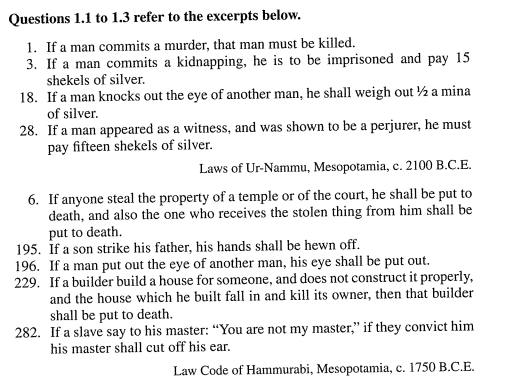
- AA
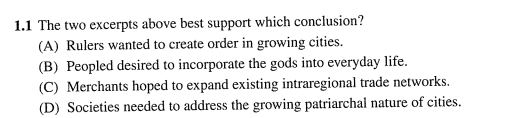
- BB
- CC
- DD
- AA
10Use the images provided to choose your answer.
- AA
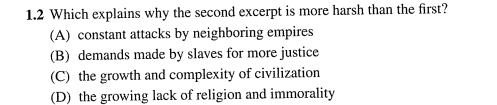
- BB
- CC
- DD
- AA
11Use the images provided to choose your answer.
- AA
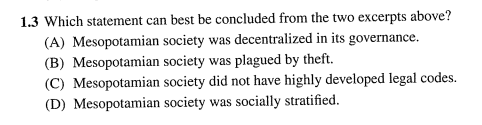
- BB
- CC
- DD
- AA
12Use the images provided to choose your answer.
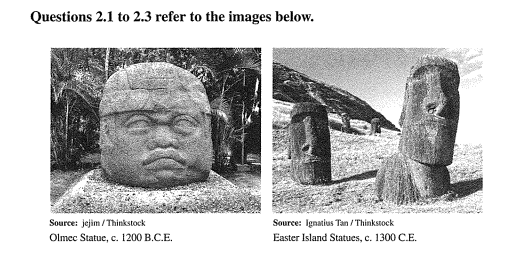
- AA
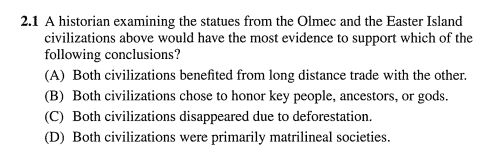
- BB
- CC
- DD
- AA
13Use the images provided to choose your answer.
- AA
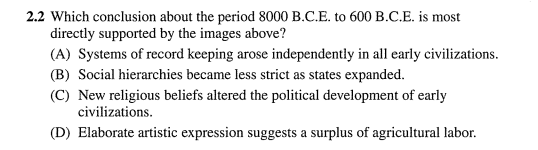
- BB
- CC
- DD
- AA
14Use the images provided to choose your answer.
- AA
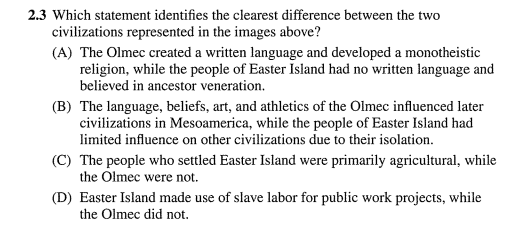
- BB
- CC
- DD
- AA
15Use the images provided to choose your answer.
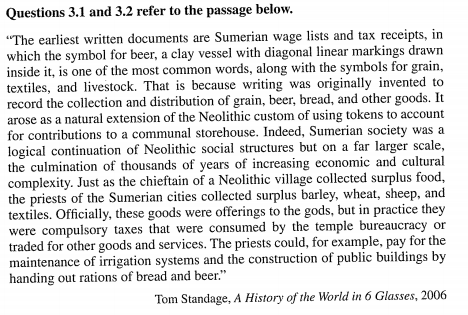
- AA
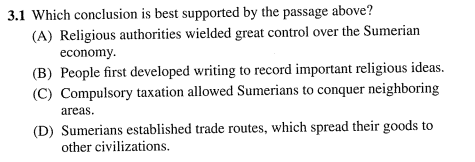
- BB
- CC
- DD
- AA
16Use the images provided to choose your answer.
- AA
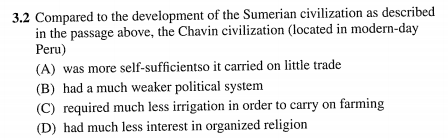
- BB
- CC
- DD
- AA
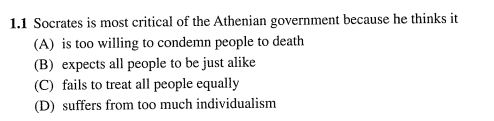
17Use the images provided to choose your answer.
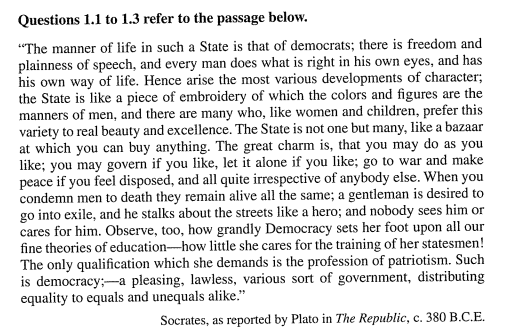
- AA
- BB
- CC
- DD
- AA
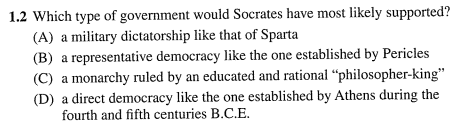
18Use the images provided to choose your answer.
- AA
- BB
- CC
- DD
- AA
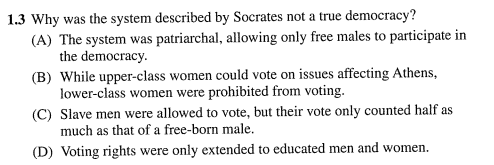
19Use the images provided to choose your answer.
- AA
- BB
- CC
- DD
- AA
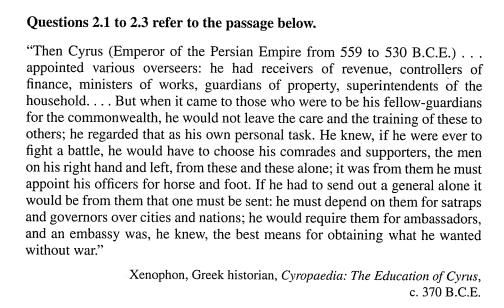
20Use the images provided to choose your answer.
- AA
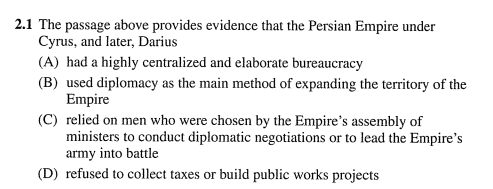
- BB
- CC
- DD
- AA
21Use the images provided to choose your answer.
- AA
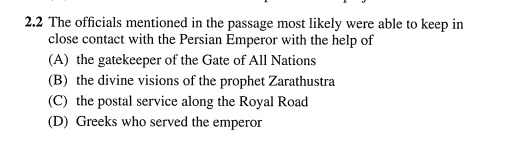
- BB
- CC
- DD
- AA
22Use the images provided to choose your answer.
- AA
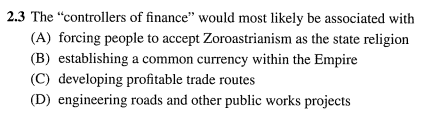
- BB
- CC
- DD
- AA
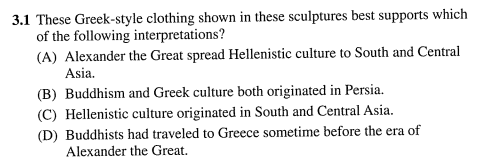
23Use the images provided to choose your answer.
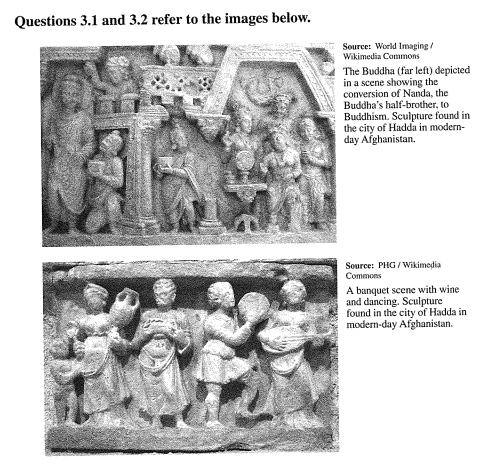
- AA
- BB
- CC
- DD
- AA
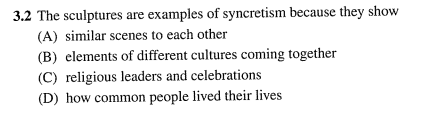
24Use the images provided to choose your answer.
- AA
- BB
- CC
- DD
- AA
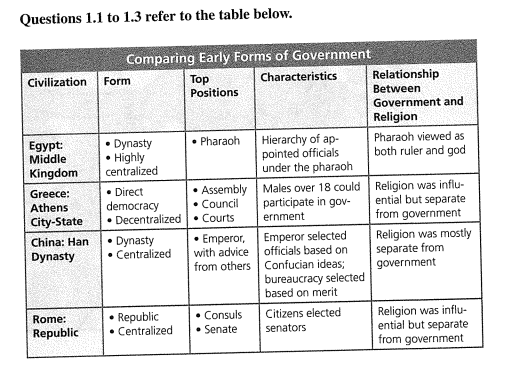
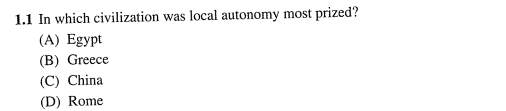
25Use the images provided to choose your answer.
- AA
- BB
- CC
- DD
- AA
26Use the images provided to choose your answer.
- AA
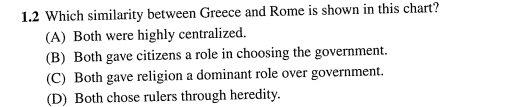
- BB
- CC
- DD
- AA
27Use the images provided to choose your answer.
- AA
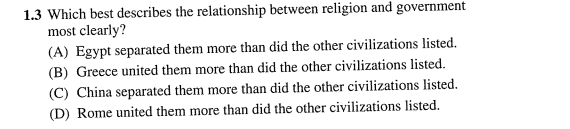
- BB
- CC
- DD
- AA
28Use the images provided to choose your answer.
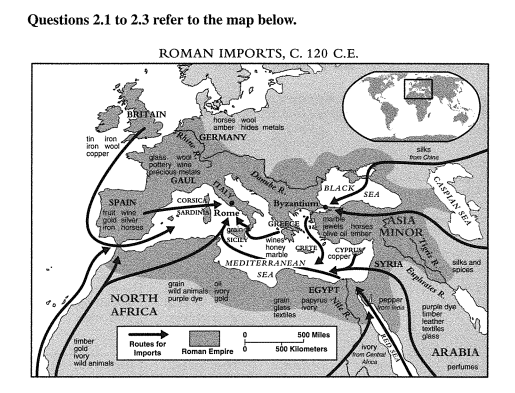
- AA
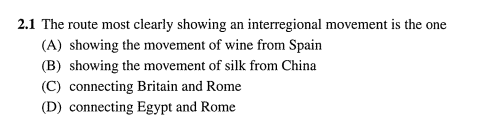
- BB
- CC
- DD
- AA
29Use the images provided to choose your answer.
- AA
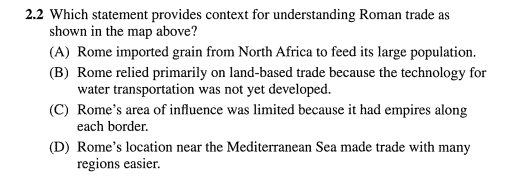
- BB
- CC
- DD
- AA
30Use the images provided to choose your answer.
- AA
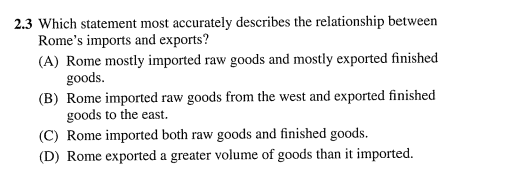
- BB
- CC
- DD
- AA
31Use the images provided to choose your answer.
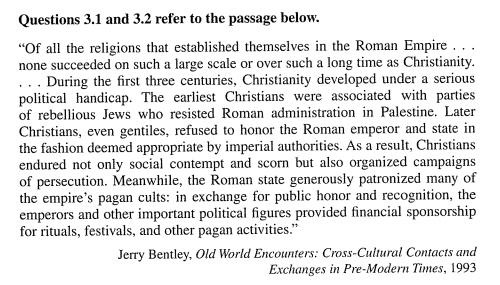
- AA
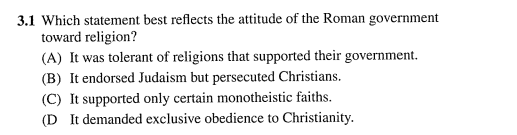
- BB
- CC
- DD
- AA
32Use the images provided to choose your answer.
- AA
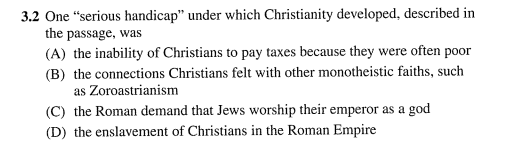
- BB
- CC
- DD
- AA
33Use the images provided to choose your answer.
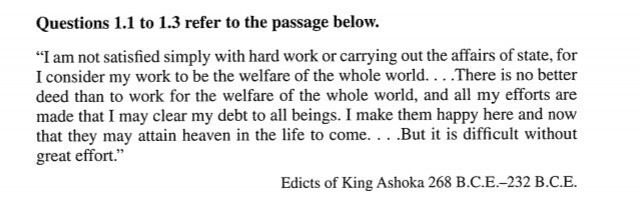
- AA
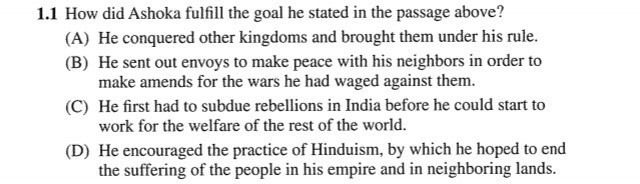
- BB
- CC
- DD
- AA
34Use the images provided to choose your answer.
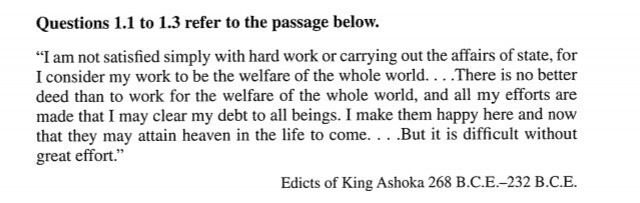
- AA
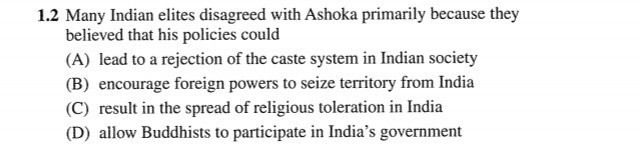
- BB
- CC
- DD
- AA
35Use the images provided to choose your answer.
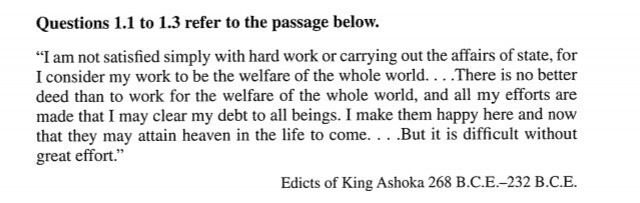
- AA
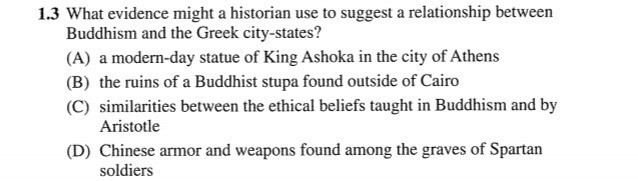
- BB
- CC
- DD
- AA
36Use the images provided to choose your answer.
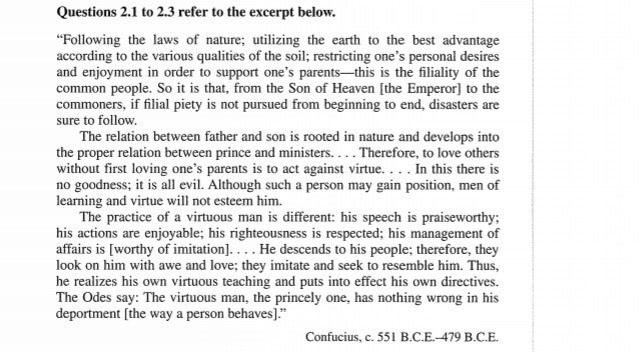
- AA
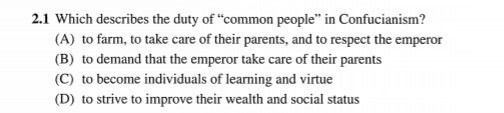
- BB
- CC
- DD
- AA
37Use the images provided to choose your answer.
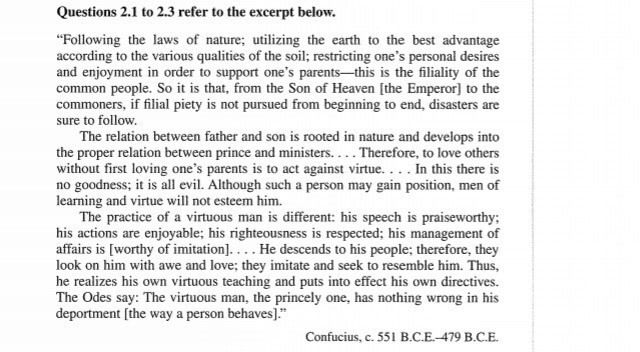
- AA
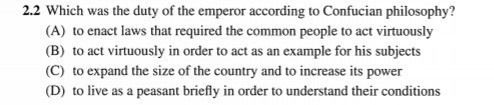
- BB
- CC
- DD
- AA
38Use the images provided to choose your answer.
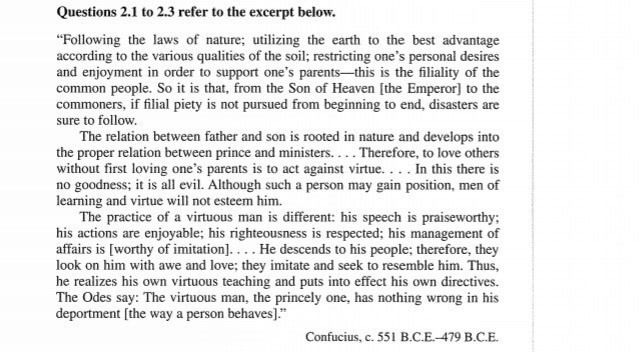
- AA
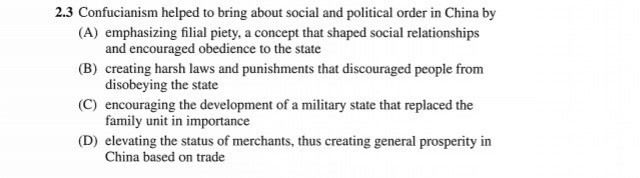
- BB
- CC
- DD
- AA
39Use the images provided to choose your answer.
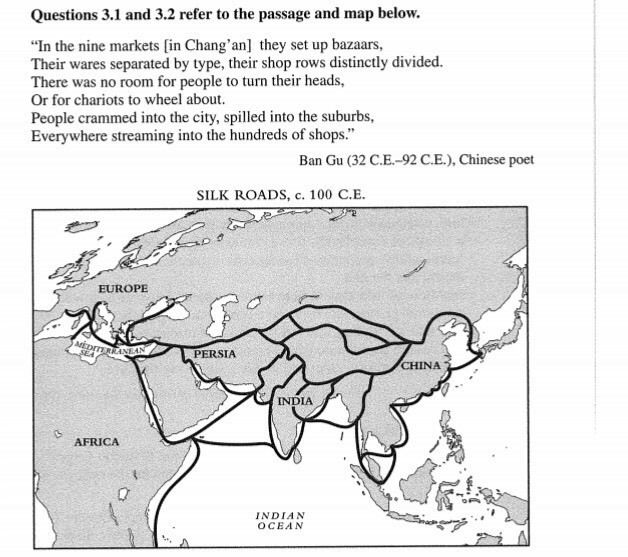
- AA
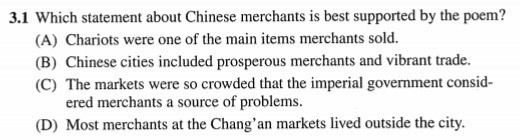
- BB
- CC
- DD
- AA
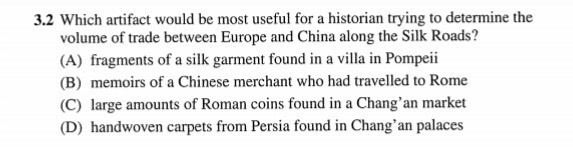
40Use the images provided to choose your answer.
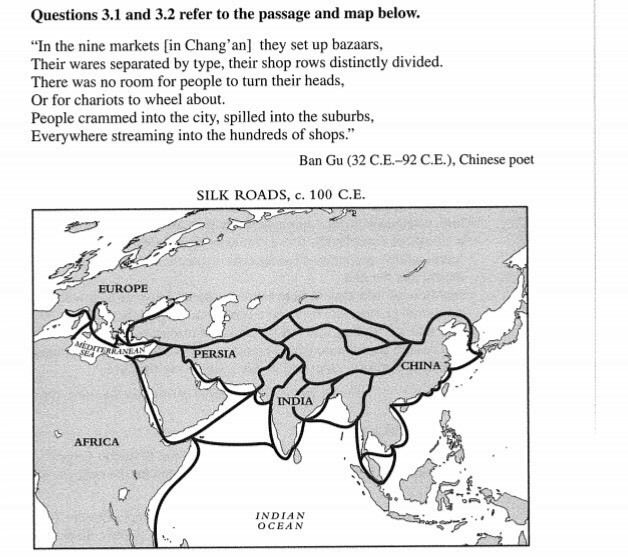
- AA
- BB
- CC
- DD
- AA
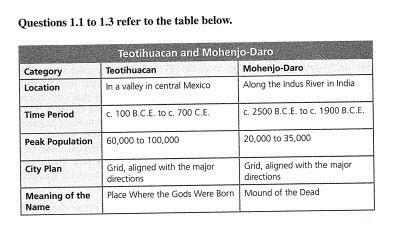
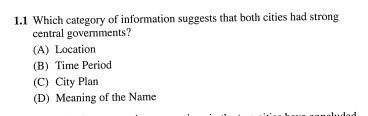
41Use the images provided to choose your answer.
- AA
- BB
- CC
- DD
- AA
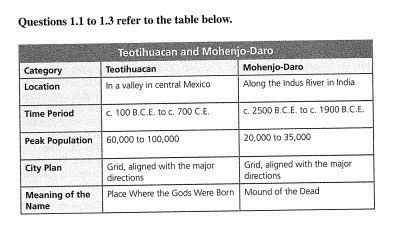
42Use the images provided to choose your answer.
- AA
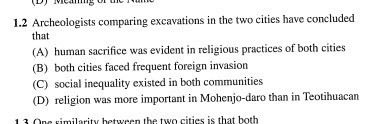
- BB
- CC
- DD
- AA
43Use the images provided to choose your answer.
- AA
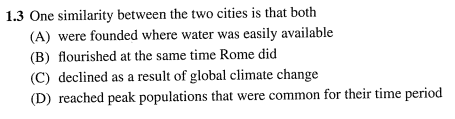
- BB
- CC
- DD
- AA
44Use the images provided to choose your answer.
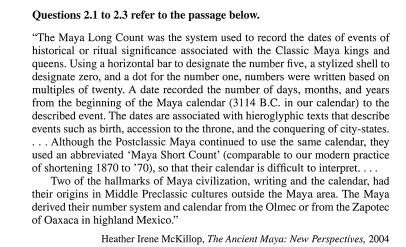
- AA
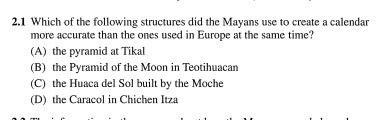
- BB
- CC
- DD
- AA
45Use the images provided to choose your answer.
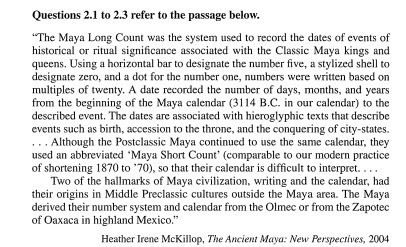
- AA
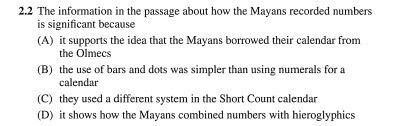
- BB
- CC
- DD
- AA
46Use the images provided to choose your answer.
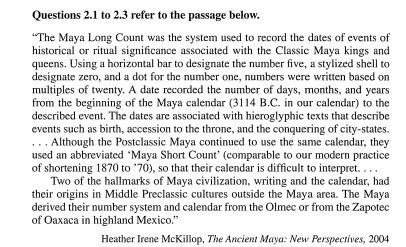
- AA
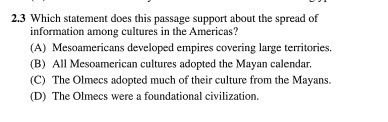
- BB
- CC
- DD
- AA
47Use the images provided to choose your answer.
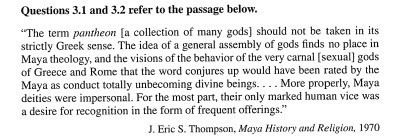
- AA
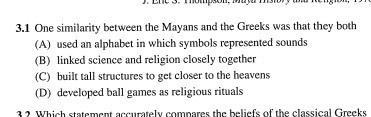
- BB
- CC
- DD
- AA
48Use the images provided to choose your answer.
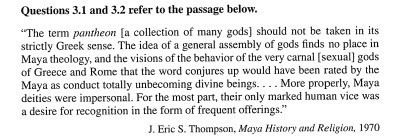
- AA
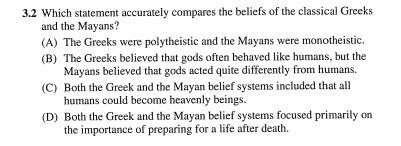
- BB
- CC
- DD
- AA
49Use the images provided to choose your answer.
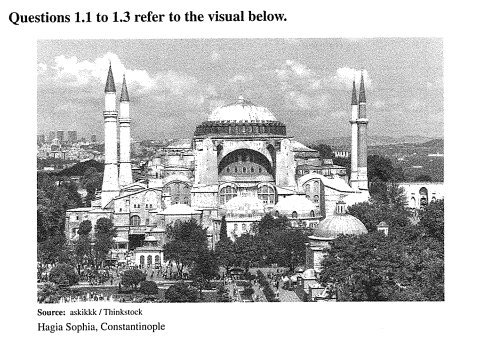
- AA
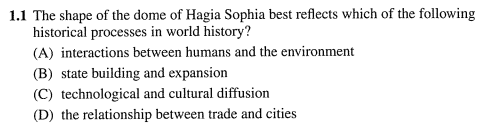
- BB
- CC
- DD
- AA
50Use the images provided to choose your answer.
- AA
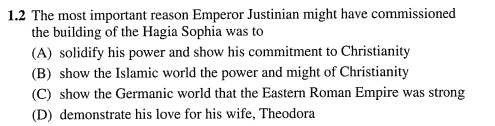
- BB
- CC
- DD
- AA
51Use the images provided to choose your answer.
- AA
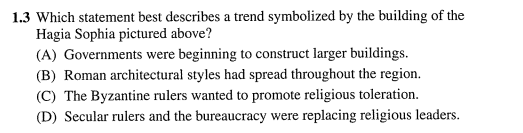
- BB
- CC
- DD
- AA
52Use the images provided to choose your answer.
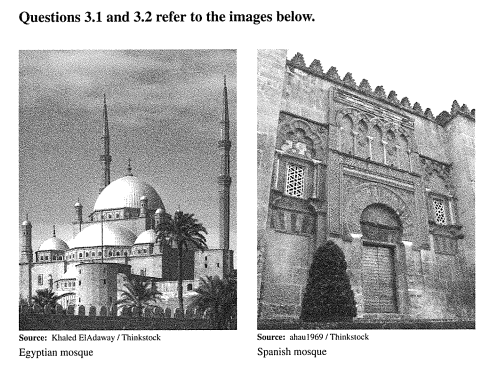
- AA
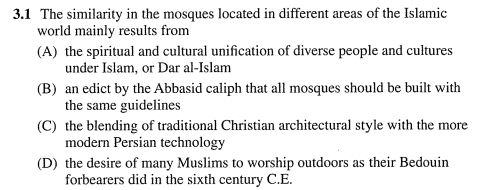
- BB
- CC
- DD
- AA
53Use the images provided to choose your answer.
- AA
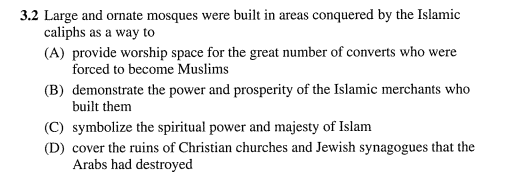
- BB
- CC
- DD
- AA
54Use the images provided to choose your answer.
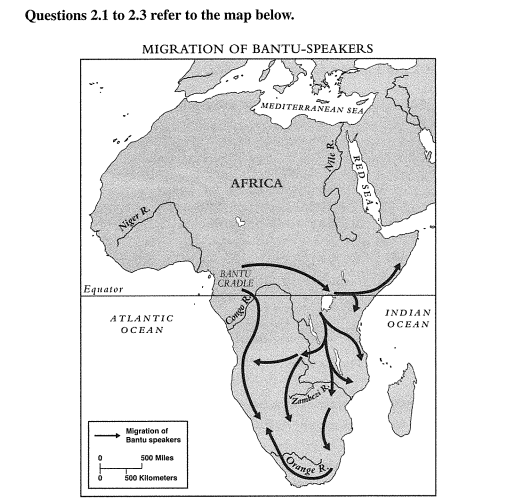
- AA
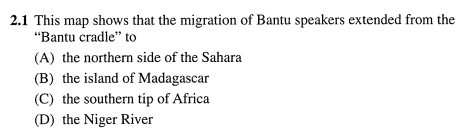
- BB
- CC
- DD
- AA
55Use the images provided to choose your answer.
- AA
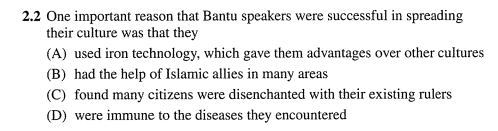
- BB
- CC
- DD
- AA
56Use the images provided to choose your answer.
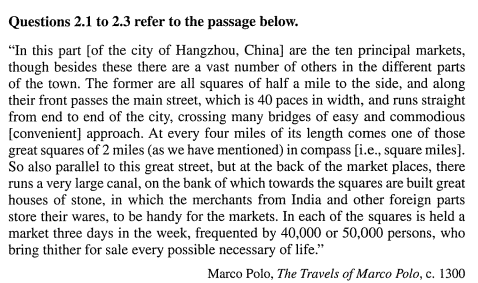
- AA
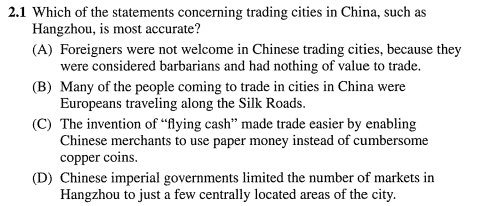
- BB
- CC
- DD
- AA
57Use the images provided to choose your answer.
- AA
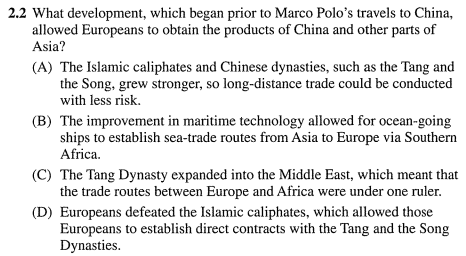
- BB
- CC
- DD
- AA
58Use the images provided to choose your answer.
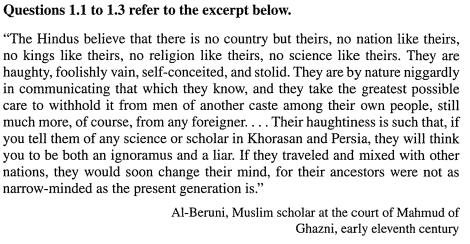
- AA
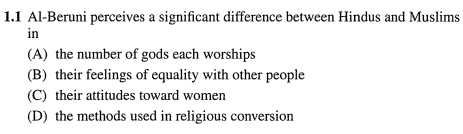
- BB
- CC
- DD
- AA
59Use the images provided to choose your answer
- AA
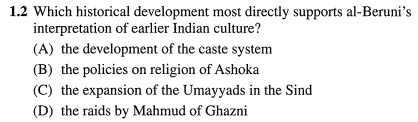
- BB
- CC
- DD
- AA
60Use the images provided to choose your answer.
- AA
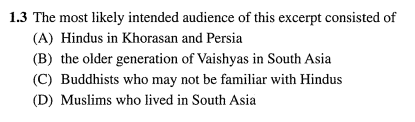
- BB
- CC
- DD
- AA
61Use the images provided to choose your answer
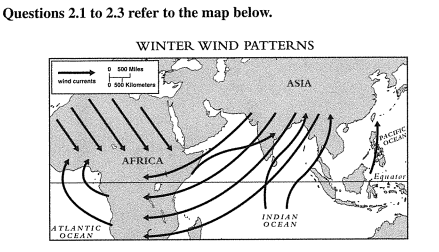
- AA
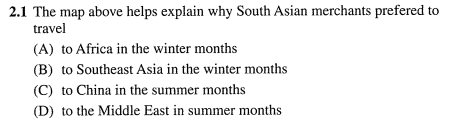
- BB
- CC
- DD
- AA
62Use the images provided to choose your answer
- AA
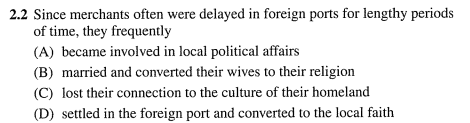
- BB
- CC
- DD
- AA
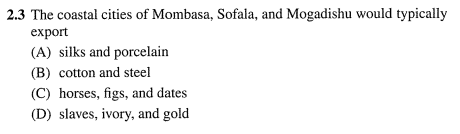
63Use the images provided to choose your answer
- AA
- BB
- CC
- DD
- AA
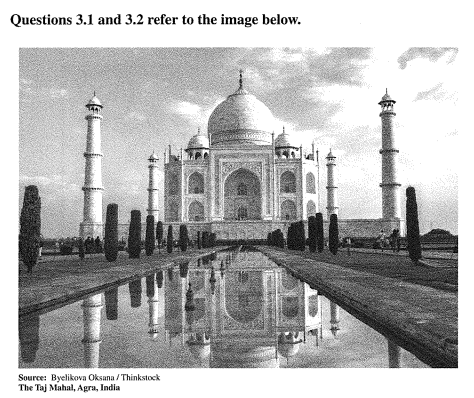
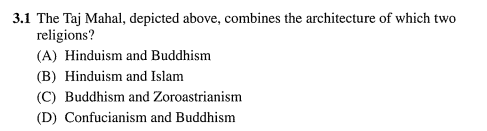
64Use the images provided to choose your answer
- AA
- BB
- CC
- DD
- AA
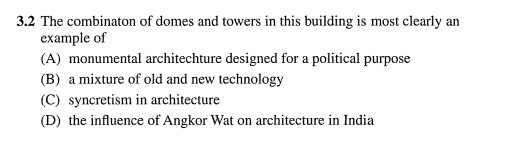
65Use the images provided to choose your answer
- AA
- BB
- CC
- DD
- AA
66Use the images provided to choose your answer.
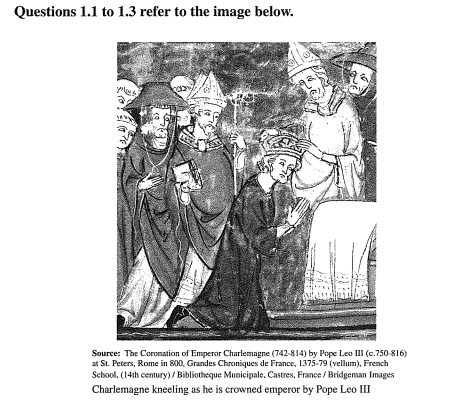
- AA
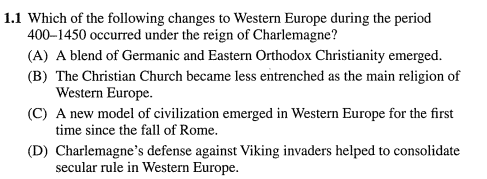
- BB
- CC
- DD
- AA
67Use the images provided to choose your answer.
- AA
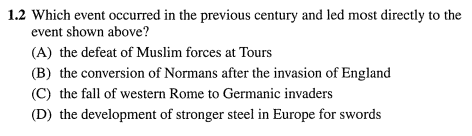
- BB
- CC
- DD
- AA
68Use the images provided to choose your answer.
- AA
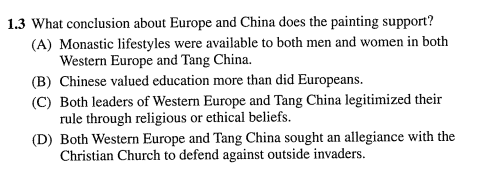
- BB
- CC
- DD
- AA
69Use the images provided to choose your answer.
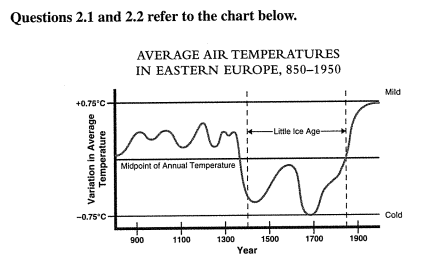
- AA
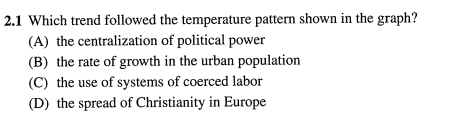
- BB
- CC
- DD
- AA
70Use the images provided to choose your answer.
- AA
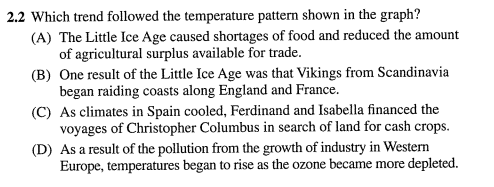
- BB
- CC
- DD
- AA
71Use the images provided to choose your answer.
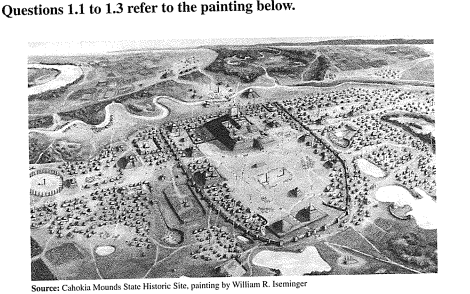
- AA

- BB
- CC
- DD
- AA
72Use the images provided to choose your answer.
- AA
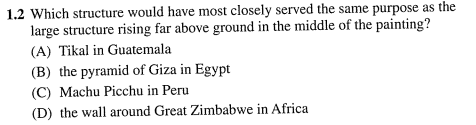
- BB
- CC
- DD
- AA
73Use the images provided to choose your answer.
- AA
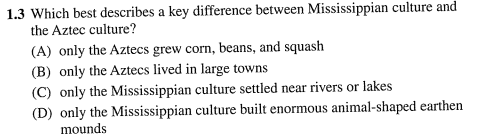
- BB
- CC
- DD
- AA
74Use the images provided to choose your answer.
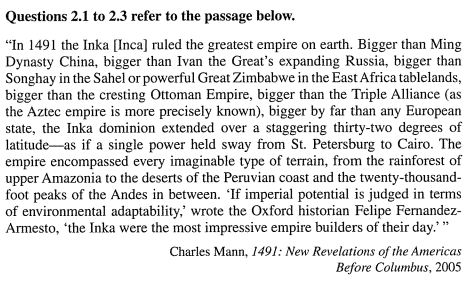
- AA
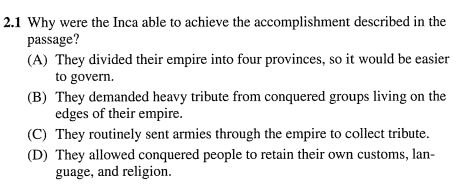
- BB
- CC
- DD
- AA
75Use the images provided to choose your answer.
- AA
- BB
- CC
- DD
- AA
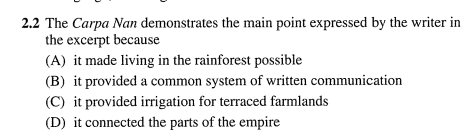
76Use the images provided to choose your answer.
- AA
- BB
- CC
- DD
- AA
Informações
- Descrição
- 10th grade World History Quiz sobre AP World History Final Review (Period 1-3), criado por Wendy Torres em 12-12-2018.
- Autor
- Wendy Torres
- Idioma
- English
- Visualizações
- 137
- Etiquetas
- Avaliação
- Ainda sem avaliações Avalie este quiz