
Notes
WEB DESIGN
Content of the notes (1)
Page 1
WEB DESIGN
HTML TAGS
Web pages are created using the HyperText Markup Language or HTML. HTML is not a programming language, it's a markup language that tells a Web browser how to display a web page's content. For this class we use the latest version of HTML, version 5. The videos provided in this assignment will show you the most common HTML5 tags and will also teach you how to use some basic web design tools and techniques.
Goal: Upon completion of this assignment you will be able to:
utilize a proper HTML 5 code structure
use common HTML tags for basic formatting of text on a web page
implement the coding style expected from students in this class
utilize a proper coding cycle: code - save - refresh - preview
utilize a code editor - in this class we use Komodo Edit
implement a web design that is universally usable
Preparation:
This Lesson utilizes Komodo Edit and Google Chrome.
Approach: View the videos and/or read the video summaries to learn the concepts. Follow the instructions in each of the "Do it!" sections to create a web page to submit for a grade. Check the requirements checklist at the end of the Lesson to make sure you've completed all the requirements. Click the Page Topics Menu above to view the topics on this page.
View this example of a finished project03. Note that you can view the code of the example page by right-clicking on the page and selecting View Page Source. This can be very useful in completing this lesson successfully.
CHOOSE A WEBSITE TOPIC
Over the course of the next five lessons - the first half of the semester, you will be building a website. Your website will be complete when you finish Lesson 7 and will include three pages of content. View this example of a completed website (project07). Now take a look at an example of a completed project03 to see what your work will look like at the end of THIS Lesson. Note that you can view the source code for the example to see the HTML code by right-clicking on the page and selecting View Page Source. Also note that your website won't begin looking very good until after you've applied CSS as taught in Lessons 5 - 7. Be content with plain looking pages for Lessons 3 and 4.
Select a Topic
Give some serious thought to your website topic. It should be informative and useful to the general public. It should be related to your FSU major or professional interests. Don't pick a topic that is too general/big. It should be a topic that provides enough information to justify a three-page website that includes:
at least four paragraphs of informative content
a couple photos or other images
a YouTube or Vimeo video
a bulleted and/or numbered list
a quote from a notable source
data displayed in a table
and at least three online resources of associated information
Again, view the finished website example to see the level of detail and quality expected.
When selecting a topic:
DO choose a topic or news related to your professional interests.
DO NOT choose a topic of general popular interest, such as:
football or other sports, sport teams or athletes
Video games, movies, bands or musicians
Apple computers, or other popular products
DO NOT choose a topic of personal interest, such as:
Your family reunion
Your home town/state/country
Your church
Your vacation overseas
Fishing, boating or other hobbies
Developing your content isn't intended to be time consuming. Students are welcome to use portions of research from papers they submitted in other classes - so long as it is their own work. No plagiarizing! Choose a topic that has a significant amount of coverage online and a related video. Either choose a topic that you know a lot about, and then seek online sources of information, or visit an online resource associated with your studies or professional interests and browse for a topic. For example, an IT or CS student might look for topic ideas at www.wired.com. An advertising or marketing student might look for topic ideas at www.ecommercetimes.com. A business student might look for topic ideas in the Business section of the NewYork Times (http://www.nytimes.com/pages/business/). Or you could start by searching for topics on YouTube.
OVERVIEW
Important points from the video:
Web pages are created using the hypertext mark-up language or HTML
HTML is not a programming language, it is a mark-up language that describes how content should appear on a page
Web browser software such as Google Chrome, Internet Explorer, Safari, and Firefox interpret the HTML code to display web pages
HTML code is stored in plain text files, and created using a text editor like Notepad, or TextEdit, or a Code Editor like Komodo Edit or Dreamweaver
Never create HTML code with a word processor such as Word, since word processors create binary files that store additional information along with the text
HTML is open source by nature, you can view the HTML code for any web page by right-clicking the page in the browser and selecting View page source (try it now!)
HTML defines the appearance of web page content using "tags."
Some tags operate on text content. This code instructs the browser to display the words "Important Points about Tags" in a paragraph:
1<p>Important Points about Tags</p>
Opening tags use a tag code - such as p for paragraph, in angle braces
Closing tags use the same tag code and angle braces with an added forward slash
The text on which the tag operates is inserted between the opening tag and closing tag
Tags can be combined - or "nested." This code displays the words "Important Points about Tags" in a paragraph in bold type:
1<p><strong>Important Points about Tags</strong></p>
Notice that nested tags are closed in the reverse order in which they are opened
Some tags don't operate on text and so do not utilize a closing tag. This code inserts a horizontal line across the page:
1<hr>
Some tags utilize "attributes" to provide additional information. This code inserts an image stored in the file portrait.jpg on the page:
1<img src="../03_hrml_tags/portrait.jpg">
Some tags work together with other tags. Here is an ordered list <ol> with multiple list items <li>
1 <ol>
<li>Janet Peterson</li>
<li>Paul Porter</li>
<li>Rosco Tanner</li>
5 </ol>
THE HTML 5 TEMPLATE
VIEW IT!
Don't be confused! Komodo Edit 8 is used in the videos. You will have downloaded the brand new Komodo Edit 9. While the appearance is a bit different, the important buttons and functionality remain the same.
Video Summary
Every HTML 5 webpage begins with this code structure:
<!DOCTYPE html>
<html>
<head>
<meta charset="UTF-8">
<title> </title>
</head>
<body>
</body>
</html>
The !DOCTYPE on the first line tells the browser to interpret the file as HTML
The remaining code is enveloped by the html tags opening at the beginning and closing on the last line
HTML code is organized into two sections the head and the body
Komodo automatically adds closing tags as you enter the opening tag. This feature can be useful but will take some getting used to. This feature can be turned off in Komodo Preferences under Code Intelligence.
Do it!
Launch Komodo Edit
Click the File menu and New and then File from template
Select HTML 5 from the template list
Check to make sure that the open file is scrolled completely to the left edge of the page (this is a quirk of Komodo)
Compare the code in the Komodo document to the code shown above. What's missing?
Yes, Komodo adds a default title - "Page Title, but something important is missing in the Komodo code: The meta tag with the characters set (charset).
Add the meta tag in Komodo just as it is in the above code
Select File > Save As, navigate to your cgs2821 folder and use the New Folder button to create a folder named project03 (project zero three - no spaces, all lower case).
Save the file with the name index.html in cgs2821/project03
Launch Google Chrome
Open the File menu, and click Open File, navigate to cgs2821/project03 and open index.html
The page should be blank, and the tab should say "Page Title."
Leave Chrome open and switch back to Komodo for the next step (tip: Ctrl/Command + Tab is a fast way to switch between apps.
THE HEAD
Video summary
The head contains information for the browser that is not directly displayed on the page. Two items are always included:
The title tag is used to display the page title in the browser title bar or tab
The meta tag is used to tell the browser what character set (charset) is being used. HTML5 uses UTF-8. You can learn more about charset and character encoding at http://www.w3schools.com/html/html_charset.asp if you are curious.
Other items that you may find in the head include:
Other meta data associated with the page such as key terms for search, summary and author name
Javascript code for animating a webpage
CSS code for defining the visual style of the page
Links to supportive code files such as CSS and Javascript
Do it!
It's time to start working on your website content!
Change the page title from "Page Title" to a title that suites your website topic
Add three meta tags to the head section of your page to provide a description of your topic, keywords related to your topic for use by search engines, and author name (see http://www.w3schools.com/tags and click the meta tag to see how this is done).
Save your file (cgs2821/project03/index.html)
Switch to Google Chrome (Ctrl/Command+tab), and click the Refresh button to apply the changes you just made.
You should see your topic title displayed in the webpage tab, but no other changes.
FORMATTING CONTENT
Video summary
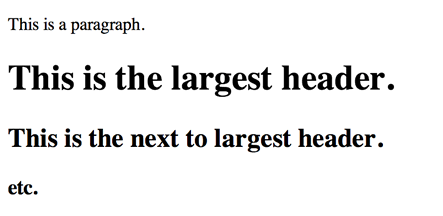
The <body> of the HTML page holds all that is displayed in the browser window. Most text is defined either as paragraphs or headings:
1 <p>This is a paragraph.</p>
<h1>This is the largest header.</h1>
<h2>This is the next to largest header.</h2>
4 <h3>etc.</h3>
The result:
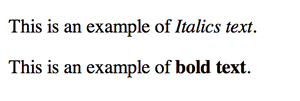
Additional formatting can be added such as:
1 <p>This is an example of <em>Italics text</em>.</p>
2 <p>This is an example of <strong>bold text</strong>.</p>
The result:
View more formatting options at http://www.w3schools.com/html/html_formatting.asp.
The paragraph and heading tags are classified as block level tags because they begin and end with a new line. Italics and bold tags are examples of inline tags because they are displayed without a new line. Inline tags operate on content within a block level tag as in the example above.
Block level tags are separated by a blank line. There may be times when you wish to move text down to the next line without skipping a line:
<br> - the break tag, moves content to the next line and has no closing tag
You'll find that HTML does not recognize the tab key, multiple spaces, or multiple empty paragraphs. Web designers use CSS to align content horizontally across the page in columns, or vertically down the page in rows. In some cases, a special character called a non breaking space - can be used to move text down. For example if you provide the browser with the following code:
1 <p></p>
<p></p>
<p></p>
4 <p></p>
It will ignore it, because HTML does not support multiple empty paragraphs. Adding to each paragraph tag will force the browser to acknowledge each paragraph and add four blank lines. More on special characters shortly.
Finally, the <hr> tag inserts a horizontal line (rule) across the page.
Do it!
Return to Komodo to edit index.html - it's time to do a little writing...
Remember an example of a finished project03 is provided. Right click the page to View Page Source and see what is expected of you.
Add the title of your website to the top of the page (body) using the h1 tag.
Save index.html and preview it in Google Chrome by clicking the small arrow on the preview button in Komodo and selecting Chrome from the list.
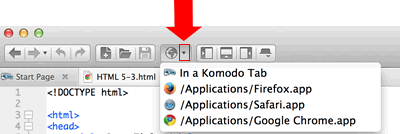
3 Leave the file open in Chrome and return to editing in Komodo.
4 Use the H2 tag with italics to add a subtitle, byline or tag line.
5 Save index.html and switch to Google Chrome and click the reload button to apply and review your latest changes.
6 Write at least four interesting paragraphs on your topic utilizing at least three online references. Do not write your content in Word, or copy it from Word since Word uses characters not recognized in HTML. Note that Komodo has spell check in the tools menu.
7 Save index.html and switch to Google Chrome and click the reload button to apply and review your latest changes.
8 Include a quote from a notable source utilizing the quote tag (look it up at w3schools).
9 Save index.html and preview it in Google Chrome
10 Conclude with a horizontal rule.
11 Save index.html and preview it in Google Chrome
Feel free to consult the example page at http://www.techminded.co/cgs2821/project03/.
THE CODE CYCLE
In the above steps, you were instructed to utilize a repetitive cycle called the coding cycle.
The coding cycle involves making small incremental changes to code and checking their effect in the browser.
Using this cycle, the developer can catch errors the moment they are made.
If you were to make many changes to code prior to previewing the changes in the browser, it would be much more difficult to track down errors in (debug) your code.
The coding cycle:
Add or change code in the code editor (Komodo)
Save the code file
Utilize the preview command in the editor to view the changes in the browser (Chrome)
Return to the editor and make additional changes or additions
Save the file
Switch to the browser and Reload to preview the changes
Repeat steps 4 - 6 over and over again until code is finished
COMPOUND TAGS
Video summary
Some tags are designed to be used together. For example, the bulleted list (unordered list - ul):
1 <ul>
<li>This is a list item</li>
<li>This is another list item</li>
<li>And another</li>
5 </ul>
The result:
This is a list item
This is another list item
And another
An unordered lists <ul> and ordered lists <ol> must always include at least one list item between opening and closing tags. Likewise, a list item cannot be used outside an unordered or ordered list.
The code for an ordered or numbered list looks like this:
1 <ol>
<li>This is the first list item</li>
<li>This is the second list item</li>
<li>And the third</li>
5 </ol>
The result:
This is the first list item
This is the second list item
And the third
Multiple level lists created by placing a new list within the <li> of a list. Here's an example:
1 <ol>
<li>This is the first list item</li>
<li>This is the second list item</li>
<li>and the third
<ol type="A">
<li>This is the first item in a sublist</li>
<li>This is the second item in a sublist</li>
<li>and the third</li>
<ol type="a">
<li>This is the first item in a sublist of a sublist</li>
<li>This is the second item in a sublist of a sublist</li>
<li>and the third</li>
</ol>
<li>and the forth</li>
</ol>
</li>
<li>You get the idea</li>
18 </ol>
The result:
This is the first list item
This is the second list item
and the third
This is the first item in a sublist
This is the second item in a sublist
and the third
This is the first item in a sublist of a sublist
This is the second item in a sublist of a sublist
and the third
and the forth
You get the idea
Komodo automatically indents code properly for easier reading.
As you can see, lists inside lists can get rather complicated. Indenting the code assists in keeping track of what level of list is represented. HTML provides many options for unordered lists <ul> and ordered lists <ol>. You can learn about them at http://www.w3schools.com/html/html_lists.asp.
Tables are a bit more complicated. A table has three elements: <table>, <tr> for table row, and <td> for table data/columns. Here is the code for a table with four columns and three rows. The first column and the first row serve as headings.
<table border="1" cellpadding="12" cellspacing="0">
<tr>
<th> </th>
<th>Breakfast</th>
<th>Lunch</th>
<th>Dinner</th>
</tr>
<tr>
<th>Saturday</th>
<td>Pop Tarts</td>
<td>PBJ</td>
<td>Mac & Cheese</td>
</tr>
<tr>
<th>Sunday</th>
<td>Omelet</td>
<td>Sub Sandwich</td>
<td>Lasagna</td>
</tr>
</table>
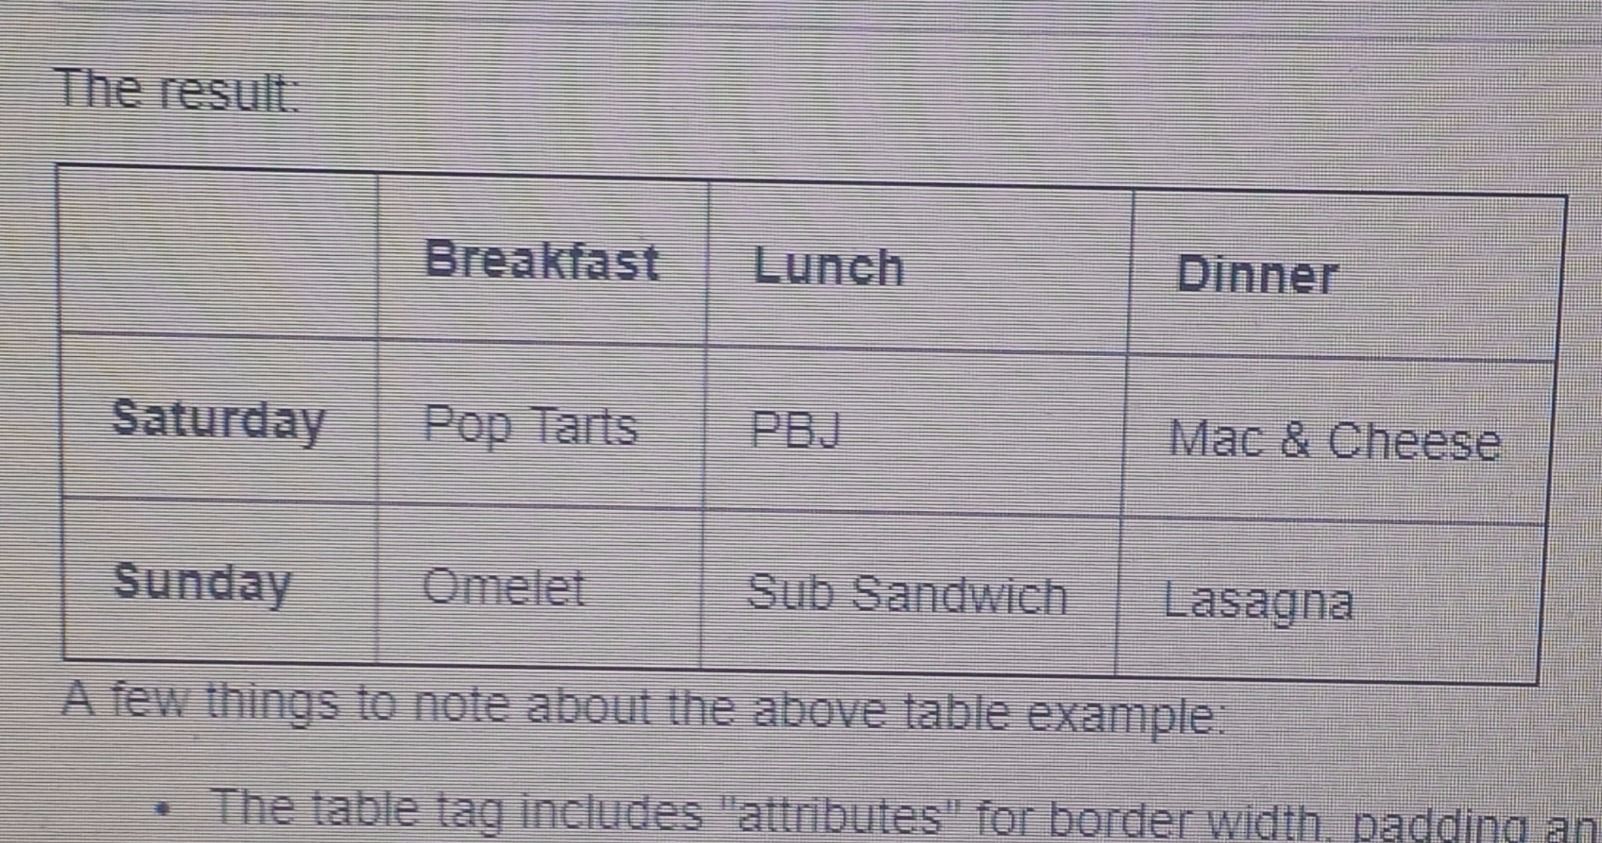
A few things to note about the above table example:
The table tag includes "attributes" for border width, padding and spacing. Attributes are covered in the next Lesson. HTML5 prefers that table attributes are specified in CSS code. Since you won't learn CSS code until Lesson 5 and 6, I've included them as attributes in the tag so this table will look good.
th is used rather than td for cells that serve as headings
The number of <td>'s must be the same for each <tr>.
The non-breaking space character ( ) is used in any cell that has no content. The ampersand is inserted using a special character as well. Special characters are covered in the next section.
Again, there are many options for tables provided at http://www.w3schools.com/html/html_tables.asp.
Do it!
Use your HTML knowledge and the coding cycle to implement the following:
Add your list of online references to the bottom of your page using an unordered list in the format illustrated by the example page at http://www.techminded.co/cgs2821/project03/. Include the references for your quote.
Consider other page content that would benefit from presentation in an unordered list and/or an ordered list and implement if needed.
Add a table to your webpage in an appropriate and useful manner for your topic.
CHARACTER ENTITIES
Video summary
Certain characters aren't allowed in HTML content because they are used in HTML tags. These are called reserved or special characters. For example the less than (<) and greater than (>) signs aren't allowed because they serve to identify tags. Similarly there are symbols that are not on a standard keyboard that can be included on a web page. Both reserved characters and special symbols are added to HTML documents using character entities. A character entity is a special code that begins with an ampersand sign and ends with semicolon. Below is a table of commonly used character entities.
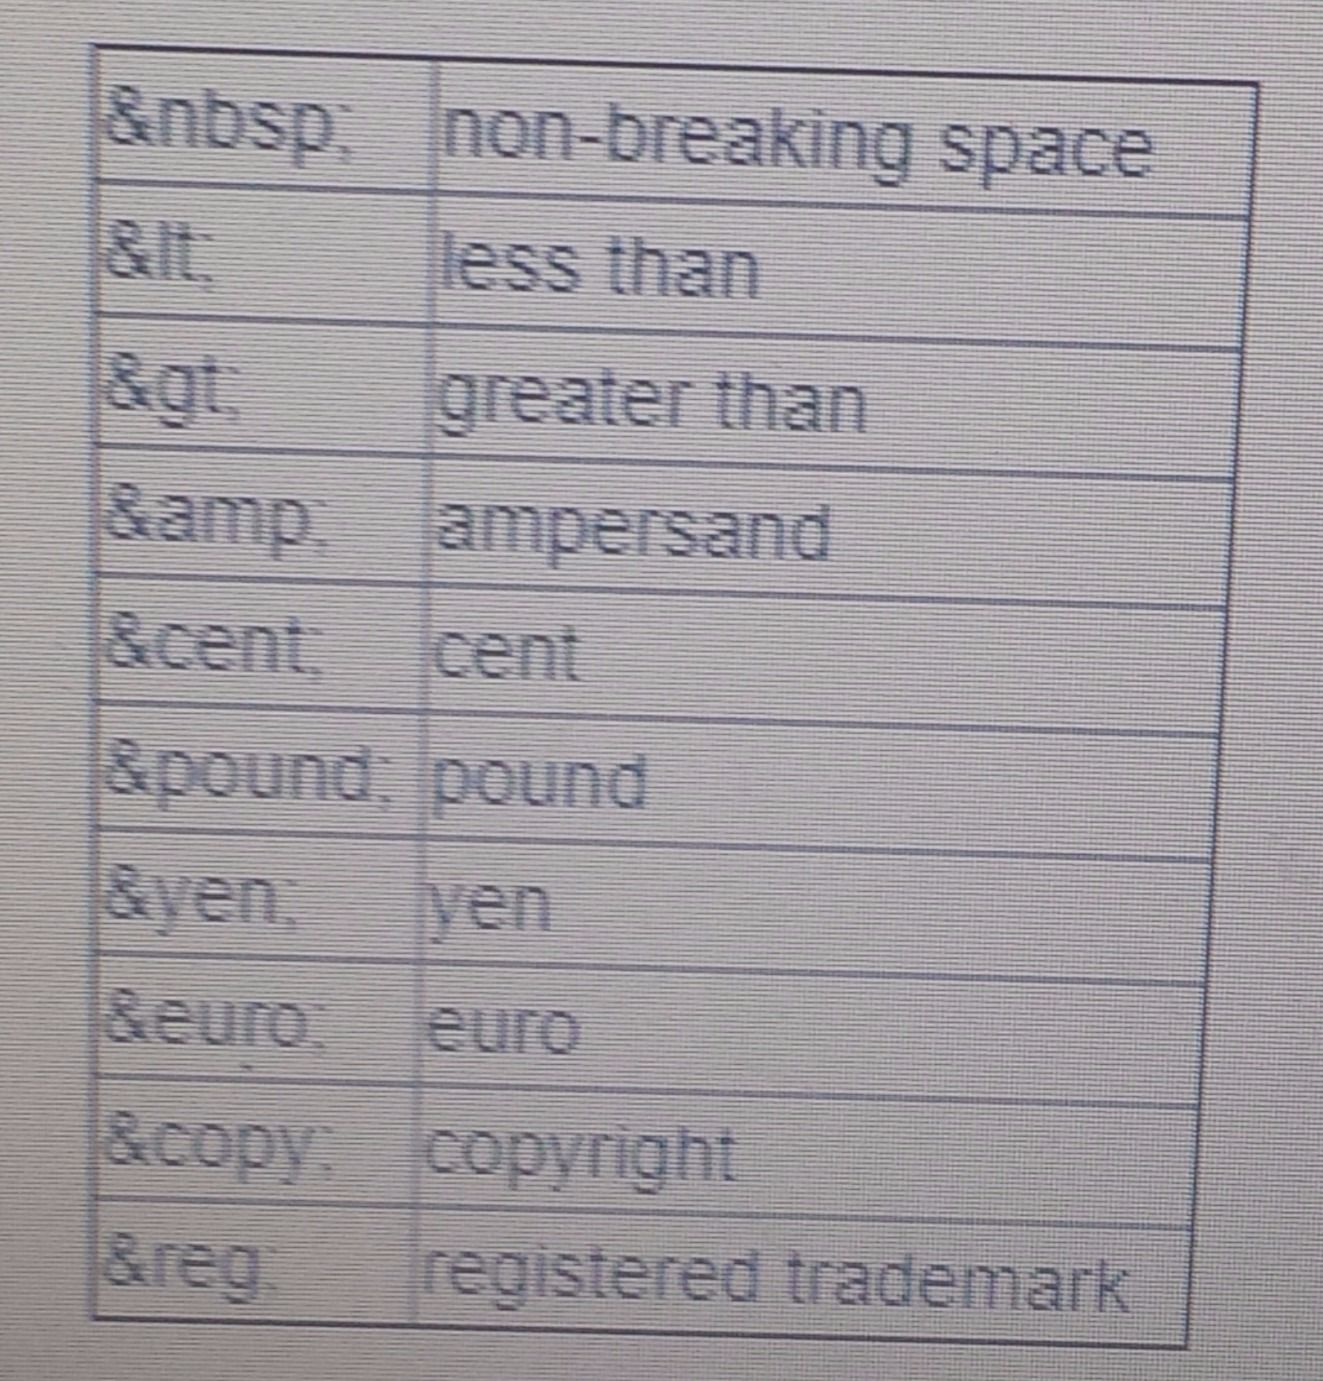
See more at http://www.w3schools.com/html/html_entities.asp and http://www.w3schools.com/html/html_symbols.asp.
Do it!
Add the character entity for a copyright symbol to the bottom of your page followed by your name and the date.
Use other character entities in your content as needed.
COMMENTING AND FORMATTING CODE
Video summary
So far we've focused on formatting content for the public to view in a web browser. Now let's turn our attention to formatting code for developers to view.
HTML, like most coding languages, provides a mechanism for inserting comments in code intended to be viewed with the code, but not in the content displayed in the browser window.
1 <!-- This is a comment -->
The above illustrates how comments are inserted in HTML code. Comments are typically used to:
Document level:
Credit the author of the code, providing copyright information and contact information
Provide revision information and publication date
Describe the purpose of the page
Section level:
Describe what each section of code does
Line level:
Describe what a line of code does
Disable lines of code
Commenting out code disables it so you can see how the page behaves and later enable it if needed, or delete it
Comments don't only assist others in understanding a developers code, but they also assist the developer in navigating through the code quickly. Right-click this page and view the page source to see how comments are uses in this page.
More on comments at http://www.w3schools.com/html/html_comments.asp
In addition to commenting code, indentation should be used to organize your code into visually identifiable sections as was done in the example code above in the compound tags section. Komodo automatically indents code as you enter it.
Developers sometimes like to use blank lines in code to identify new sections.
Do it!
Add a comment to the head section of your page providing your name and the date of completion.
Add code indentation and additional comments as necessary
OTHER HTML TAGS
This Lesson has discussed the most commonly used HTML tags for text formatting. Needless to say there are many more tags available for use. No developer can remember them all. That's why it's nice to have a resource like http://www.w3schools.com/tags where you can quickly look up a tag and its usage requirements. In the next lesson you will learn about more common tags that require attributes such as tags for inserting images and embedding videos, and tags that create links to other web pages.
Do it!
Feel free to experiment with other HTML tags. You will not be penalized for any additional html features you wish to add to your work.
When finished, submit your index.html file using the form in "Submit Assignments" on the Learning for Life Student Portal.
UNIVERSAL USABILITY
The Designers Lounge is a brief sidebar provided in each lesson that teaches important web design principles.
Usability is a measure of effectiveness. In web site design it describes how easy a website is to navigate
and understand. Universal usability refers to the usability of a web site for every type of user. Universal usability becomes challenging when concerned with disabled users. Accessibility refers to designing a web site to be usable by individuals with disabilities. Users may be challenged by physical disabilities such as vision or hearing loss, loss of motor skills, old age, mental disorders, lack of education, or technological challenges such as slow Internet or small display. Some disabled users make use of assistive technologies such as zoom text and screen readers which read everything on the screen aloud.
commercial and governmental web sites, U.S law requires that all citizens have equal access. Just as modern brick and mortar stores are designed to accommodate shoppers of all types with ramps rather than stairs, wide entryways, accessible shelves, motorized and shopping carts, web sites must accommodate all types of users by providing:
a logical and easy to understand navigation system,
free access to resizing text through the browser's zoom feature by defining text size as a percentage or "em" in css (covered later),
text colors and background colors that provide enough contrast for color blind users to easily read,
text alternatives (using the "alt" attribute ) for images that screen readers for blind users can read to describe images,
providing closed captioning or scripts for video and audio for deaf and/or blind users,
and avoiding
technologies that hinder disabled users, such as complicated menu systems, and embedded apps that automate navigation,
and embedding text in images
Ultimately what we define as "good design" naturally implements universal usability. Recall that "good design" is both visually pleasing and appropriate to content, and also functional. "Good web design" should first and foremost provide access to information through mechanisms that are so simple to use they become "transparent" - effortless to navigate. Good web designers don't get caught up with flashy technologies, they strip away the technologies to provide a clean, simple and elegant user experience (UX). Designers are all about UX - check out http://www.uxbooth.com/, http://uxmag.com/ and http://uxdesign.smashingmagazine.com/.
Clean and simple design not only assists all types of users, but it also assists bots. Bots?! Yes bots. Google, Bing, Yahoo, and other web apps have bots constantly traveling the web to discover and define what's out there. If you want your site to appear in appropriate web search results, you'll exercise universal usability in your design. Search Engine Optimization (SEO) will be covered in a future Designers Lounge.
Information
- Description
- Note on WEB DESIGN, created by osborn hodges on 18/09/2017.
- Created by
- osborn hodges
- Views
- 0
- Rating