Frequently Asked Questions
Creating Resources
You can be as creative as you like with our flowchart maker, but our tool is not just a set of pretty shapes. The shapes are actually symbols that have a particular meaning when used in a process or flow diagram. Flowcharts are often used in computer modelling and project management. This short guide explains how the symbols are frequently used.
| SYMBOL | MEANING | EXAMPLES | |
|---|---|---|---|
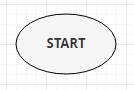 |
Starting point of a process | 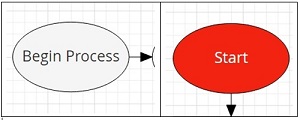 |
|
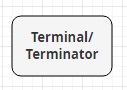 |
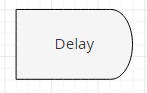
The end point of a process | 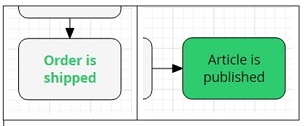 |
|
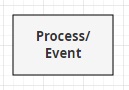 |
Used to illustrate a process, action, or operation | 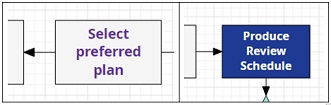 |
|
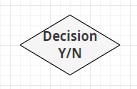 |
The ‘decision’ object is a question and the answers determine the arrows coming out of it. | 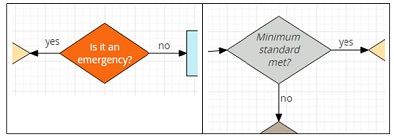 |
|
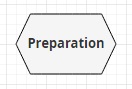 |
Setting up for another step in the process | 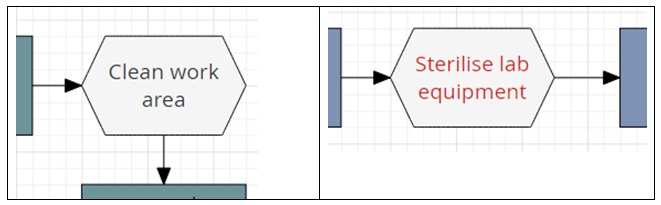 |
|
 |
|
 |
|
 |
|
 |
You can see more examples in the GoConqr Guide to Flowcharts for Business and of course you can create your own flowcharts for free on GoConqr and share them with your friends and colleagues.
The button to create resources is located in the left-hand side of the top menu on GoConqr. Click on it and select the Mind Map option. You’ll then be brought straight to a blank Mind Map canvas.
If you create a Mind Map, it will automatically be saved to your Unassigned subject. However, if you are within a subject when you decide to create a Mind Map, it will be saved in this subject automatically.
Creating your Mind Map
When you first enter a Mind Map you will see your central node and a Menu bar with many options to customise your map.

Clicking the central node and typing will automatically rename the Mind Map. If you drag the “+” icon out from the node you can create another node. This will be connected to the central node by a thin strand.
Customising your Mind Map
![]()
In the menu bar you will find several controls to edit your text; you can make it bigger, bold, italic or change the font type of the node and any nodes that are attached to it.
You can also change the colour of a node. If you want, you can apply these changes to the outline of a node only, all child nodes and enable a gradient filter.
To delete a node and any nodes connected to it, select the node and click on the trash can icon. You will be asked to confirm this selection.
The paperclip icon allows you to attach another resource to a Mind Map node for easy access. You can also attach an Annotation, which is a short note. An Annotation can only be accessed through the node it’s attached to. Click on the little notepad icon in your Mind Map to access an Annotation.
Zooming in/out and Inserting Images
In the bottom left-hand of the screen you will see a slider that will allow you to zoom in and out.![]()
You can also insert images by clicking on the corresponding button in the top menu bar.![]()
Actions
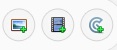
You can share, copy, print and edit flowcharts in the same way as other GoConqr resources, by clicking the actions icon![]()
Visual Resources
Using these techniques you will be able to create your own Mind Maps in no time. Here’s a Mind Map we made earlier!
All GoConqr Resources – those that you’ve made yourself and those created by others give you access to the ‘Actions’ menu where you can print, share, edit and more – depending on your permissions.
When you find a resource by searching, or when you look in your own subject folder, hover over it and you will see two buttons: Actions and Info (Info gives you information including description, author, views and ratings).

When you are in view mode, or in edit mode of your own resource, you can access the Actions menu by clicking the symbol with a cog and a folder in the bar at the top of the page. ![]()
The actions you can do will depend on whether it is your resource or someone else’s, and the type of account that you have.
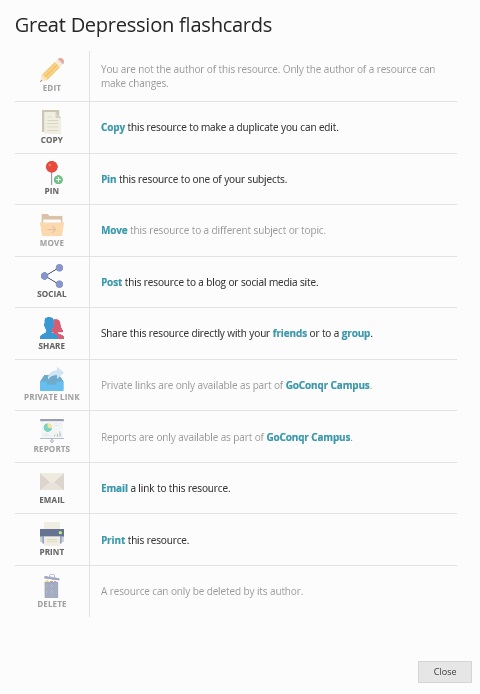
Edit: Allows you to edit the resource. You can only edit your own resource, however if the owner of the resource allows copies to be made, you can copy the resource and edit the copy.
Copy: Allows you to take a copy, if the author has permitted copies. A premium user may lock their resources so that other users cannot take copies.
Pin: Allows you to ‘pin’ a resource to one of your subject folders (or topics if you have specified them). You can then easily find the resource in the future. Pinning resources to your folder also helps us to suggest other relevant resources for you. You can see in ‘Info’ how many times a resource has been pinned by others.
Move: If you have created the resource, or already pinned it, this allows you to move it to a different subject or topic.
Post: This allows you to share a resource on Google, Facebook, Twitter or LinkedIn, or to embed the resource in a blog or website. The resource must be public to do this.
Share: You can share resources that you have made directly with friends on GoConqr, or you can share any public resource with groups that you are a member of.
SmartLinks: This is a GoConqr Campus feature that allows users to share resources privately with individuals who are not GoConqr members, provided they have this permission.
Reports: This is a GoConqr Campus feature that allows users to report on views and results of resources, provided they have have this permission.
Email: Allows you to send a link via email, including to a friend who is not a GoConqr member.
Print: Allows you to print you resource! (bear in mind that GoConqr is optimised for online experience).
Delete: Allows you to delete the resource.
The button to create resources is located in the left-hand side of the top menu on GoConqr. Click on it and select the Flowchart option. You’ll then be brought straight to a blank Flowchart canvas.
Creating your flowchart
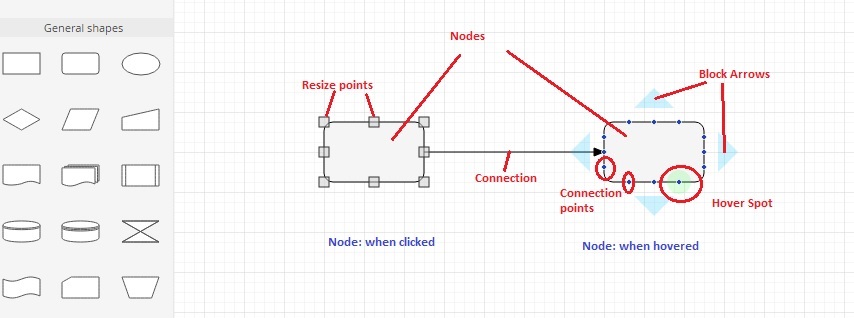
- Drag and drop a shape from the left hand side, then hover over it and blue block arrows will appear around it.
- (a) Click an arrow and a node of the same shape will appear, or (b) Type some text/or change colour the colour of the node, using the formatting bar on the top.
- Once you have more than one shape (either from the blue block arrows or another drag and drop), hovering over will also show small blue connection points. Hover over and click on a connection point to drag a connector arrow to the connection points on another shape.
Adding and formatting text
Add text by clicking on a node, or by dragging a text box from the left hand side. You can format the text using the buttons on the left side above the grid.

Advanced features
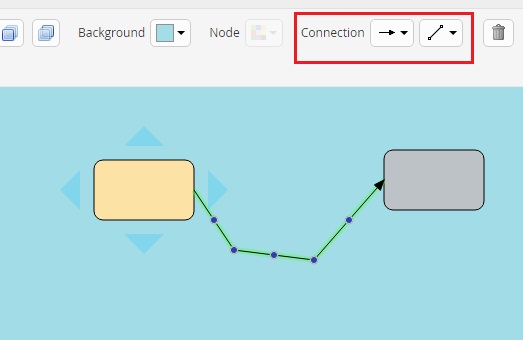
You can copy and paste or send nodes, images, or connection arrows to the back or front of your flowcharts using these buttons:
![]()
You can also change the colour of nodes or the flowchart background. You can change the shape of and direction of the connections, and you can change the pathway of the connection, by clicking on the connector and moving the blue dot.
You can add images to your flowchart and place them in a node if you would like to connect them.
Actions
You can share, copy, print and edit flowcharts in the same way as other GoConqr resources, by clicking the actions icon. ![]()
You can view an example of a flowchart here.
The button to create resources is located in the left-hand side of the GoConqr top menu. Click on it and select the Flashcards option. You’ll then be brought straight to a new Flashcard deck.
The first thing you will need to do to get started with your Flashcard deck is to give it a name. You can do this by clicking on the top bar where it says “Untitled”. A pop-up window will appear and you will be able to add a Title, Description and as many Tags as you want for your resource. You can also enable/disable notifications alerts related to your resource in the same area.
Creating your Flashcard Deck
When you are visiting the edit screen for your Flashcards, you will be presented with two boxes. The one on the left is for the front of the card; the one on the right is for the back of the card.
Click on the boxes and enter whatever content (text, image or both, including GIF files) you want and click ‘Add to Deck’. You will see the cards you enter appear below this. You can see more on how to add images to your Flashcards here.
Once here, they are automatically saved so don’t worry! You can enter up to 200 flash cards per deck.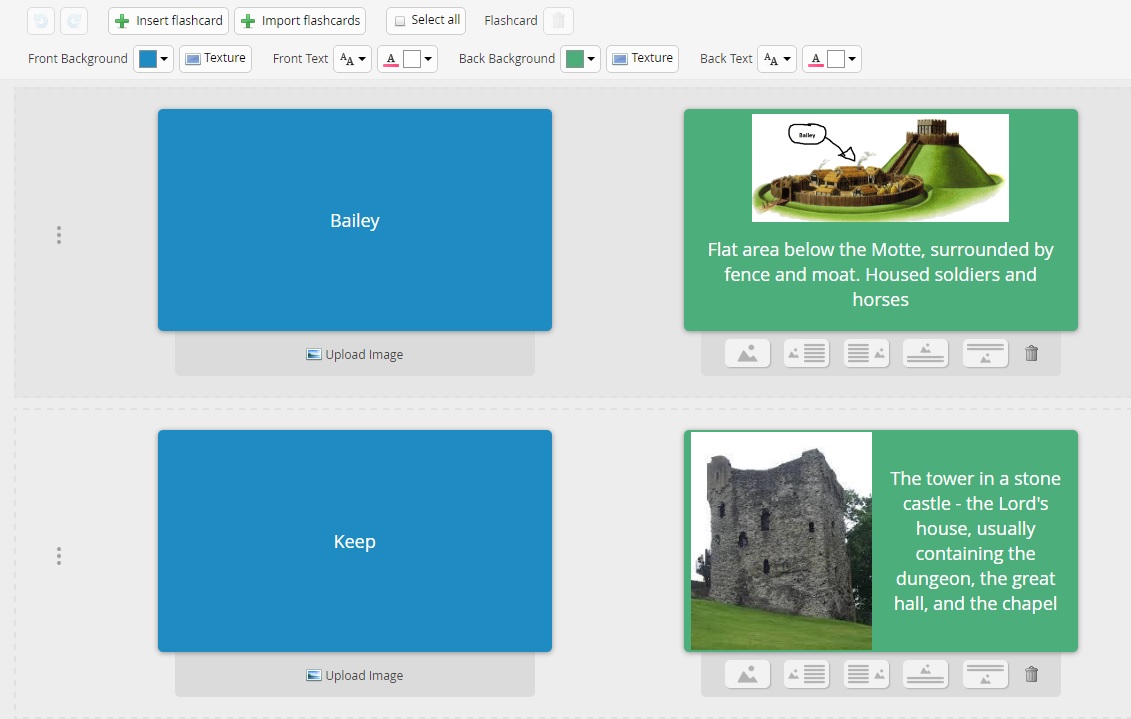
Styling your Flashcards
You can also apply several styles to your Flashcards. For example, you can change a card’s background or use different fonts types for your text. These styles can be applied separately to the front and the reverse. Please note that whenever
you apply a style to either side, this will be rolled over to all cards in the deck.
You can change the text/ image positioning on each card individually.
Playing your Flashcard Deck
When playing your Flashcard deck, click the on the next card to move forward using the arrows to go left or right, or click on the numbered circles above the cards to jump into a certain card. Turn a card over and shuffle the deck. You can also use keyboard shortcuts to navigate through your deck. The left and right arrow keys will move the deck and the space bar will turn a card over. You can use a touchscreen device to navigate the deck also.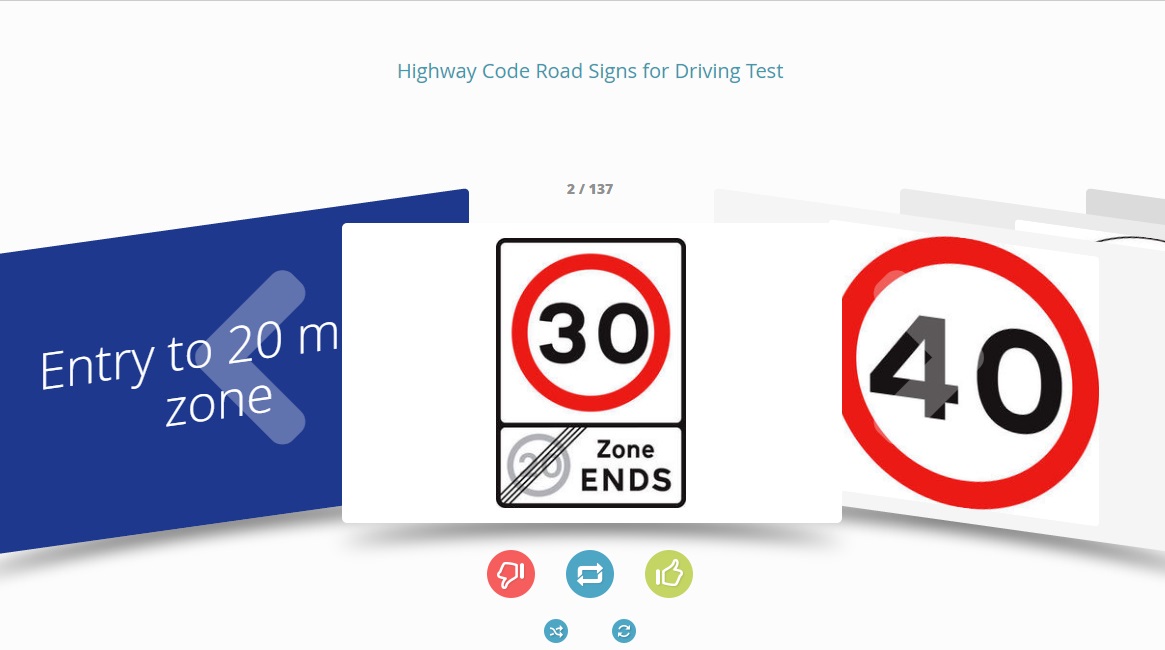
As you flick through your cards, you also have the option to mark each of them as “I know it/I don’t know it” using the thumbs up/down buttons, to Shuffle or to Flip the deck. When you get to the end of the deck you can see how many you knew. You also have the option to ‘Hide known cards”, so that the next time you view the Flashcards, you can test yourself just on what you still need to learn.
Actions
You can share, copy, print and edit flashcards in the same way as other GoConqr resources, by clicking the actions icon. ![]()
Visual Resources
Using these techniques you will be able to create your own Flashcard deck in no time. Here’s a Flashcard deck we made earlier!
 Click on the ‘create’ option and you’ll be brought straight to a new quiz screen. A Quiz is a series of questions. As such, when making a quiz, you’ll be asked to create questions which will become a part of your Quiz.
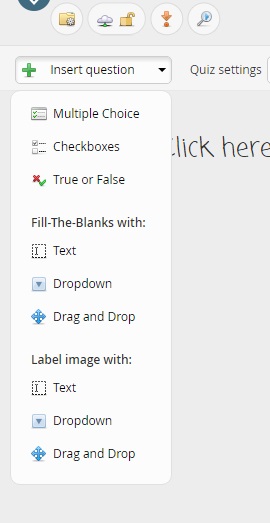
You can choose a variety of question types, as shown on the right, including options to fill in the blanks, and to label images.
You can use different question types in the same quiz. Each question type allows you to ask a question, provide multiple possible answers, and to provide an explanation of why the correct answer is correct, when viewing the answers at the end of the quiz.
Quiz Settings
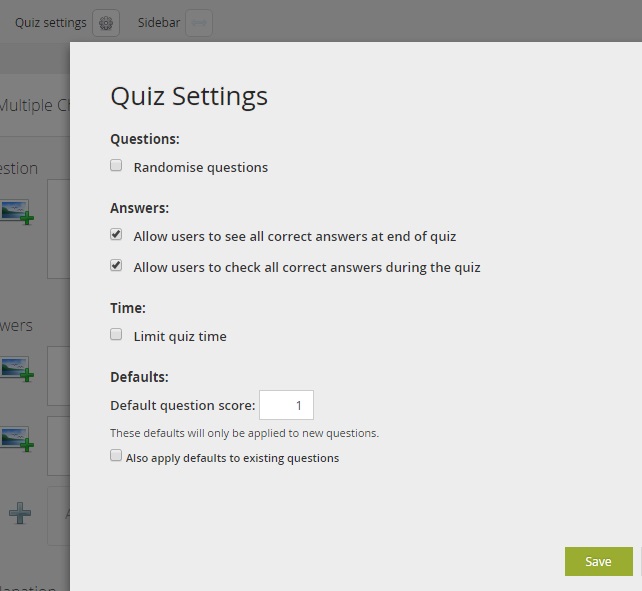
Before your start adding your questions, select your preferred quiz settings.
You can chose to randomise the question order, whether you want users to be able to see the correct answers during and /or at the end of the quiz.
You can set a limit on the overall quiz time, or a limit per question. And you can chose a default score (usually 1).
You will have further opportunities to customise individual questions.
You can add images to questions and to answers. You can change the default score for an individual question using the settings cog on the question.
Quiz Results
At the end of taking a quiz you can view your results. You can review all your answers, or just the incorrect ones (provided the person who created the quiz allows this).
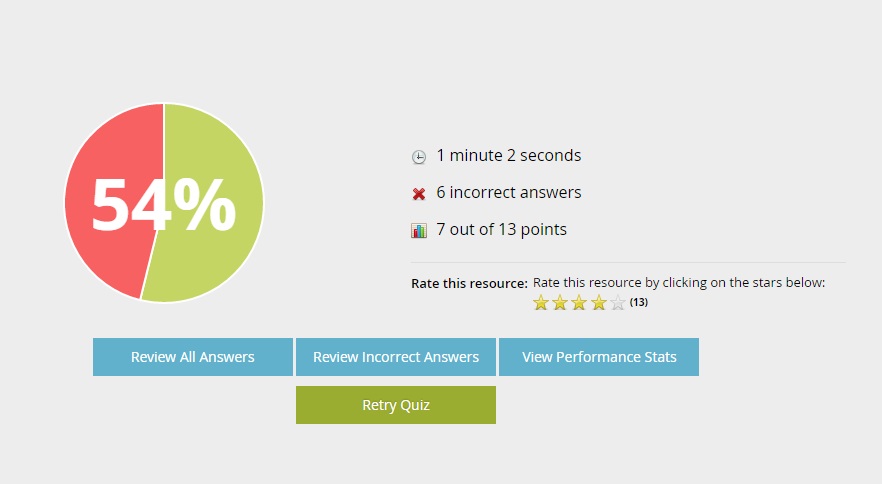
The quizzes also allow you to track your performance with a certain quiz over time.
Click on “View Performance Stats” to view a chart with your progress or “Global Attempts” to see how your performance compares to that of other users.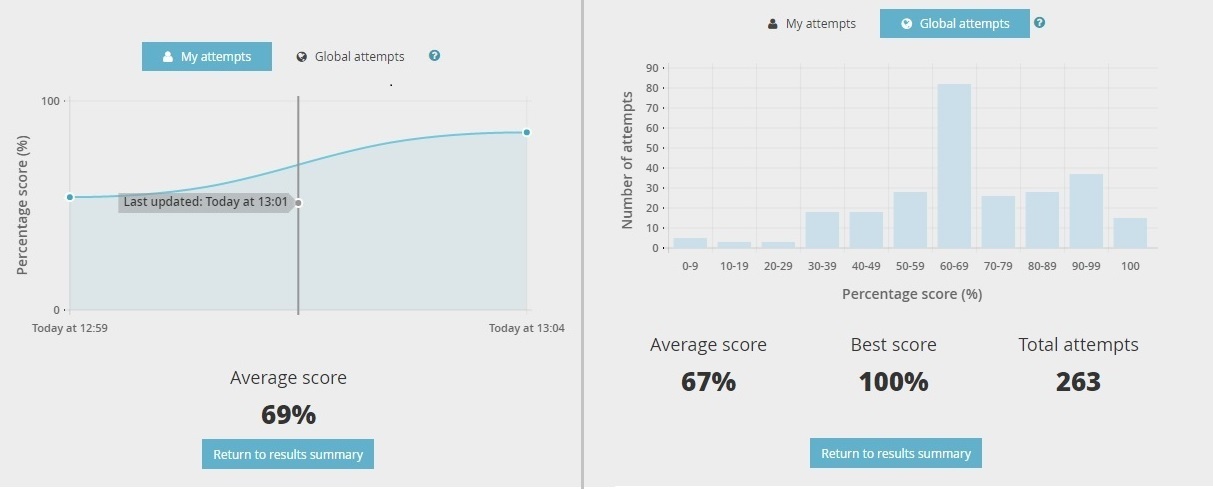
Actions
You can share, copy, print and edit quizzes in the same way as other GoConqr resources, by clicking the actions icon. ![]()
You can view a quiz example here
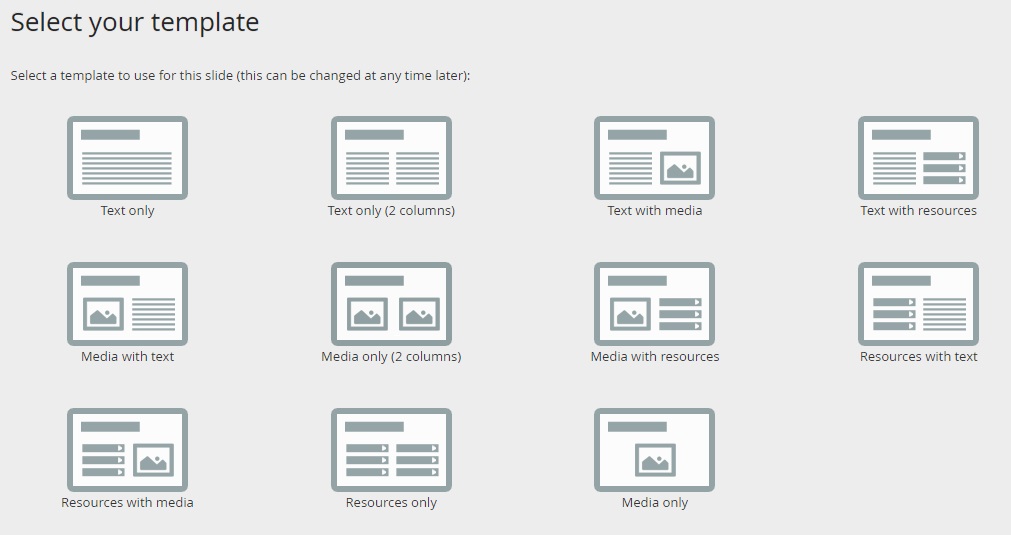
The button to create resources is located in the left-hand side of the top menu on GoConqr. Click on it and select the Slide Set option. You’ll then be brought straight to a blank Slide deck. Click to insert a slide and you can choose from a variety of templates.
Templates
Choose the template that suits you best – we have combinations that include media (images, video, audio), text, and other GoConqr resources.
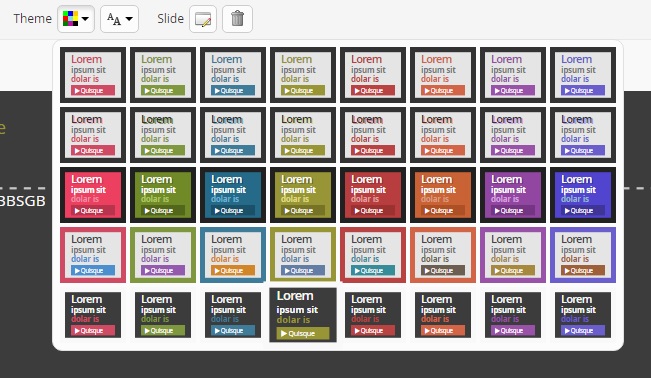
You can choose a theme to alter the colour and design of the Slide Set.
Formatting
Once you have entered content into the Slides, you will see formatting options, including font size, bullet points, and alignment. Hovering over these buttons will explain what they do.

Actions
You can share, copy, print and edit flowcharts in the same way as other GoConqr resources, by clicking the actions icon. ![]()
You can view an example of a Slide Set here.
The create Note button is located in the “Create” drop-down menu. Click on this and you’ll be brought straight to a new Note canvas. Give your note a title and click ‘Add page’.
You can start typing straight away. There are numerous text formatting tools located in the toolbar. You can also insert a link to an external site. 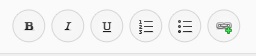
You can also add video, images or embed a GoConqr resource.
 Click on the + sign to add a new page, and click the grid symbol to see an overview of your Note.
 ![]()
You can share, copy, print and edit flowcharts in the same way as other GoConqr resources, by clicking the actions icon. ![]()
You can view an example of a Note here.
When you are in ‘edit mode’ you will see a grey navigation bar at the top of the screen. Look for the symbol of a landscape picture.
Click here to add your image.![]()
When you add an image it will not be connected to any node. You will be able to insert it anywhere on the canvas. If you want, you can place a node in front or behind the image to make it look like it is connected.
The order in which items appear in a Mind Map depends on the order they were created. So if you want a node to overlay an image it needs to be created after the image is uploaded. Conversely, if you want it to appear behind the image the node needs to be created before the image is uploaded.

Along with text , you can insert other study resources created with GoConqr (Mind Maps, Flashcards, Quizzes, Flowcharts, Slides and Notes). Images and other multimedia resources (videos, sounds, presentations) can also be inserted into your Online Notes.
GoConqr uses the universal mark-up language LaTex to input Mathematical Symbols and Equations.
You can enter Mathematical Symbols and Equations anywhere in Flashcards, Quizzes, Slides, Notes and Courses, and in the annotations (not in the nodes) on Mind Maps. This is due to how our Mind Map tool renders text.
To enter mathematical symbols you need to insert the code within either:
\( …\) or \[ …\]
The \(…\) is for inline text
While \[…\] is for stand alone text
Below we have outlined the text needed for the most common types of Mathematical symbols and equations.
Note: All these examples appear in the stand alone text format i.e. \[…\]. If you wish to include the symbols within text you will need to use the inline bracket set of \(…\)
When it comes to maths it’s always best to start with the Greeks…
Greek Alphabet
 \[\alpha\] \[\alpha\] |
 \[\beta\] \[\beta\] |
 \[\gamma\] \[\gamma\] |
 \[\delta\] \[\delta\] |
|||
 \[\epsilon\] \[\epsilon\] |
 \[\zeta\] \[\zeta\] |
 \[\eta \] \[\eta \] |
 \[\theta\] \[\theta\] |
|||
 \[\iota\] \[\iota\] |
 \[\kappa \] \[\kappa \] |
 \[\lambda\] \[\lambda\] |
 \[\mu\] \[\mu\] |
|||
 \[\nu\] \[\nu\] |
 \[\xi \] \[\xi \] |
\[\omicron\] |
 \[\pi\] \[\pi\] |
|||
 \[\rho\] \[\rho\] |
 \[\sigma\] \[\sigma\] |
 \[\tau\] \[\tau\] |
 \[\upsilon\] \[\upsilon\] |
|||
 \[\phi\] \[\phi\] |
 \[\chi \] \[\chi \] |
 \[\psi\] \[\psi\] |
 \[\omega\] \[\omega\] |
Geometry
 |
\[\tan\] |
 |
\[\sin\] |
 |
\[\cos\] |
 |
\[\sin^2\] |
 |
\[\cos^9\] |
Fractions, Square Roots and Degrees
 \[\frac{1}{2}\]
\[\frac{23}{100}\]
\[\sqrt{3}\]
\[\sqrt {\frac{3}{2}}\]
\[\sqrt[\frac{3}{2}]{\frac{4}{4.2}}\]
\[sin120\,^{\circ}\]
\[180\,^{\circ}\]
Powers, Limits and other formulas

\[1^2\]
\[\lim_{x \to \infty} \exp(-x) = 0\]
\[a \bmod b\]
\[x \equiv a \]
\[\pmod b\]
\[k_{n+1} = n^2 + k_n^2 – k_{n-1}\]
Periodic Table
| Sodium: Na: \[Na\] |
Water: H2O: \[H_2O\] | Glucose: C6H12O6: \[C_6H_{12}O_6\] |
| Alcohol: C2H6O: \[C_2H_6O\] |
Sulfate group: CaSO4: \[CaSo_4\] | Hydrogen Sulfide: H2S: \[H_2S\] |
| Salt: NaCl: \[NaCL\] |
Oxygen: O2 : \[O_2\] | Ethanol: C2H6O: \[C_2H_6O\] |
| Vinegar: C2H4O2: \[C_2H_4O_2\] |
Ammonia: NH3: \[NH_3\] | Magnesium: Mg: \[Mg\] |
| Acetic acid: C2H4O2: \[C_2H_4O_2\] | Butane: C4H10: \[C_4H_{10}\] | Acetate: CH3CO2: \[CH_3Co_2\] |
| Nitrate : NO3: \[NO_3\] |
Copper: Cu : \[Cu\] | Nitrogen: N2: \[N_2\] |
| Carbon Dioxide: CO2: \[CO_2\] | Sulfuric Acid: H2SO4: \[H_2SO_4\] | Methane: CH4: \[CH_4\] |
| Sucrose: C12H22O11 : \[ C_{12}H_{22}O_{11}\] |
Propane: C3H8: \[C_3H_8\] | Baking Soda: NaHCO3: \[NaHCO_3\] |
| Fluoride: F: \[F\] | Flouride: F2: \[F_2\] | Peroxide: H2O2: \[H_2O_2\] |
| Caffeine: C8H10N4O2: \[ C_8H_{10}N_4O_2\] | Sodium Chloride: NaCl: \[NaCl\] | Aspirin: C9H8O4: \[C_9H_8O_4\] |
| Hydrochloric Acid: HCl: \[HCI\] | Zinc: Zn(NO3)2 : \[ Zn(NO_3)_2\] | Carbon Monoxide: CO: \[CO\] |
| Sodium Hydroxide: NaOH: \[NaOH\] | Sodium Cyanide: NaCN: \[NaCN\] | Gold: Au: \[Au\] |
| Iodine: I : \[I\] | Tin: Sn : \[Sn\] | Benzene: C6H6: \[C_6H_6\] |
| Hydrogen Sulfide: H2S: \[H_2S\] | Acetone: CH3COCH3 : \[CH_3COCH_3\] | Phosphoric Acid: H3PO4: \[H_3PO_4\] |
| Pentane: C5H12: \[C_5H_{12}\] | Methanol: CH3OH: \[CH_3OH\] | Hydrobromic Acid: HBr: \[HBr\] |
| Carbonic Acid: H2CO3 : \[H_2CO_3\] | Titanium: Ti : \[Ti\] | Sodium Hypochlorite: NaClO: \[NaCIO\] |
| Ethane: C2H6: \[C_2H_6\] | Ammonium Sulfate: (NH4)2SO4: \[(NH_4)_2SO_4\] | Octane: C8H18 : \[C_8 H_{18}\] |
| Copper Sulfate: CuSO4 : \[CuSO_4\] | Cholesterol: C27H46O: \[C_{27}H_{46}O\] | Benzoic Acid: C7H6O2: \[C_7H_6O_2\] |
| Sulfurous Acid: H2SO3: \[H_2SO_3\] | Galactose: C6H12O6 : \[C_6H_[12}O_6\] | Ascorbic Acid: C6H8O6 : \[ C_6H_8O_6\] |
| Dry Ice: CO2 : \[Co_2\] | Sodium Nitrate: NaNO3: \[ NaNO_3\] | Calcium Oxide: CaO: \[CaO\] |
| Iodic Acid: HIO3 : \[ HIO_3\] | Lactic Acid: C3H6O3: \[C_3H_6O_3\] | Magnesium Bromide: MgBr2 : \[MgBr_2\] |
| Carbon: C: \[C\] | Hydrogen: H: \[H\] | Sugar: CnH2nOn : \[C_nH_{2n}O_n\] |
| Sulfate: O4S2-:\[O_4S^{2-}\] | Citric Acid: C6H8O7: \[C_6H_8O_7\] | Camphor: C10H16O: \[C_{10}H{16}O\] |
| Silver Oxide: AgI: \[AgL\] | Arsenic Trioxide: As4O3: \[As_4O_3\] | Gold Trioxide: Au2O3: \[Au_2O_3\] |
| Gold Sulfide: Au2S: \[Au_2S\] | Bromine: Br2: \[Br_2\] | Alumunium: Al2O3: \[AI_2O_3\] |
Brackets
 \[( a )\]
 \[ [ b ]\]
 \[ \{ c \}\]
 \[ | d |\]
 \[ \| e \|\]
 \[\langle f \rangle\]
 \[\lfloor g \rfloor\]
 \[\lceil h \rceil\]
 \[ \ulcorner i \urcorner\]
Formula and Equations

\[\left(A=2\middle|\frac{A^2}{B}>4\right)\]
\[\left\{\frac{x^2}{y^3}\right\}\]
\[\left.\frac{x^3}{3}\right|_0^1\]
\[( \big( \Big( \bigg( \Bigg(\]
\[\frac{\mathrm d}{\mathrm d x} \left( k g(x) \right)\]
\[\frac{\mathrm d}{\mathrm d x} \big( k g(x) \big)\]
Subscripts:
\[a_i\] gives
\[b_{ij}\] gives
\[C_{m,n}\] gives
\[\delta_{j+k}\] gives


Superscripts:
\[x^y \] gives
\[a^{j2\pi}\] gives


\[x^2_3\] gives

\[C^k_[\mu,\nu] gives

Composition with preceding indexes: \[{}_1^2\Psi_3^4\] gives

Underlines, Overlays and Stacking
Includes vectors
\[\hat a\] \[\bar b\] \[\vec c\]

\[\overrightarrow{a b} \] \[\overleftarrow {c d} \] \[\widehat {d e f} \]

\[\overline { g h i} \] \[\underline {j f l} \]

\[overbrace {1 +2+ \cdots +100}^ {5050}\}

\underbrace{ a+b+\cdots+z }_{26}
\[\underbrace{a+b+\cdots +z}_{26}\]

\[A \xleftarrow{n+\mu-1} B \xrightarrow{T] {n\pm i-1} C
![A \xleftarrow{n+\mu-1} B \xrightarrow[T]{n\pm i-1} C](https://s0.wp.com/latex.php?latex=A+%5Cxleftarrow%7Bn%2B%5Cmu-1%7D+B+%5Cxrightarrow%5BT%5D%7Bn%5Cpm+i-1%7D+C++&bg=ffffff&fg=aa0000&s=1 "A \xleftarrow{n+\mu-1} B \xrightarrow[T]{n\pm i-1} C")
\[ \overset {\alpha} {\omega} \underset {\mu}{\nu} \overset {\beta}{underset{\Delta}{\tau}} \stackrel {\zeta}{\eta}

For more in-depth guides check here and here. If you still can’t find what you’re looking for then just ask us!
Pro Tips:
Right click on any symbols you see in GoConqr and you’ll be given options to see it in LaTex code. If you’re copying and pasting code in from elsewhere make sure and ‘paste as plain text’.
Having LaTex in a resources title will create very ugly links if you share that resource. Only enter LaTex as a title if it’s necessary!
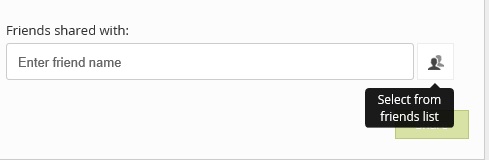
Yes, a private resource can be shared with a friend on GoConqr. Click on Share on theactions bar and you can enter your friends username or click the icon to select from your list of friends.
We have introduced GoConqr tags as a way of categorising your resources so that common topics and resources can be identified. By adding a tag to your resource, you can allow GoConqr to suggest similar public resources on that topic. This allows you to gain access to a wider range of relevant public content on GoConqr.
![]() Tags can be added when you title your resource or by choosing the “edit details” (tag) button in view mode of the resource. You should give information about the topic, subject or level. Simply type a word or phrase and press enter.
Tags can be added when you title your resource or by choosing the “edit details” (tag) button in view mode of the resource. You should give information about the topic, subject or level. Simply type a word or phrase and press enter.
Finding Resources
You can find your study resources by:
- Searching through your Subjects
- Using the Search bar
1. Searching through your Subjects
 The Left hand side of your home page shows your most recently accessed subjects. Click on Show All to see all your subjects. You can arrange the resources in your subject in different Topic sections. You can add new subjects and you can archive old subjects when you no longer need them.
Note: If you start creating a resource while in a subject folder, that resource will automatically be saved to that subject. When you close a resource you have created, you will be prompted to save it to a subject. If you do not save the resource to a subject, it will be placed in your ‘Unassigned’ folder.
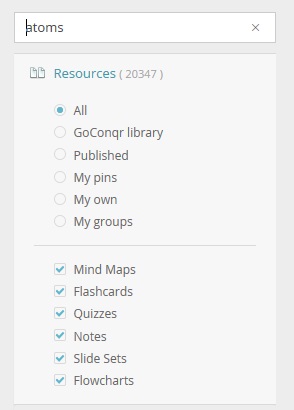 2. Using the Search Bar
Input your desired search terms on the Search bar, visible on GoConqr’s header.
Once presented with the results of your query, you can further filter them, by selecting the search scope and resource type.
- My own = resources you have created
- My pins = resources created by others that you have pinned to one of your subjects
- My groups = resources that have been shared with groups that you are a member of.
Filling in this information allows us to tailor public content to what will be of interest to you. We can suggest Courses, Resources, and Groups based on your profile info.
It also helps us to categorise your content properly so others can learn from what you’ve created too!
It will make it easier for friends, colleagues, and people with similar learning interests to find you on GoConqr.
Imagine that you have found a great learning resource that you would like to check again in the future. Since you did not create the resource, you cannot move it onto one of your subjects.
Pins exist for those cases. By clicking on the “Pin to…” option, while on a resource’s view mode, you are effectively saving a link to it, within your preferred subject, for later reference. The pin option is located at the bottom right hand of any mind map or flash card document.
That way, you will easily find it any time!
Your Pinned Resources will be within the Subject that you assigned them to, when you initially pinned them.
You will be able to differentiate your pinned resources from the rest because they display a “Pin” icon on the top right-hand side corner of a resource tile. You can move the resource to a different subject by clicking the check box to the left of the tile and then clicking the ‘move folder’ icon at the top of the page.

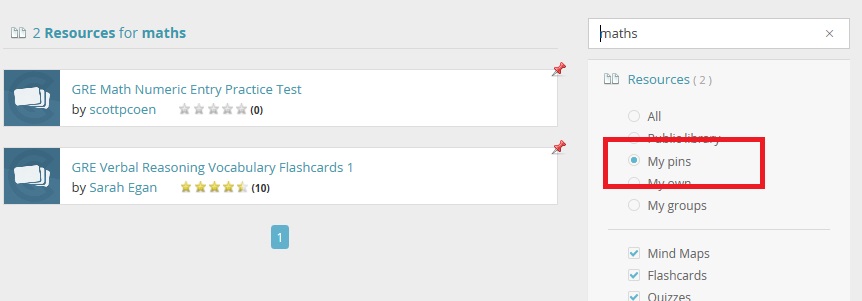
When you search for a resource using the search bar at the top of the page, you will see the option to filter by ‘my pins’, if you want to limit the search to things you’ve already pinned
To move a pinned a learning resource, go to the resource’s view mode and click on the actions icon. ![]() On the emerging pop-up menu, you will notice a “Move” button. Click on it and tyou can move the pinned resource to another topic or subject instead.
On the emerging pop-up menu, you will notice a “Move” button. Click on it and tyou can move the pinned resource to another topic or subject instead.
You can also remove a pin from with in a subject by clicking the checkbox to the left of the tile and then clicking the trashcan icon at the top of the page.
Playing Resources
Play Mode is a quick way of turning your resources into a presentation. This is perfect for students or teachers who want to quickly recap a resource before an exam or while studying.
Press Play to see an overview of the Living Environment Regents Exam here.
When you are in view mode of a mind map, you will see a little play button in the center of the frame. Clicking the play button will obviously set things in motion but you can also do a step by step play-through by clicking the arrow buttons on either side.
You can also adjust the speed at which it plays by adjusting the control to the left (yes, the little turtle and hare).
Once you know the logic behind how Mind Maps play you’ll easily be able to adjust it to suit your needs.
A Mind Map plays the central node first and then plays the first layer of nodes. It starts at 9 o’clock and works clockwise around the central node. Once it plays each node in the inner layer it moves on to the next layer. Once it has shown all nodes it then shows the images you have inserted in the same way.
Desktop users cannot view their GoConqr resources without an internet connection, but they can easily print them off for off-screen viewing.
Note also that GoConqr automatically saves your study resources as you work so that should your internet connection fail while you are creating or editing a resource, your content will be restored once your session resumes.
Mobile users, however, can view resources offline when using the GoConqr apps.
They can also create and edit new resources offline and then sync their offline changes to their web accounts once they have regained internet access.
Yes, you can print your Mind Map, Flashcards, Quizzes, Notes, Slides, Flowchart and your Study Planner/ Calendar. Print my resources.
Printing is one of the options you access via the Actions menu, either by clicking the Actions Icon in view mode, or the actions button on a resource tile. ![]()
A Public resource is discoverable. This means that if someone has the unique public URL, they will be able to view the resource. Users who search the GoConqr library will be able to discover and learn from your resource. A Private resource is locked-down; only you and those you share it with can see it.
Every GoConqr user has the option of searching the GoConqr library– this is the collection of all public resources. Others may study using your resources but you can use theirs. We think this approach is best as it allows for the cross-pollination of ideas and viewpoints which are beneficial for better learning.
Resources must be public in order to embed on a blog, share on social media, or embed in another GoConqr resource.
How to switch from Public resource to Private resource or vice versa
When in View Mode, you can see whether a resource is Public or Private by looking into the resource’s information area, next to the resource’s title. You can then turn a resource public or private by clicking on “Edit Details” and selecting your preferred option.
To encourage sharing and learning, only users with Premium accounts can make their resources private. Learn more about Premium accounts here.
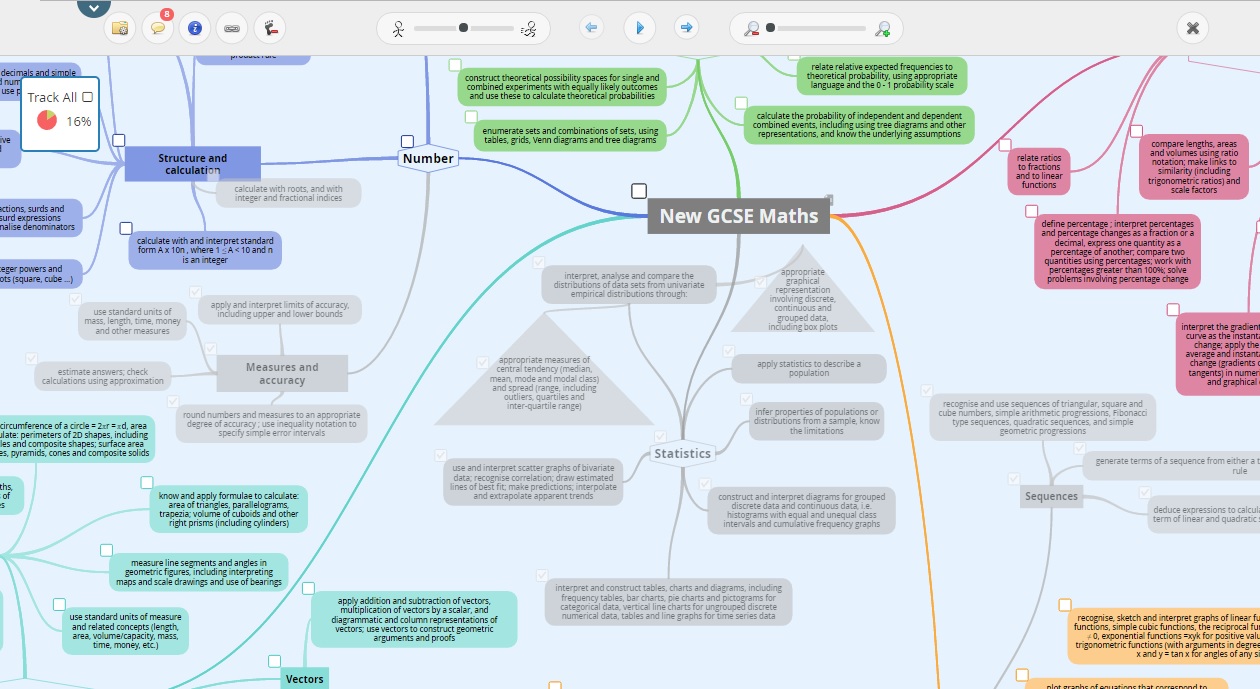
Tracking allows you to easily tick off areas of a Mind Map that you feel you know or that you have completed tasks for. To access this feature, click footprint (tracking!) button in the view mode of a Mind Map.
You now have the ability to tick the corner of nodes or notes. Tick all the nodes or text boxes you have completed or learned. You will notice a small completion box appear on the resource showing an update of the % completed and the parts you know will be grayed out.
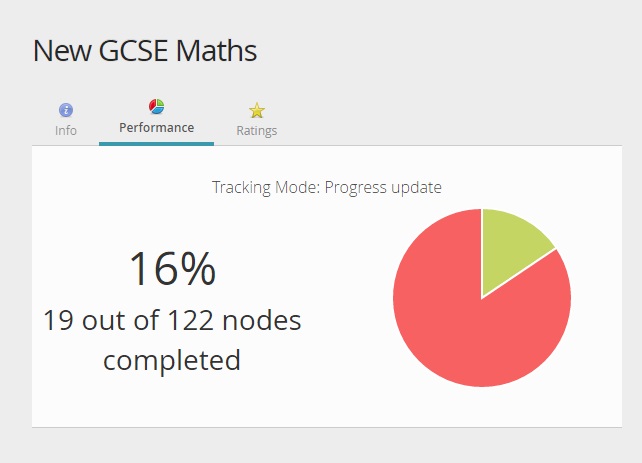 To see the completion rate without being in the resource, simple click the info button on the resource tile and then chose the performance tab.
Tracking on Mind Maps is a useful tool to track your progress as you work through your study material. It is particularly helpful to map out what you need to learn (e.g. a subject curriculum) and gain confidence as you learn.
GoConqr allows you to view your performance on Quizzes and Flashcards over time. Simply click on the “View Performance Stats” button at the completion of a Quiz or Flashcard deck.
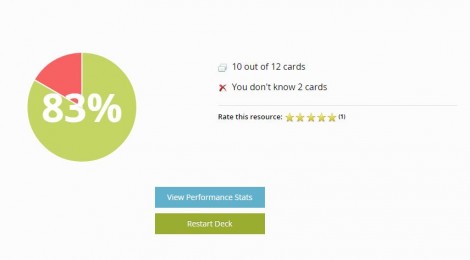
This will provide 2 options, “My Attempts” and “Global Attempts”.
“My Attempts” displays your recent scores in a graphical format. Hover over the data point to see the score and date of the attempt on the graph. You are also provided with an average score from all your attempts.
“Global Attempts” is a feature that enables you to see the range of scores from all attempts on the resource, not just your own. This will allow you to gauge your level of knowledge compared to the total GoConqr community.
Sharing Resources
A read-only share is like a snap-shot of your resource— other people can’t edit it, just view it. Copyable resources can be copied and edited by others. This is useful,for example, if you want to provide a template of a mind map and have students or colleagues work on their own copies.
In order to make a resource read-only, you must have a premium account.
To make a resource read only, in edit mode, click on the lock icon. Note that this is a different permission from Public/Private – you may want public access to your resource (e.g. to share on social media, but might still want to restrict copying)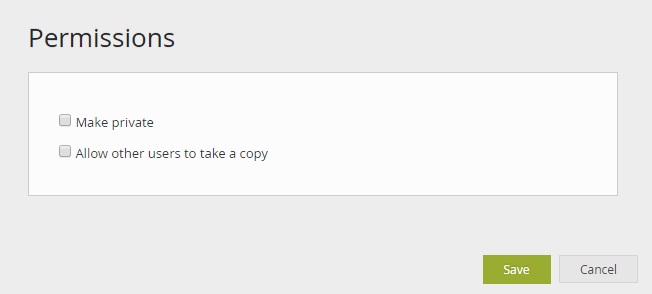
When you are viewing a resource, you can click on info to see if it has been copied, and who the original author was.
GoConqr has a vast library of public learning resources. We have introduced tags to help you identify related resources. You can now add various tags to your resource which will act as a way of identifying related resources. We then suggest resources to you in a number of ways.
- We suggest resources to you in your activity feed.
- We suggest resources to you in your subject folder.
- We suggest resources to you on the Suggested Content page, which you access by click ‘Suggested Content’ on the left hand side of your home page. These suggestions can be based on your profile, or your subjects.
- When viewing a resource, click the link symbol to see more related resources.
Tags can describe the subject, exam or topic that you are studying/teaching. The more tags that you add to a resource, the more relevant content you will see.
Another good way to find related resources is to look at the the profile of the user who created a resource – you will be able to see any public resources that they have shared.
You can also find resources under the Resources tab in groups that you are a member of.
If you find a resource that you like, it is useful to rate it (with stars!) or to leave a comment for the author.
Once a resource is public, you can easily embed it in a blog (or any webpage).
When viewing a resource, click on the action icon then chose the ‘Share’ option and you’ll be shown the embed code for that resource.
Insert this code into the HTML section of your blog and your readers will be able to interact with the resource no problem!
Note: A resource must be public before it can be embedded.
If for some some reason the embed code doesn’t work, make sure you paste it in as plain text and perhaps use the tags [iframe] embed code [/iframe]
Media Library
The quota for a Basic GoConqr account is 50MB. This is usually sufficient for most people who wish to use images. If you use a lot of video, you may need to upgrade your account to a Premium account, which gives you an additional 1GB of media storage. Storage allocation is based on the size of the file when uploaded to GoConqr. Your media library will indicate how much space you are using and how much space is available, as well as how much space each media item takes up. Video embeds do not contribute to your quota as these are hosted on third party sites and do not use storage space on GoConqr.
If you do not wish to upgrade your account, you may delete media from the library to free up space.
If you are part of an organization and require additional storage space, please contact our sales team to discuss Campus storage options.
You can use videos,images and embeds in Mind Maps, Notes, Slides, Flowcharts and Courses. You can use images in Quizzes and Flashcards
When you create resources using the GoConqr apps you can add photos to your media library directly from your device and access them on your desktop or mobile.
Images: jpeg, jpg, gif, png
Videos: avi, flv, mkv, mov, mp4, mpg, mpeg, m4v, swf, webm, wmv
Document: PDF (New!)
Embeds: YouTube, Slideshare, SoundCloud, Vimeo
Coming soon: Audio…
The Media Library is a place for you to upload and store media such as images and video that you can use to create GoConqr resources and courses. This is ideal when you want to reuse the same media in different learning materials. The Media Library is available from the dropdown menu at the top of your home page.
You can add content directly to your library by uploading a media file from your computer, saving the URL for an image or video, or embedding video from an external site.
You can also add content to your library while you are creating or editing a course or resource. When you choose to add media to a resource or course you will be able to select from your existing Media Library or to add additional media content to your library which can then be inserted.
Courses
A Course is an organised sequence of Modules, which can include GoConqr learning resources (Flowcharts, Flashcards, Mind Maps, Quizzes, Slides and Notes), text, and media (images and video).
Some Course Modules can be designated as headers (e.g. to introduce a sequence of resources, or provide directions). A course can be structured so that it must be followed sequentially, and a minimum score for progression can be set for quizzes.
Course Modules can comprise of a resource, media item, or text, or you can combine text with resources or media.
Course modules can be weighted so that some contribute more to the overall score for the course.

Simply choose Course from the dropdown Create menu at the top of your home page, or Create Course from the left hand side of your home page.
Basic Information
Fill in the basic information about your course – title and description. Decide if you want the course taker to have to follow in sequence, and choose your privacy setting (private courses are a Premium feature). If you are in a GoConqr Campus you may have permission to add a certificate to the course here.
Adding Modules
Next, choose a template to add a module to the Course. You can choose from only media, resource or text, or you can combine text with media or resources.
A module with a text field will allow you to add and edit text directly within the Course editor.
If you select a resource module, click to import a resource. You will be able to search the GoConqr library and your own resources to import a resource to a course. You can filter by resource type. Note that this creates a copy of the resource which is added to the course, so any changes to the resource in the future will not be reflected in the course copy. To add a resource to a course you must be the author, or else the author must allow copies of the resource to be made.
If you select a media module, click to add media. This will open your media library, where you can choose from your existing media (images, video, embeds), or you can add media to your library from here.
After adding your template you will see the module appear on the left hand side index. You can hide this index at any time, by sliding it to the left. Modules with resources will be named after the resource, and modules with media will be named after the media file title. Modules with text only, or that you have not yet added media or resources to, will be untitled by default. You can change the names of any of the module by clicking ‘Manage Modules’ in the index on the left.
Organising your Course and Managing Modules
You can re-arrange modules by dragging and dropping in the index on the left hand side. Clicking Manage Modules gives you more options:
- Rename Modules – by clicking and editing the name
- Promote to Header – this makes the module appear bold in the index and is often used for dividing sections of a course or sharing instructions
- Add a Score weight – for modules with resources you can add a weight to the module, if for example one quiz is more important than others. By default all resources are weighted = 1.
- Progression Score – In a sequential course you may add a minimum score to flashcards and quizzes that a user must achieve in order to progress.
- Change template type – you may change the layout of the module, provided the content still fits (e.g. you can put media above resource instead of media below resource)
- Delete – check the box here if you wish to delete any modules
Once you have made all the desired changes, click ‘Save all changes’ to return to the main course editor. When you are finished creating the course close it by simply clicking the x in the top right hand corner of the page. The Course will be available on the left hand side of your activity feed.
Assigning a course means sharing it with members of any GoConqr Group in which you are administrator. This is a very useful for encouraging collaborative learning and knowledge sharing with your students, colleagues or employees.
There are two ways by which you can assign a course to a Group:
Option 1. Through your list of courses
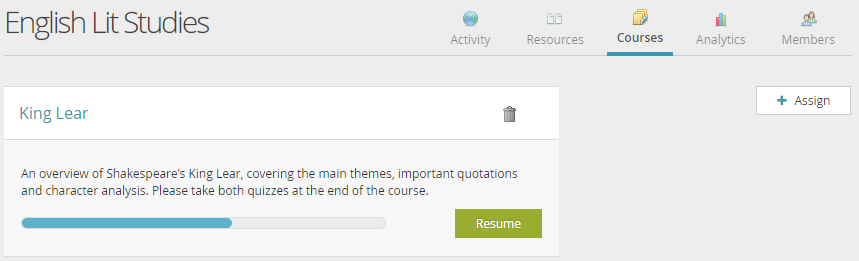
- A. Go to “Courses” on the left-hand side of your dashboard.
- B. Select the course you want to assign from your list using the “Assign” button located to the right of your course.
- C. This will bring you to a box where you can choose the Groups to which you can assign your course, along with the option to schedule when you want your course to be assigned and a field to enter instructions for course users when the course goes live.
- D. Note that you can also enable/disable the alert email to participants when the course starts the notification box.
Steps B and C:
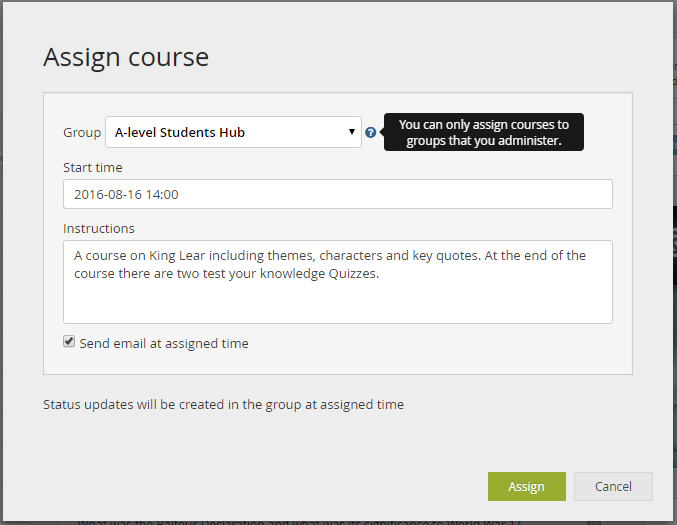
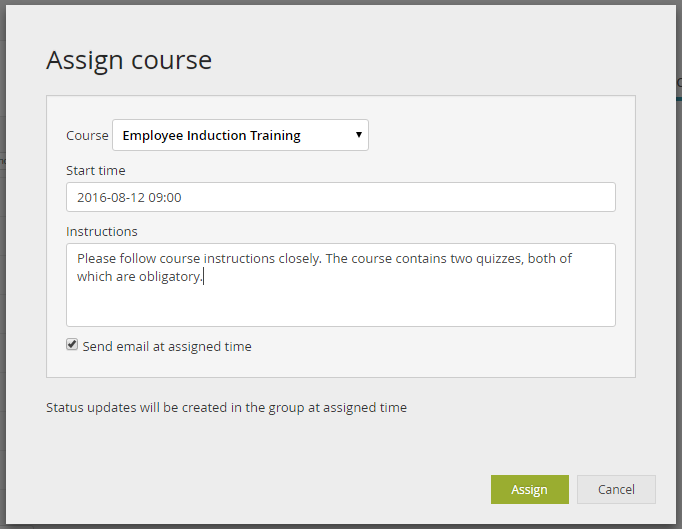
Option 2. Through the Group you want to assign your course to
- A. Click on the “Courses” tab on the right side of the group you have chosen.
- B. Next, click on the “Assign” button located to the right of the screen.
- C. Choose one of your courses from the dropdown list, the start time at which you want your course to be assigned and instructions you wish to send to the participants by mail when the course goes live.
After performing either of these two steps, the system will alert you that the course has been successfully assigned. Although you can also manually check whether your course has been assigned to your group by going to the “Courses” tab.
Can I change a course I’ve already assigned?
You can change the settings of the courses that you have already assigned (such as the start date, instructions and email notifications).
To change the course settings, go to the Group to which you have assigned the course and click on the “Courses” tab. Choose the course you’d like to modify. To the right of the course you will see an icon with a cogwheel, which allows you to change the settings of the course, and another icon with a paper that lets you delete the Course Group.
Note: Please note that you can only assign courses to GoConqr Groups in which you are an Administrator. For details about creating Groups click here.
Sharing a course with a friend
Although you can’t share a course directly with a friend, you can share the URL. This is in the top navigation bar of your browser, or click on the Info button when viewing a Course.
Sharing a course with SmartLinks
If you are a GoConqr Campus member with SmartLinks permissions, you can securely share a Course you have authored with users who are not on GoConqr by using our SmartLinks function.
GoConqr Mobile
The mobile app has been created to enable you to view, share and discover learning resources.
Group activity is available on the main GoConqr mobile apps, but to administer a group you must use the web app.
You can create Mind Maps, Flashcards, Slides and Quizzes with the respective apps. In addition you can view Flowcharts and Courses on the main GoConqr apps and we hope to develop creation apps for these tools in the future.
The Calendar/Study Planner is not yet available on mobile, but we hope to introduce it, so stay tuned!
Yes! We have a number of apps available – we have our main GoConqr app for iOS (Apple) and Android.
On these apps you can see your activity feed, including group updates and discussion, and view and play resources.
We also have a number of different apps for creating content on the go: Mind Maps, Quizzes, Slides, and Flashcards. We have built separate apps for each of these tools so that you can maximise the efficiency of your mobile device. But of course they are all FREE, so feel free to download as many as you would like to use!
View, discover and share resources with a swipe. Download today:
![]()
![]()
Select the search icon (magnifying glass) which appears in the top right-hand corner of your screen and enter what you are looking for to search the mobile app for relevant resources.
You can rate the mobile app and send us your feedback within the settings section. You can also tell your friends about the app, learn the app version and sign out in this area.
Yes, if you are using an Apple or Android tablet you can download and use the GoConqr mobile apps.
When you open the app, you can sign in using your email address, Facebook or Google account.
Yes, all the GoConqr mobile apps are free so you can download now to start learning on the go:
![]()
![]()
Account Management
On the GoConqr homepage, enter your details under “Sign up” which you can see below.
If you sign up using your email, we will send you a confirmation email. Once you receive this, you must click on the link inside to activate your account. Once your account is activated you can log in to GoConqr.
If you sign up via Facebook or Google, you will be asked to log in and give GoConqr access to your account. Once your GoConqr and Facebook or Google account are connected you can sign in with one click.
The Sign in button is located in the top right-hand corner. Click on this and you can then Sign into GoConqr using either your email account or via Facebook or Google.
If you didn’t get a confirmation email, make sure you check your junk mail, just in case.
You can request another confirmation email here.

If you don’t open the confirmation email for a few days, you might find that the link has expired. If this is the case, request a new one.
If you are having trouble clicking on the link in the email, then you will find a full URL underneath the button. Copy and paste this in to your browser to confirm your account.

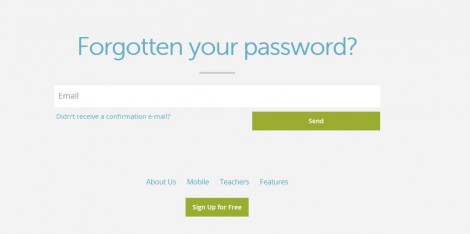
If you can’t remember your password you can request a new one here.
Enter in your email address and follow the instructions from there.
Click on the dropdown menu in the upper right hand side of the screen and click on ‘Account’.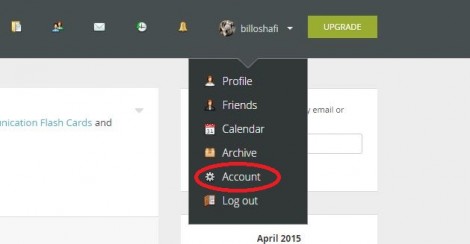
Here, you will be given the option to enter in a new password (you must do so twice) and then confirm your old password. Click update and the effect should be immediate.
1) Click on the dropdown menu in the upper right-hand side of the screen
2) Click on ‘Account‘
3) Under the section entitled ‘Social Media Connections‘, you will see the option to connect your account with Facebook. Click on this and follow the on-screen instructions.

Note: You will have to give GoConqr access to your Facebook account in order to connect them.
If you’re an existing GoConqr user but want to sign in using your Google account in the future, you can follow these easy steps to connect your Google and GoConqr accounts:
1. Click on the dropdown menu in the upper right-hand side of the screen
2. Click on “Account”
3. Under the section entitled ‘Social Media Connections‘, you will see the option to connect your account with Google. Click on this and follow the on-screen instructions.
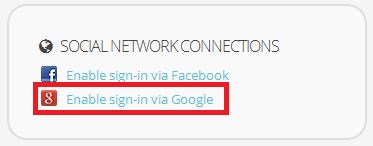
Note: You will have to give GoConqr access to your Google account in order to connect them.
To disconnect your Facebook and GoConqr accounts, follow the instructions below:
1. Sign in to GoConqr
2. Click the dropdown menu where your username and profile picture appear
3. Select “Account”
4. Under the section titled “Social Network Connections“, you will see the option to disconnect your account from Facebook (if it is connected)

5. Clicking on this will sever the link between your GoConqr and Facebook accounts. Once you have done this, you will be prompted to change your password to complete the process.
You can reconnect them again at any time, if you wish. When logging in to GoConqr the next time you will need to use your email address and password.
To disconnect your Google and GoConqr accounts, follow the instructions below:
1. Sign in to GoConqr
2. Click the dropdown menu where your username and profile picture appear
3. Select “Account”
4. Under the section titled “Social Network Connections“, you will see the option to disconnect your account from Google (if it is connected)

5. Clicking on this will sever the link between your GoConqr and Google accounts. Once you have done this, you will receive an e-mail to change your password to complete the process.
You can reconnect them again at any time, if you wish. When logging in to GoConqr the next time you will need to use your email address and password.
Click on the dropdown menu in the upper right hand side of the screen and click on ‘Profile’, or click on the profile box to the left of your activity feed.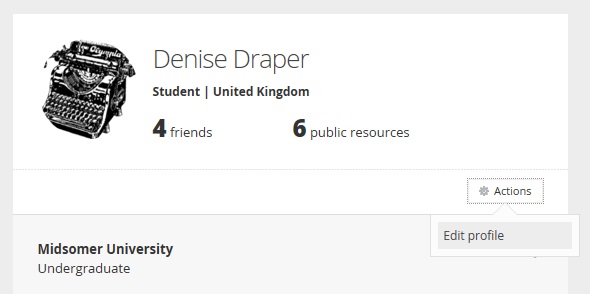
When viewing your profile click on Actions> Edit Profile to change your basic info, or edit your subjects/interests in line.
We encourage you to complete as much of your profile as possible. This way we will be able to help you discover content that is more relevant to you!
Basic information such as your user name, type (e.g. student/teacher/professional), and number of friends and public resources will be visible to all GoConqr users.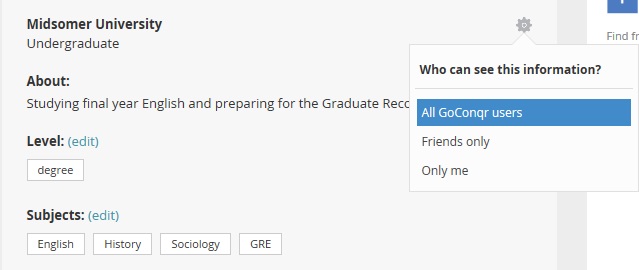
However, you can keep information such as your institution, level, and subjects private or only visible to friends if you wish.
All of your public resources will be visible to other GoConqr users. If you prefer to keep your resources private, please upgrade to a premium account.
Click on the dropdown menu in the upper right hand side of the screen and click on Profile. Once in the profile view, you will see a profile completion bar. Click on the green Edit your profile button next to it to change your username.

Note: You can only change your username once, so make sure it is correct before submitting your changes.
Every user is given a random profile avatar to start with. You can change your profile pic if you want. When you sign up via Facebook or Google, you can use your Facebook/Google picture as your profile picture.
You can also use Gravatar to select a profile picture. Click on “Edit avatar” underneath your profile picture in GoConqr and follow the instructions to pick the option that appeals to you.

If you go to your account section (under the top right-hand drop-down) you’ll see the ‘notifications’ option on the left. Click on this and you’ll see the options to control what type of email notifications you receive.

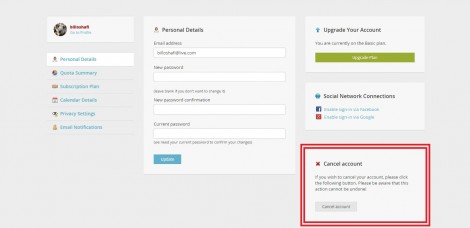
An account can be cancelled at any time. However, please be aware that this action cannot be undone!
To cancel your account:
- Go to “Account”
- Click on “Cancel Account”
- You will receive a code in your registered email address
- Insert the code in the pop-up window and click on “Cancel Account’
When you add GoConqr as a contact, you will receive all of our emails with study tips, new features, helpful resources and more straight to your inbox.
When you receive our newsletter in your inbox, you can add our contact details to your address book by following the instructions below:
Gmail:
- Click the down arrow beside reply in the top right-hand corner of this message
- Select “Add Andrea at GoConqr to Contacts List”
- Done!
Hotmail:
- Click the arrow drop down beside Outlook in the header and select “People”
- Click “New” in the header and add the email address andrea@goconqr.com
- Done!
Outlook:
- Click the from email address at the top of this message
- Select “Add to Outlook Contact” and click save
- Done!
Yahoo:
- Click the from name above “Andrea at GoConqr”
- Select “Add to Contacts” and save
- Done!
Our latest news will now hit your inbox first!
Managing Subscriptions
Yes. You can use all of our tools for free with a Basic account. To upgrade to our Premium plan and gain access to more advanced functions for personalised learning you will need to pay a small fee. To learn more about this, visit the Plans page.
GoConqr currently accepts Visa and Mastercard and soon we will also be supporting other major payment providers.
Yes, an account can be downgraded to a free account at any time. Once you choose to downgrade, your previous subscription will not be renewed on the renewal date.
To downgrade, go to your Subscription Plan page within the Account section of the website and choose the downgrade button.
On the renewal date, you will be switched to the downgraded account. You will be subject to the quotas and features of the new account. If you are above the new quotas, your account will be put on hold and you will be asked to amend your resources to fit with the new account.
We strive to be always fair and reasonable. Please review our refund policy for details.
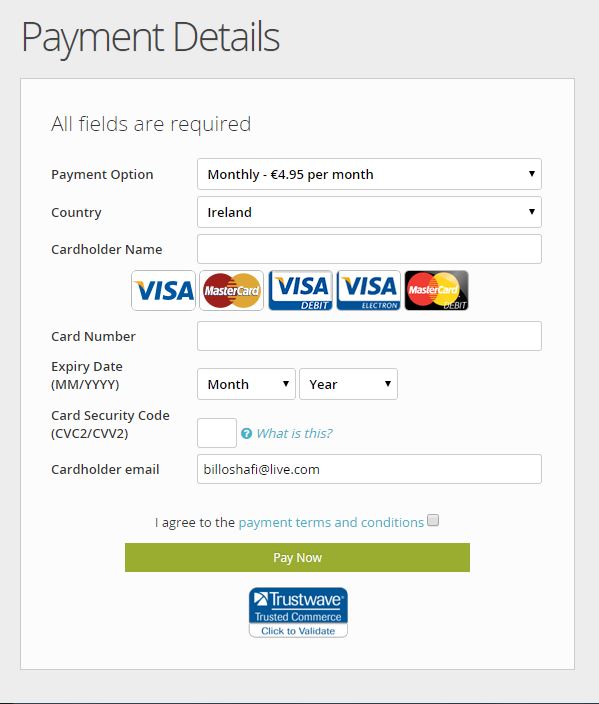
Our site is fully secure. We use an SSL Cert, encryption, and the security of our transactions is certified by Trustwave. Trustwave certifies us for compliance with the Payment Card Industry Data Security Standard (PCI DSS).
Upon providing your credit card details, you will have the opportunity to check how secure the system is, by clicking on the Trustwave icon. This will display a screen as the one shown below.

Campus
GoConqr Campus is a place on GoConqr where an educational institution or business can add users so that they can collaborate and share knowledge, and enjoy extra benefits and features.
 A Campus has a portal for dedicated Campus Announcements and Campus-only groups.
Campus administrators can track and monitor users’ performance on Courses, quizzes and other content using our dedicated reporting interface.
Users within a Campus can create certificates for Courses which appear on user’s profile, testifying to their knowledge acquisition.
Campus users can also share content using SmartLinks with people who are not logged in, or are not even members of GoConqr.
Many Campuses also provide their users with premium benefits – including the ability to make resources private and to enjoy an ad-free GoConqr experience.
The advantages that you gain from being part of a GoConqr Campus depend on the plan your institution subscribes to and the permissions that you are assigned.
Find out more about GoConqr Campus here.
SmartLinks allow you to share GoConqr resources and courses with users who are not logged in, or who are not even members of GoConqr.
If you have SmartLinks permissions you can easily share Smart Links with a GoConqr Group, or with a Share List (a list of email addresses you input). You can then report on these users’ results.
This is ideal when you want to share information or test people, but do not need full GoConqr Campus functionality.
You simply buy a ‘bundle’ of Course Smart Links or Resource SmartLinks, and easily top up when you run out. Talk with our sales team to see if this solution is right for you.
Archiving
The fact that your subjects are on file does not mean that you can’t access them again and restore their visibility in your Subjects area of your GoConqr account.
To restore an archived subject:
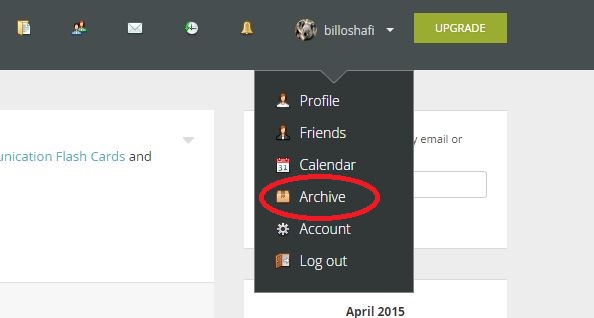
- Click “Archive” from the drop-down menu in the upper right corner of the GoConqr header under your username.
- Once you are in your archive, click the settings icon of the subject you want to restore.
- Select the option “Restore from Archive” and click “Save”.
From now on, the restored subject will be available again in your Subjects area along with the other subjects your are currently studying.
Archiving your past subjects to help you stay focused and manage your resources better is really easy.
- Go to the subject you want to archive
- Click the “Settings” button on the right marked in red in the image below
- Select the “Archive” option and then “Save” your selection
One archived, your subject will no longer be visible in the subject are and can only be access from the archive area which is located in the drop-down menu under your username.
All of your resources included within the subject will remain available as usual even after the subject as been moved.
Miscellaneous
If you have a great idea or find something that isn’t quite working right for you, then let us know by emailing us at: feedback@goconqr.com. We are happy to hear any suggestions, questions or ideas you may have.
You can find the feedback options in the GoConqr footer also.
One of the most popular study methods is using Online Flashcards. If you have never created a Flashcard deck before, here’s a quick guide to help you get started:
What are Online Flashcards?
Online Flashcards, also known as as notecards or study cards, are two-sided cards that are used to study as they help improve memory and retention. They are mainly used to remember key facts, concepts, dates, formula, vocabulary but they can be applied in a number of areas.
How Do Online Flashcards Work?
On the first or front side, you insert a question, word, image etc. and on the reverse you add the explanation, translation, synonym or any other information you want to memorise. The possibilities are endless!
Below is an example of the front and reverse of a flashcard. On the front, there is an image with a natural phenomenon and the reverse shows its name, the Aurora Borealis:


How To Use Online Flashcards to Study
Once you have created your flashcard deck based on your study notes, you can review the cards one-by-one, guessing the answer on the reverse based on the information on the front of the card. As you go through this process, you can use the thumbs up, thumbs down buttons to indicate which cards you know or don’t know. The method is very simple and helps you memorise your learning curriculum easier and quicker.
Why Use Online Flashcards
 In the past, Flashcards were made of paper or card but the widespread availability of technology means that you can now create and use virtual study resources which can be easily shared and won’t be lost or broken.
GoConqr’s online Flashcard tool allows you to access the study notes you create online from anywhere, on any device. In this way, you can take advantage of your downtime by reviewing your notes and maximising your study time.
Also, it’s very easy to mark which Flashcards you know, flip all cards in your deck, reorder and update your Online Flashcards with GoConqr.
If you have not tried ExamTime’s Flashcard tool before, you can start creating your first deck here.
The bell at the top of the screen on your GoConqr header is your notification bell.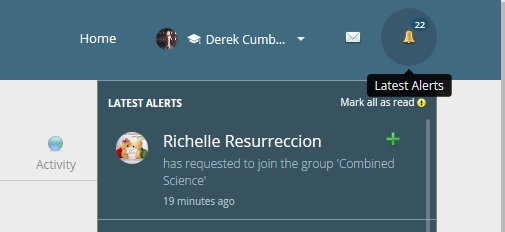
The bell will light up whenever an action occurs, to notify you. This works in a similar way to the Facebook notifications and alerts you receive when a new friends has added you on GoConqr, someone has shared a resource with you or commented on one of your learning resources etc. Click on it to see your most recent GoConqr notifications.
The icon on the side of an alert (in the green area above) tells you which alerts you have not seen yet. You can mark them as read by clicking on the icon or on the “Mark all as read” option, if you have several alerts that you already know about. You can change your preferences for notifications in your account settings.